Posted on

Vegetarian Pad Thai

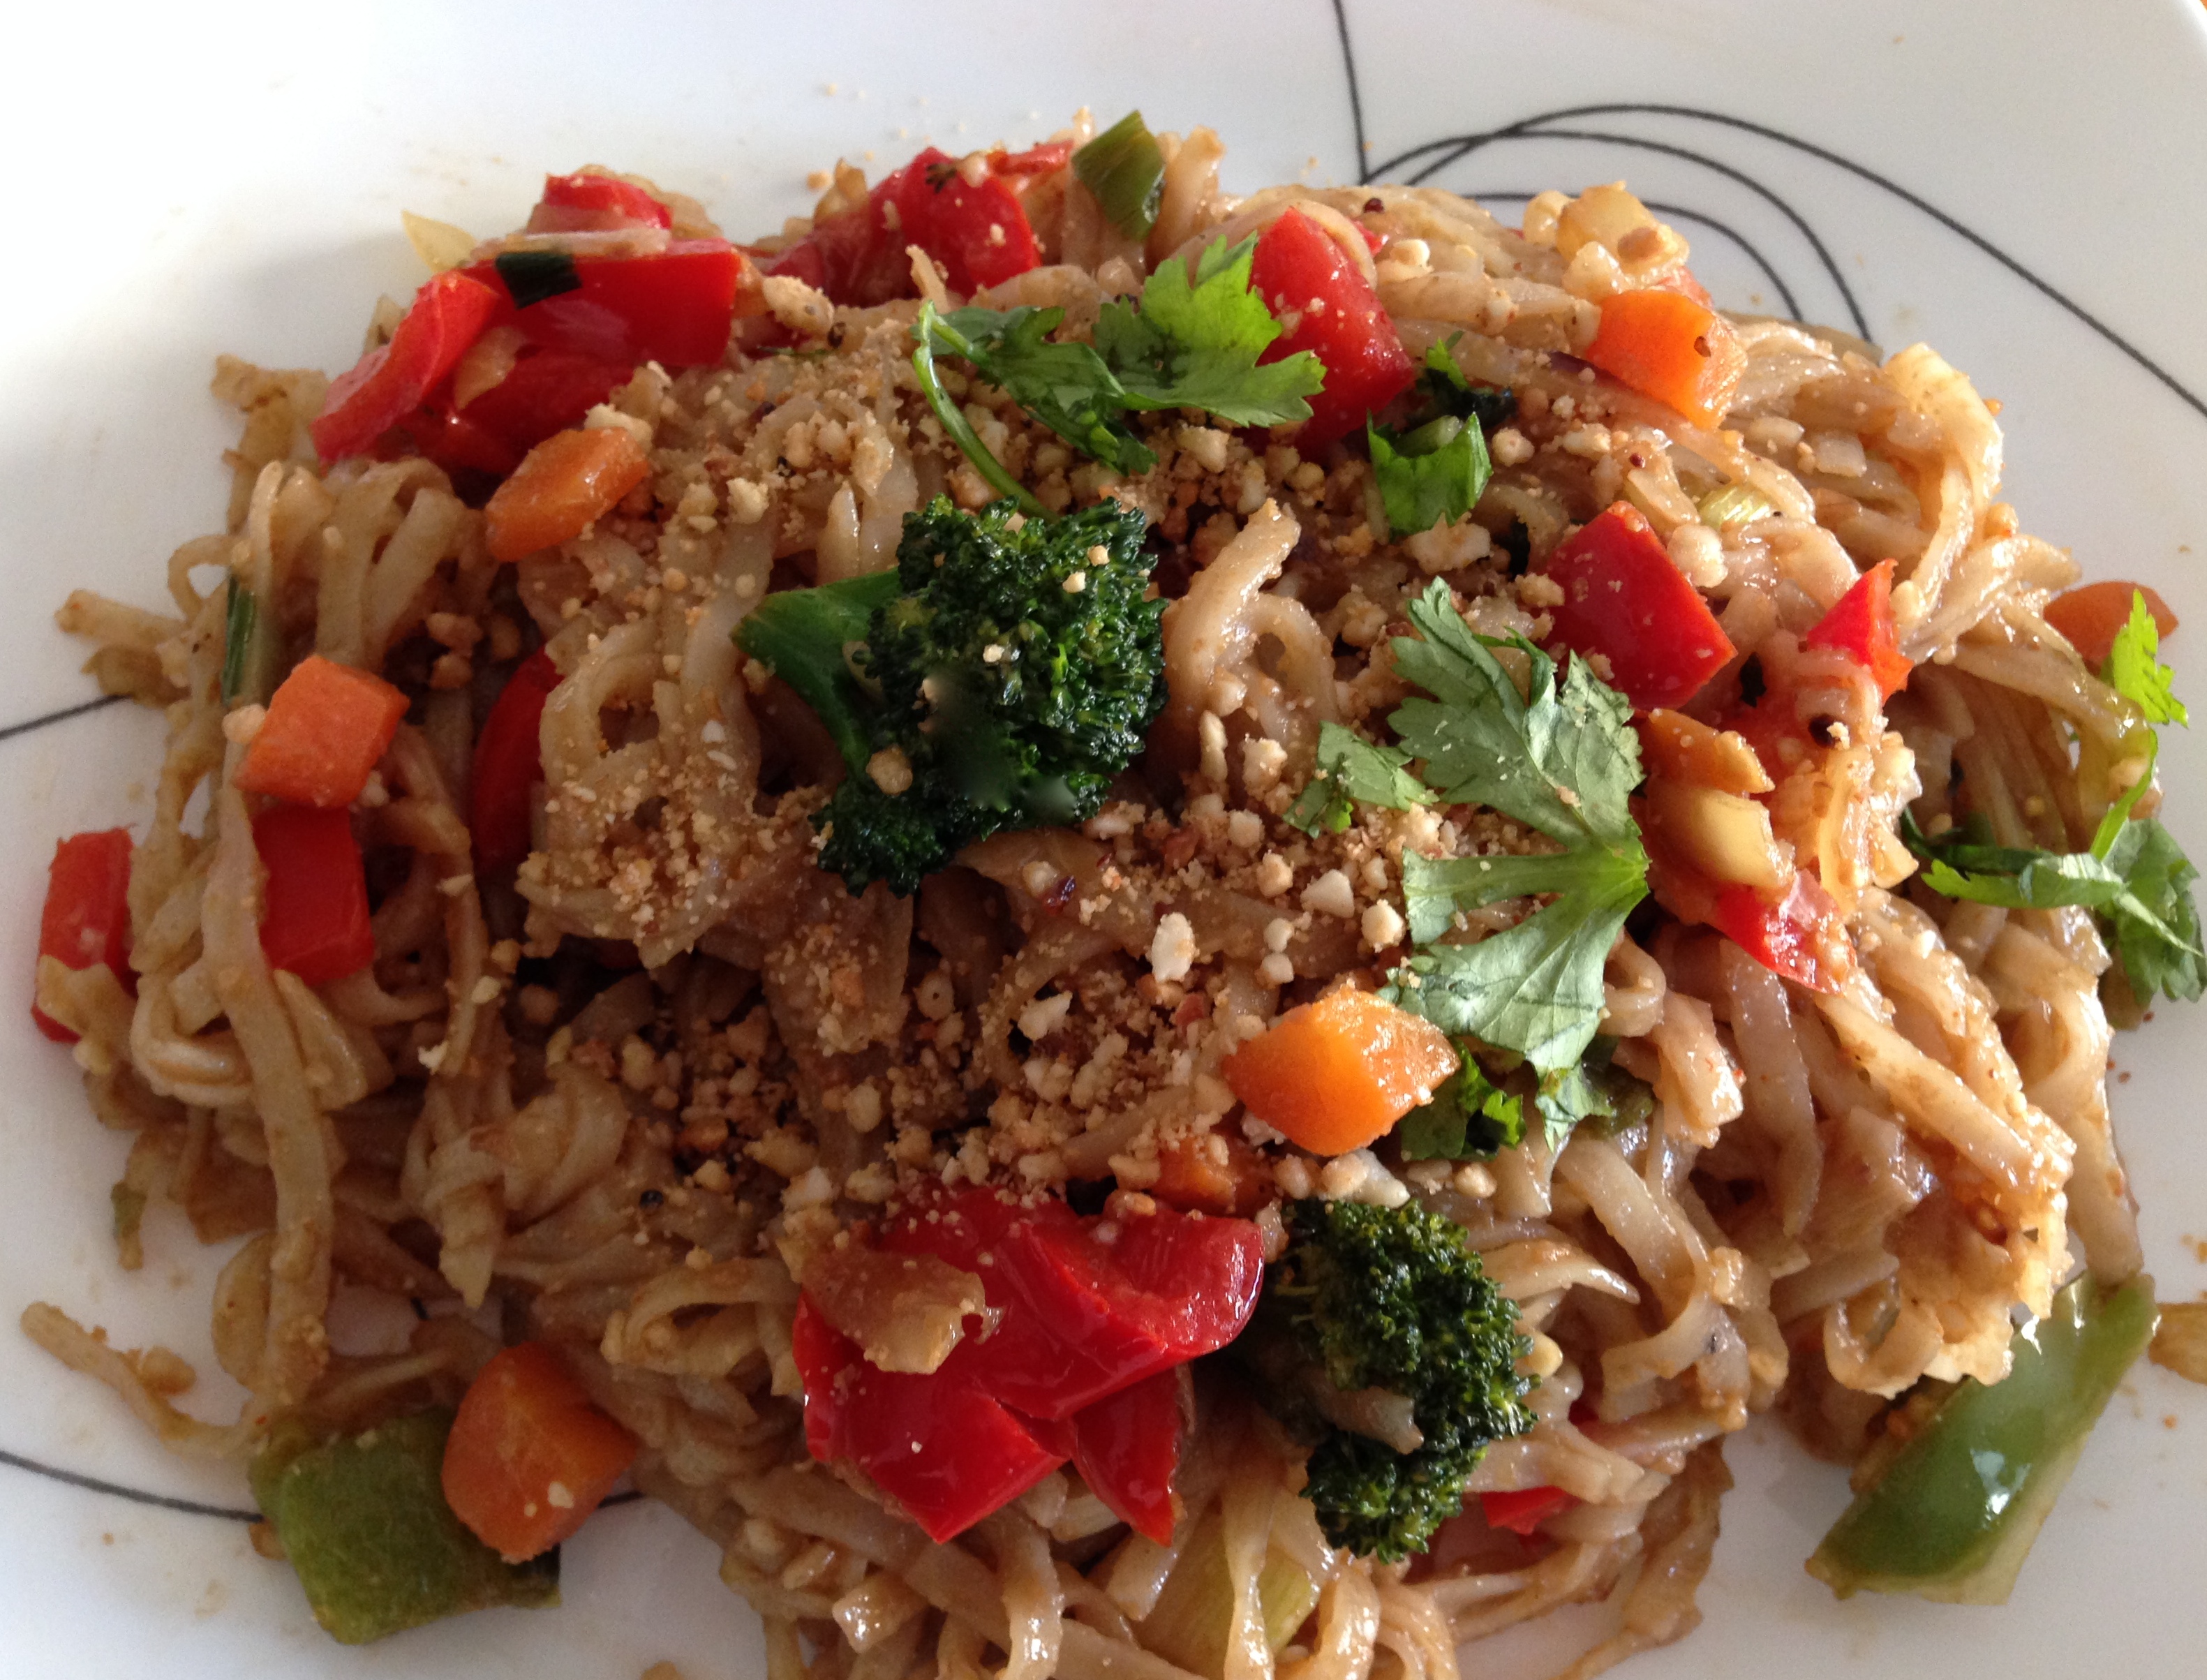
Richmond. Virginia has lots of boutique restaurants that are not available up north. One such gem is Tara Thai, whose food has been enjoyed by us for a decade or so. This is one place where the price and the quality has remained consistent through the time. My first exposure to great Thai food and in particular Pad Thai was at Tara Thai.  We used to travel a lot from north down to Richmond on vacations, at which time we use to make it a point to visit Tara Thai. But there were times when we felt like having Tara Thai pad thai when not in Richmond, and hence there was a need to create a home version of the Pad Thai.  This version of mine has a bit of my personal touch via the ginger, green chillies and peppers and minus the tofu. It is spicier than Tara Thai and bit more refreshing with extra peanuts and added vegetables.

I have fondness of peanuts, probably as I come from Gujarat, where peanut farming was very high and peanut oil is the main cooking oil too. A friend’s birthday was the inspiration to make this dish, as that was one of her favorite meals of mine. Many a times we think of someone when we make a particular item and we remember them in our hearts. Food and feelings are closely linked, at least for me and makes true a statement I read somewhere,” I cook to show my love”. and this resonates with me a lot.

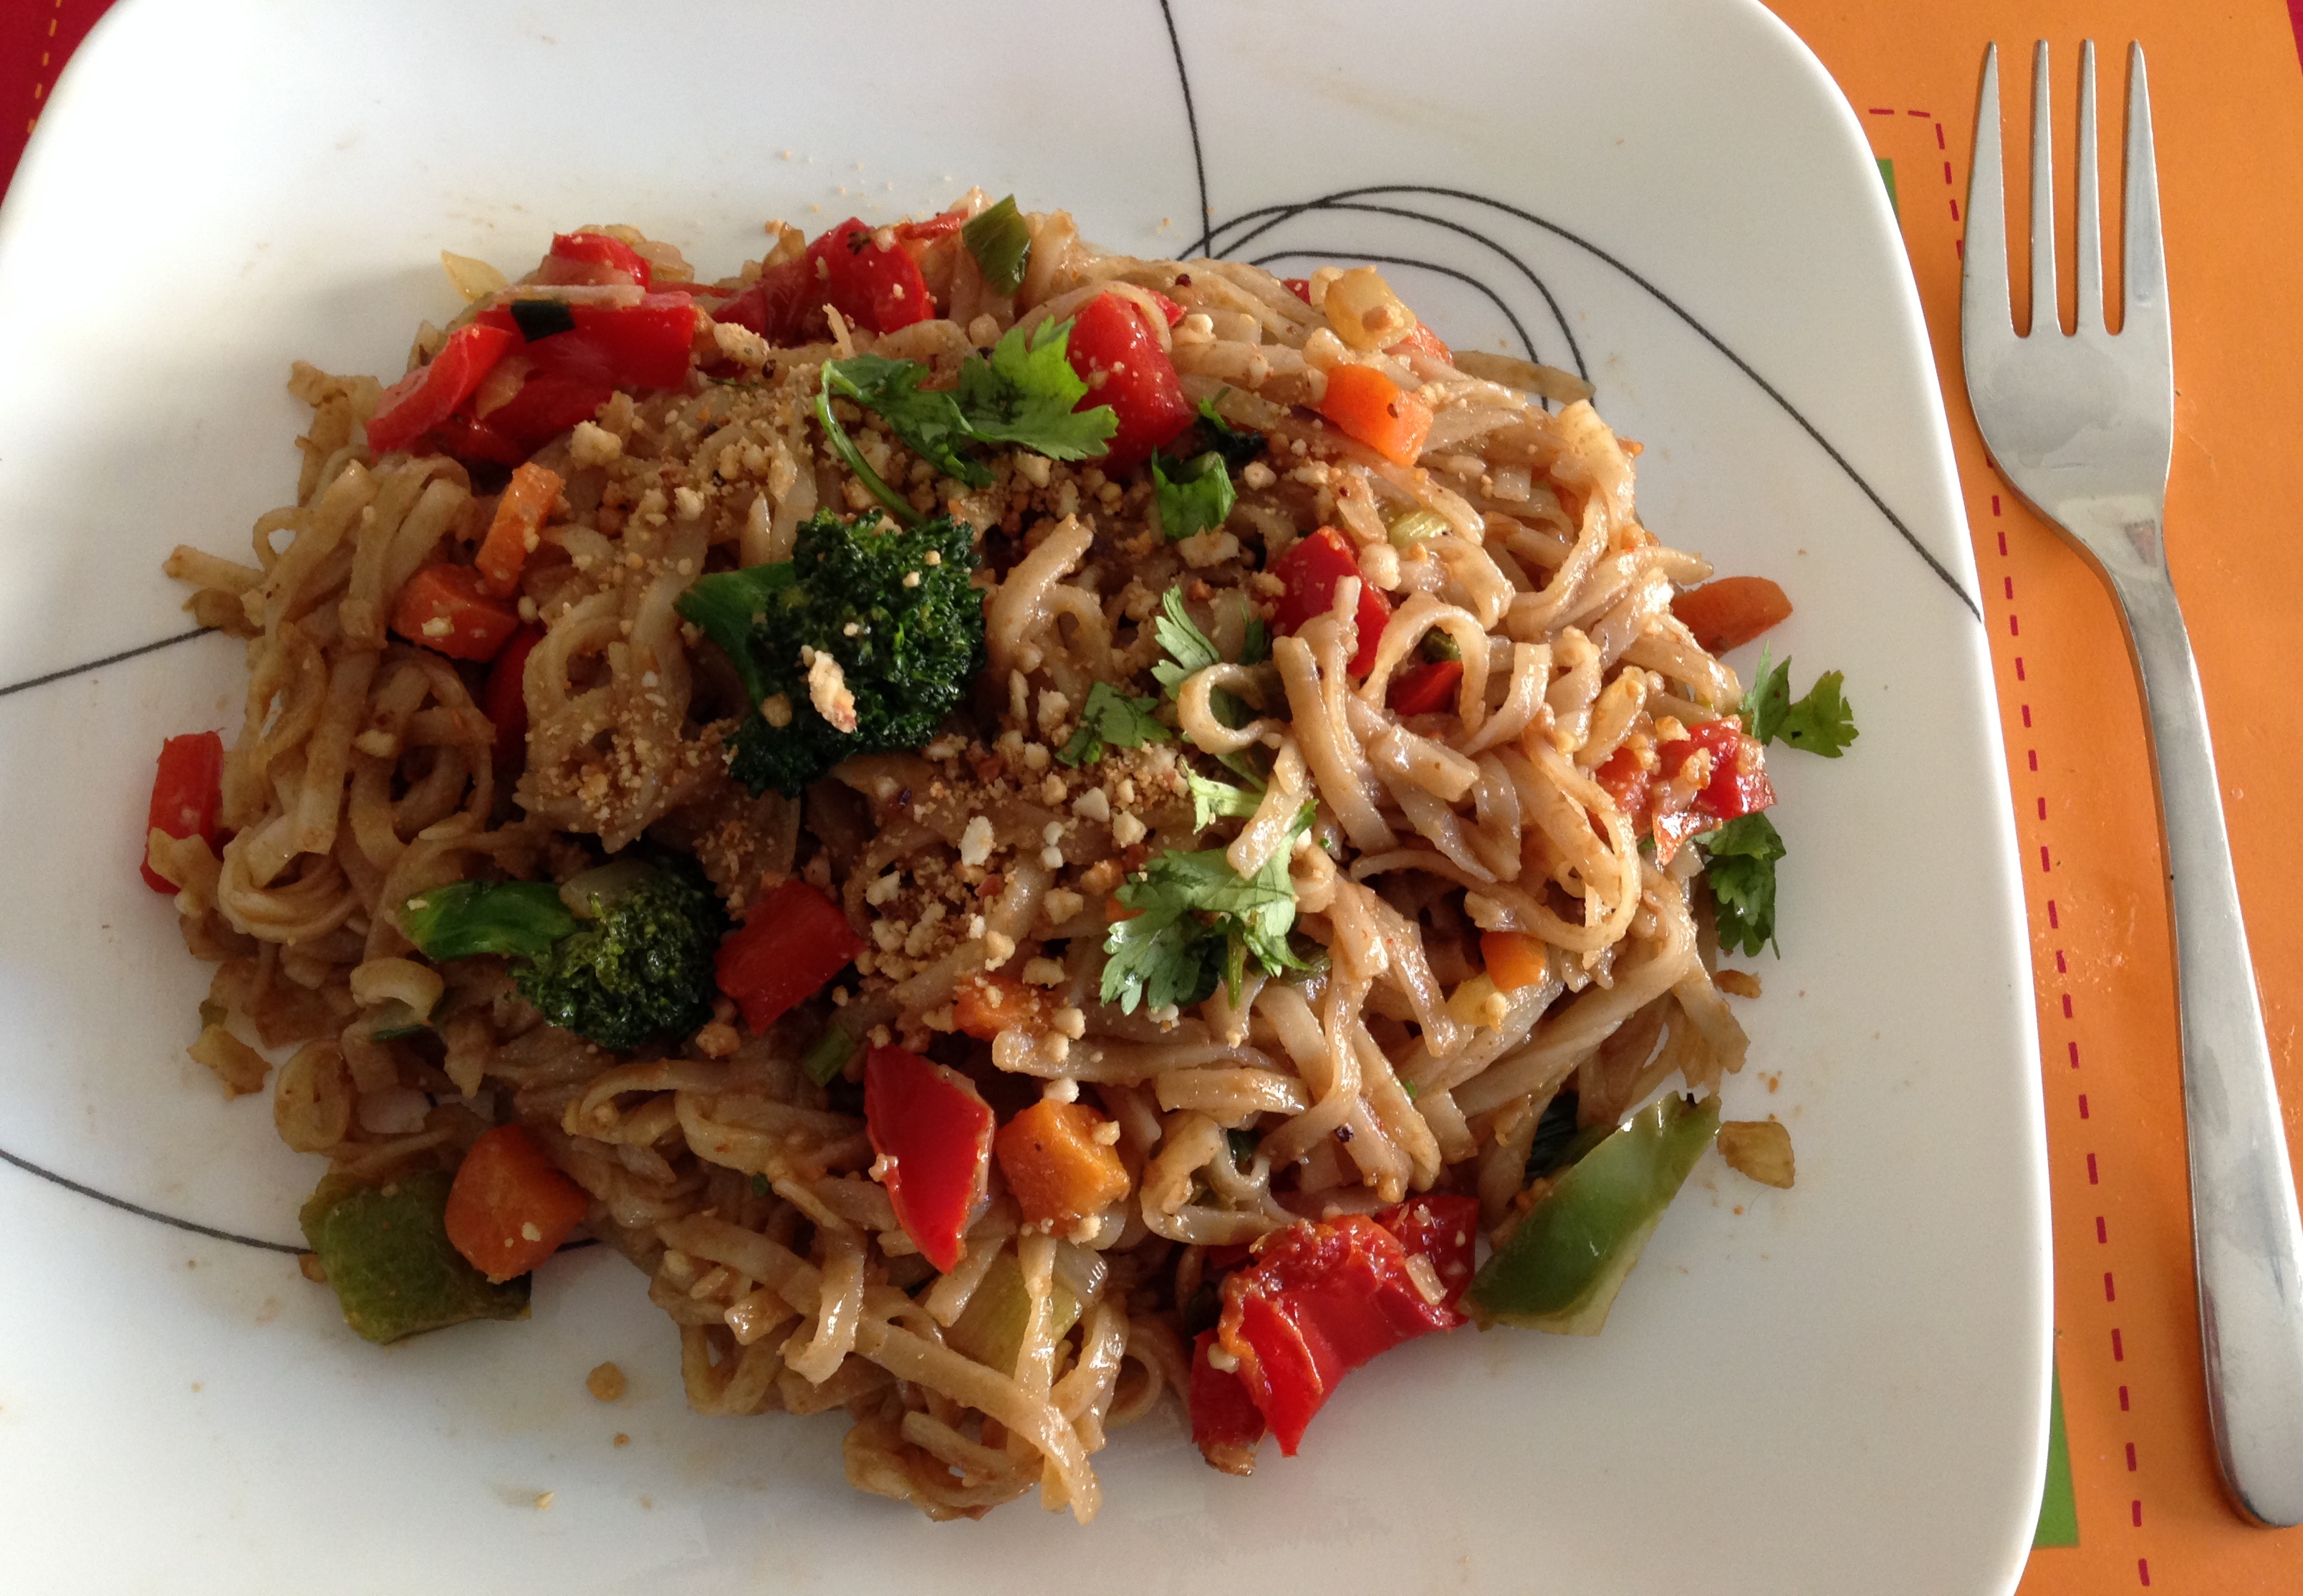
If you are peanut, tamarind and noodles lover, you will definitely enjoy this highly delicious Thai noodles that is extremely quick to make and uses sauted vegetables, which is highly nutritious. And to the frequent pasta noodles lover, this recipe offers a variation that is highly colorful too!

Recipe makes for 3 people

Cooking Time: 15 min

Preparation Time: 30 min

Ingredients by Volume
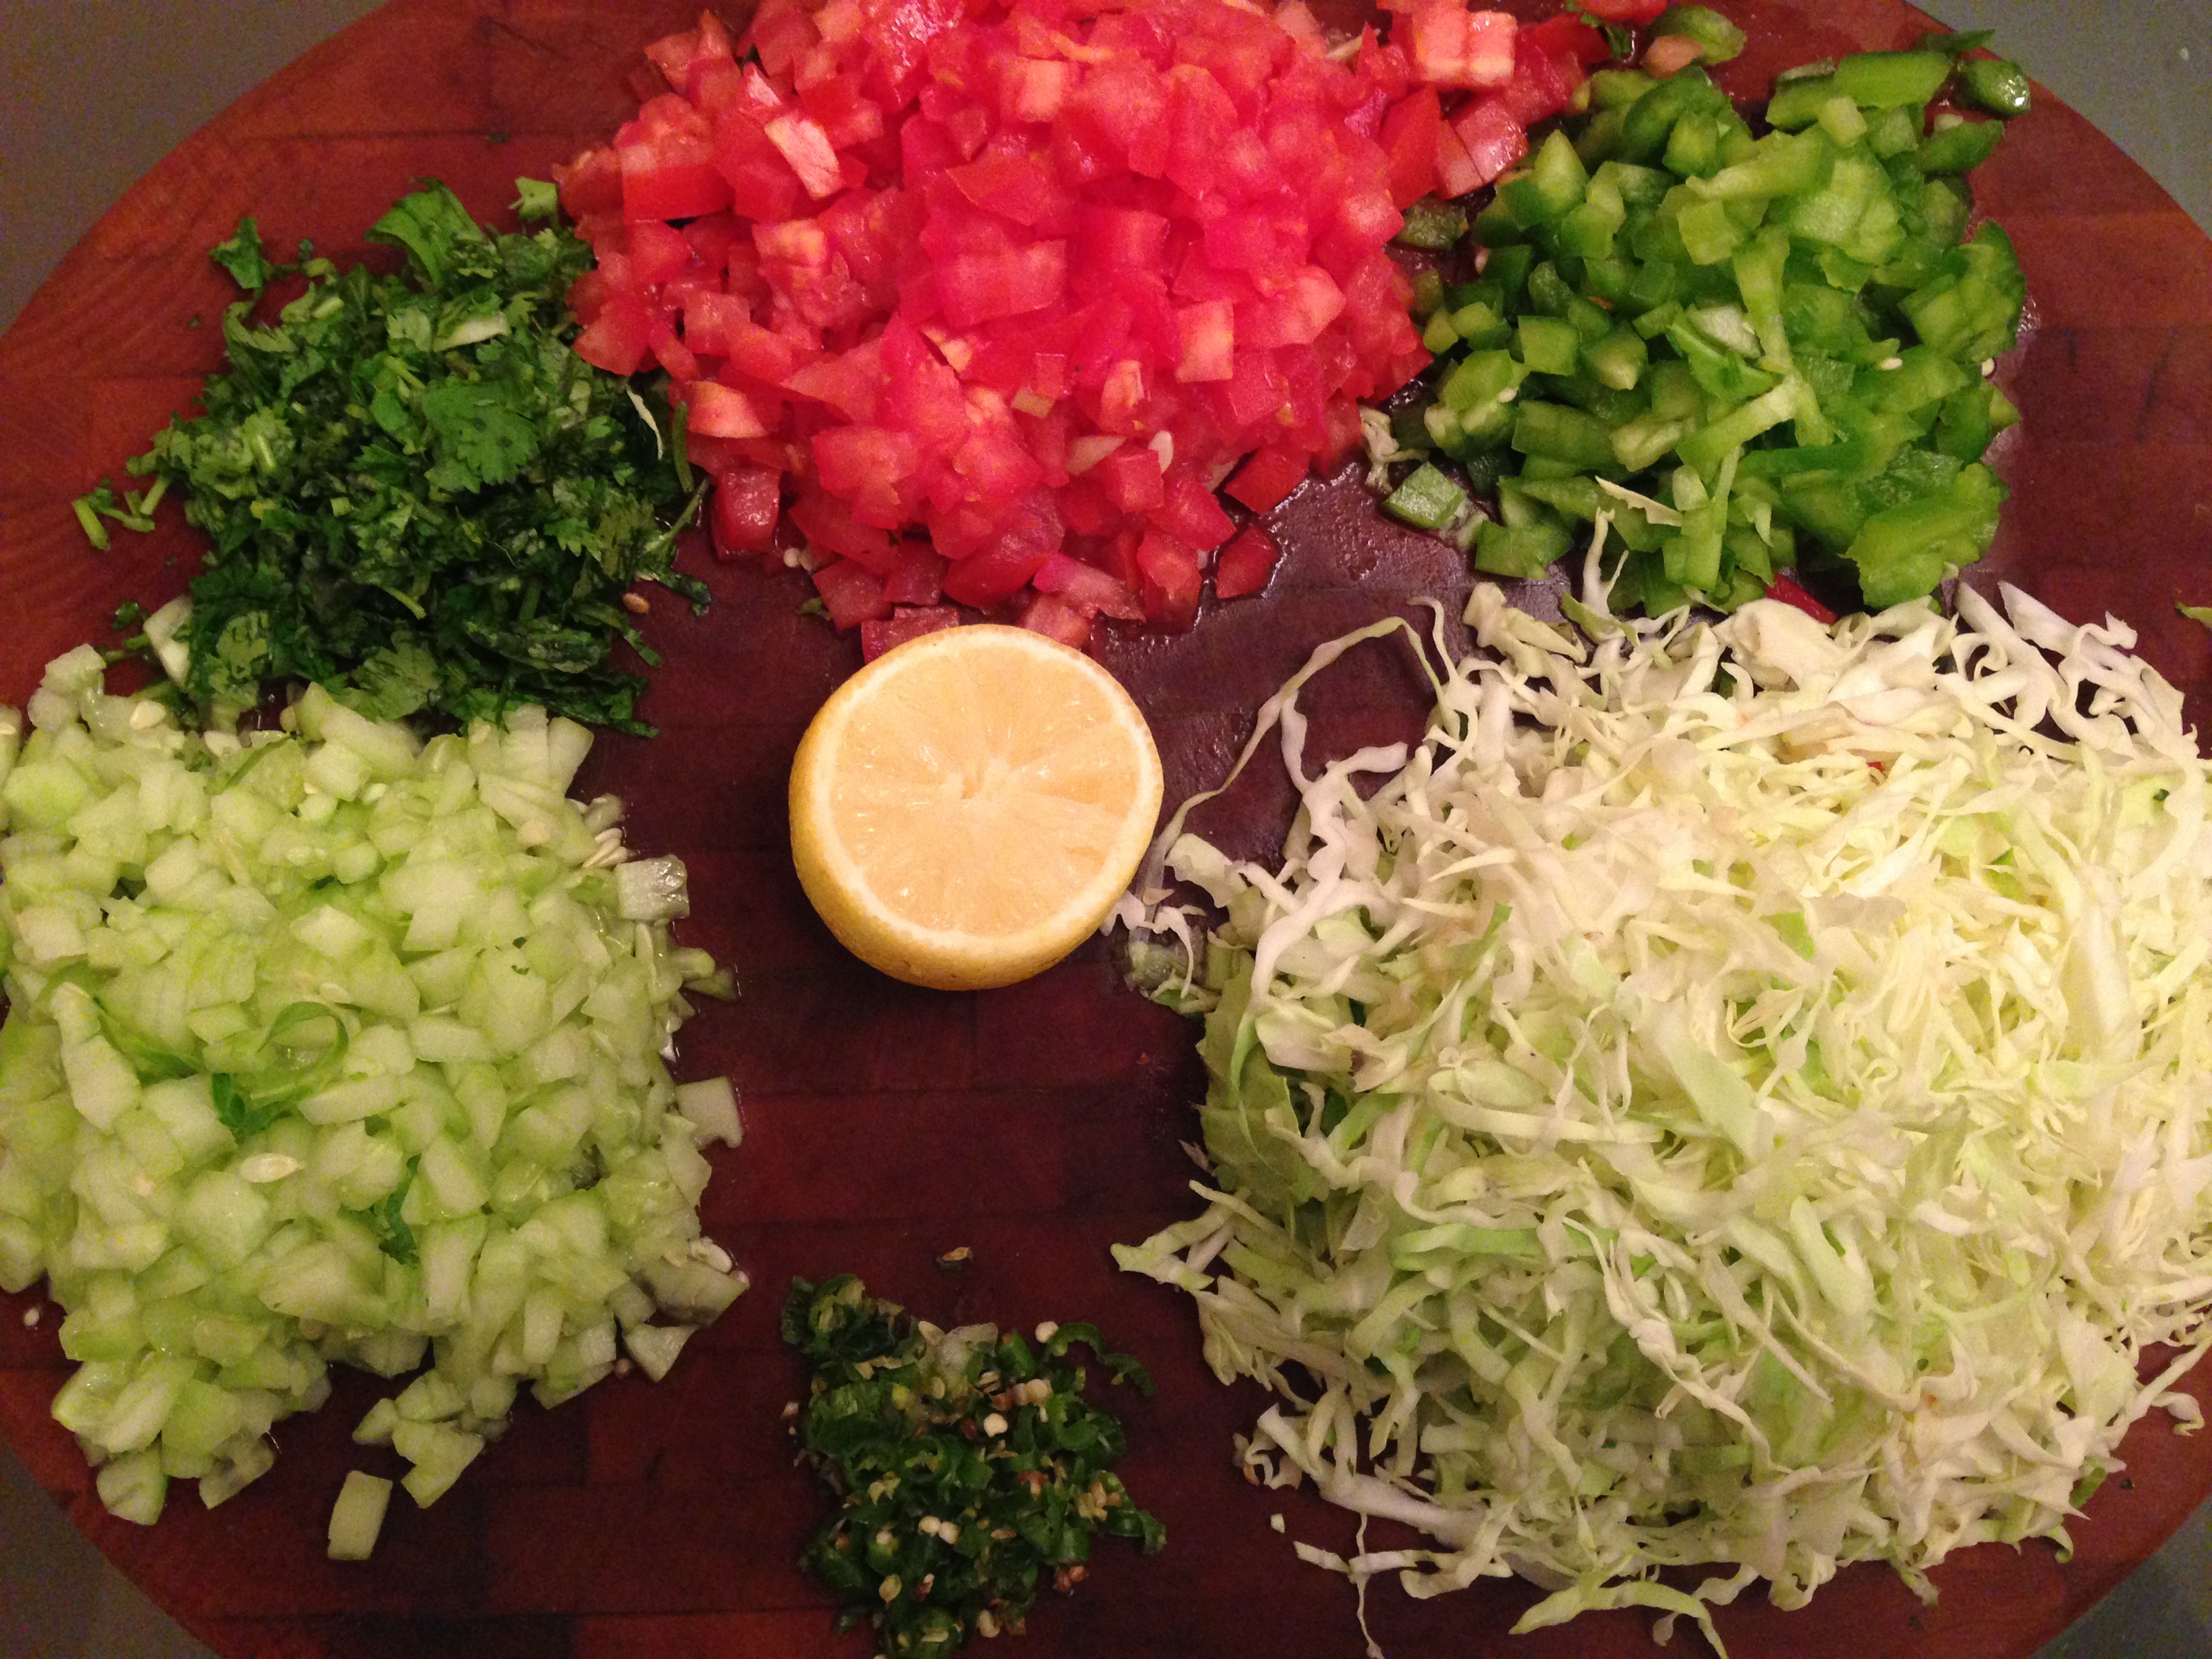
  • 1 cup broccoli florets
  • 1 cup red pepper diced
  • 1/2 cup green pepper diced
  • 1/2 cup carrots diced and boiled
  • 1/2 cup green onions choppped
  • 1 cup onions diced medium
  • 1 tbsp green chillies or 7-8 green chillies finely chopped
  • 1 tbsp ginger finely diced
  • 1 tbsp coriander chopped
  • 7 tbsp oil
  • salt to taste
  • 1 tbsp tamarind paste
  • 1/4 tsp chilli powder
  • 2 1/2 tsp brown sugar
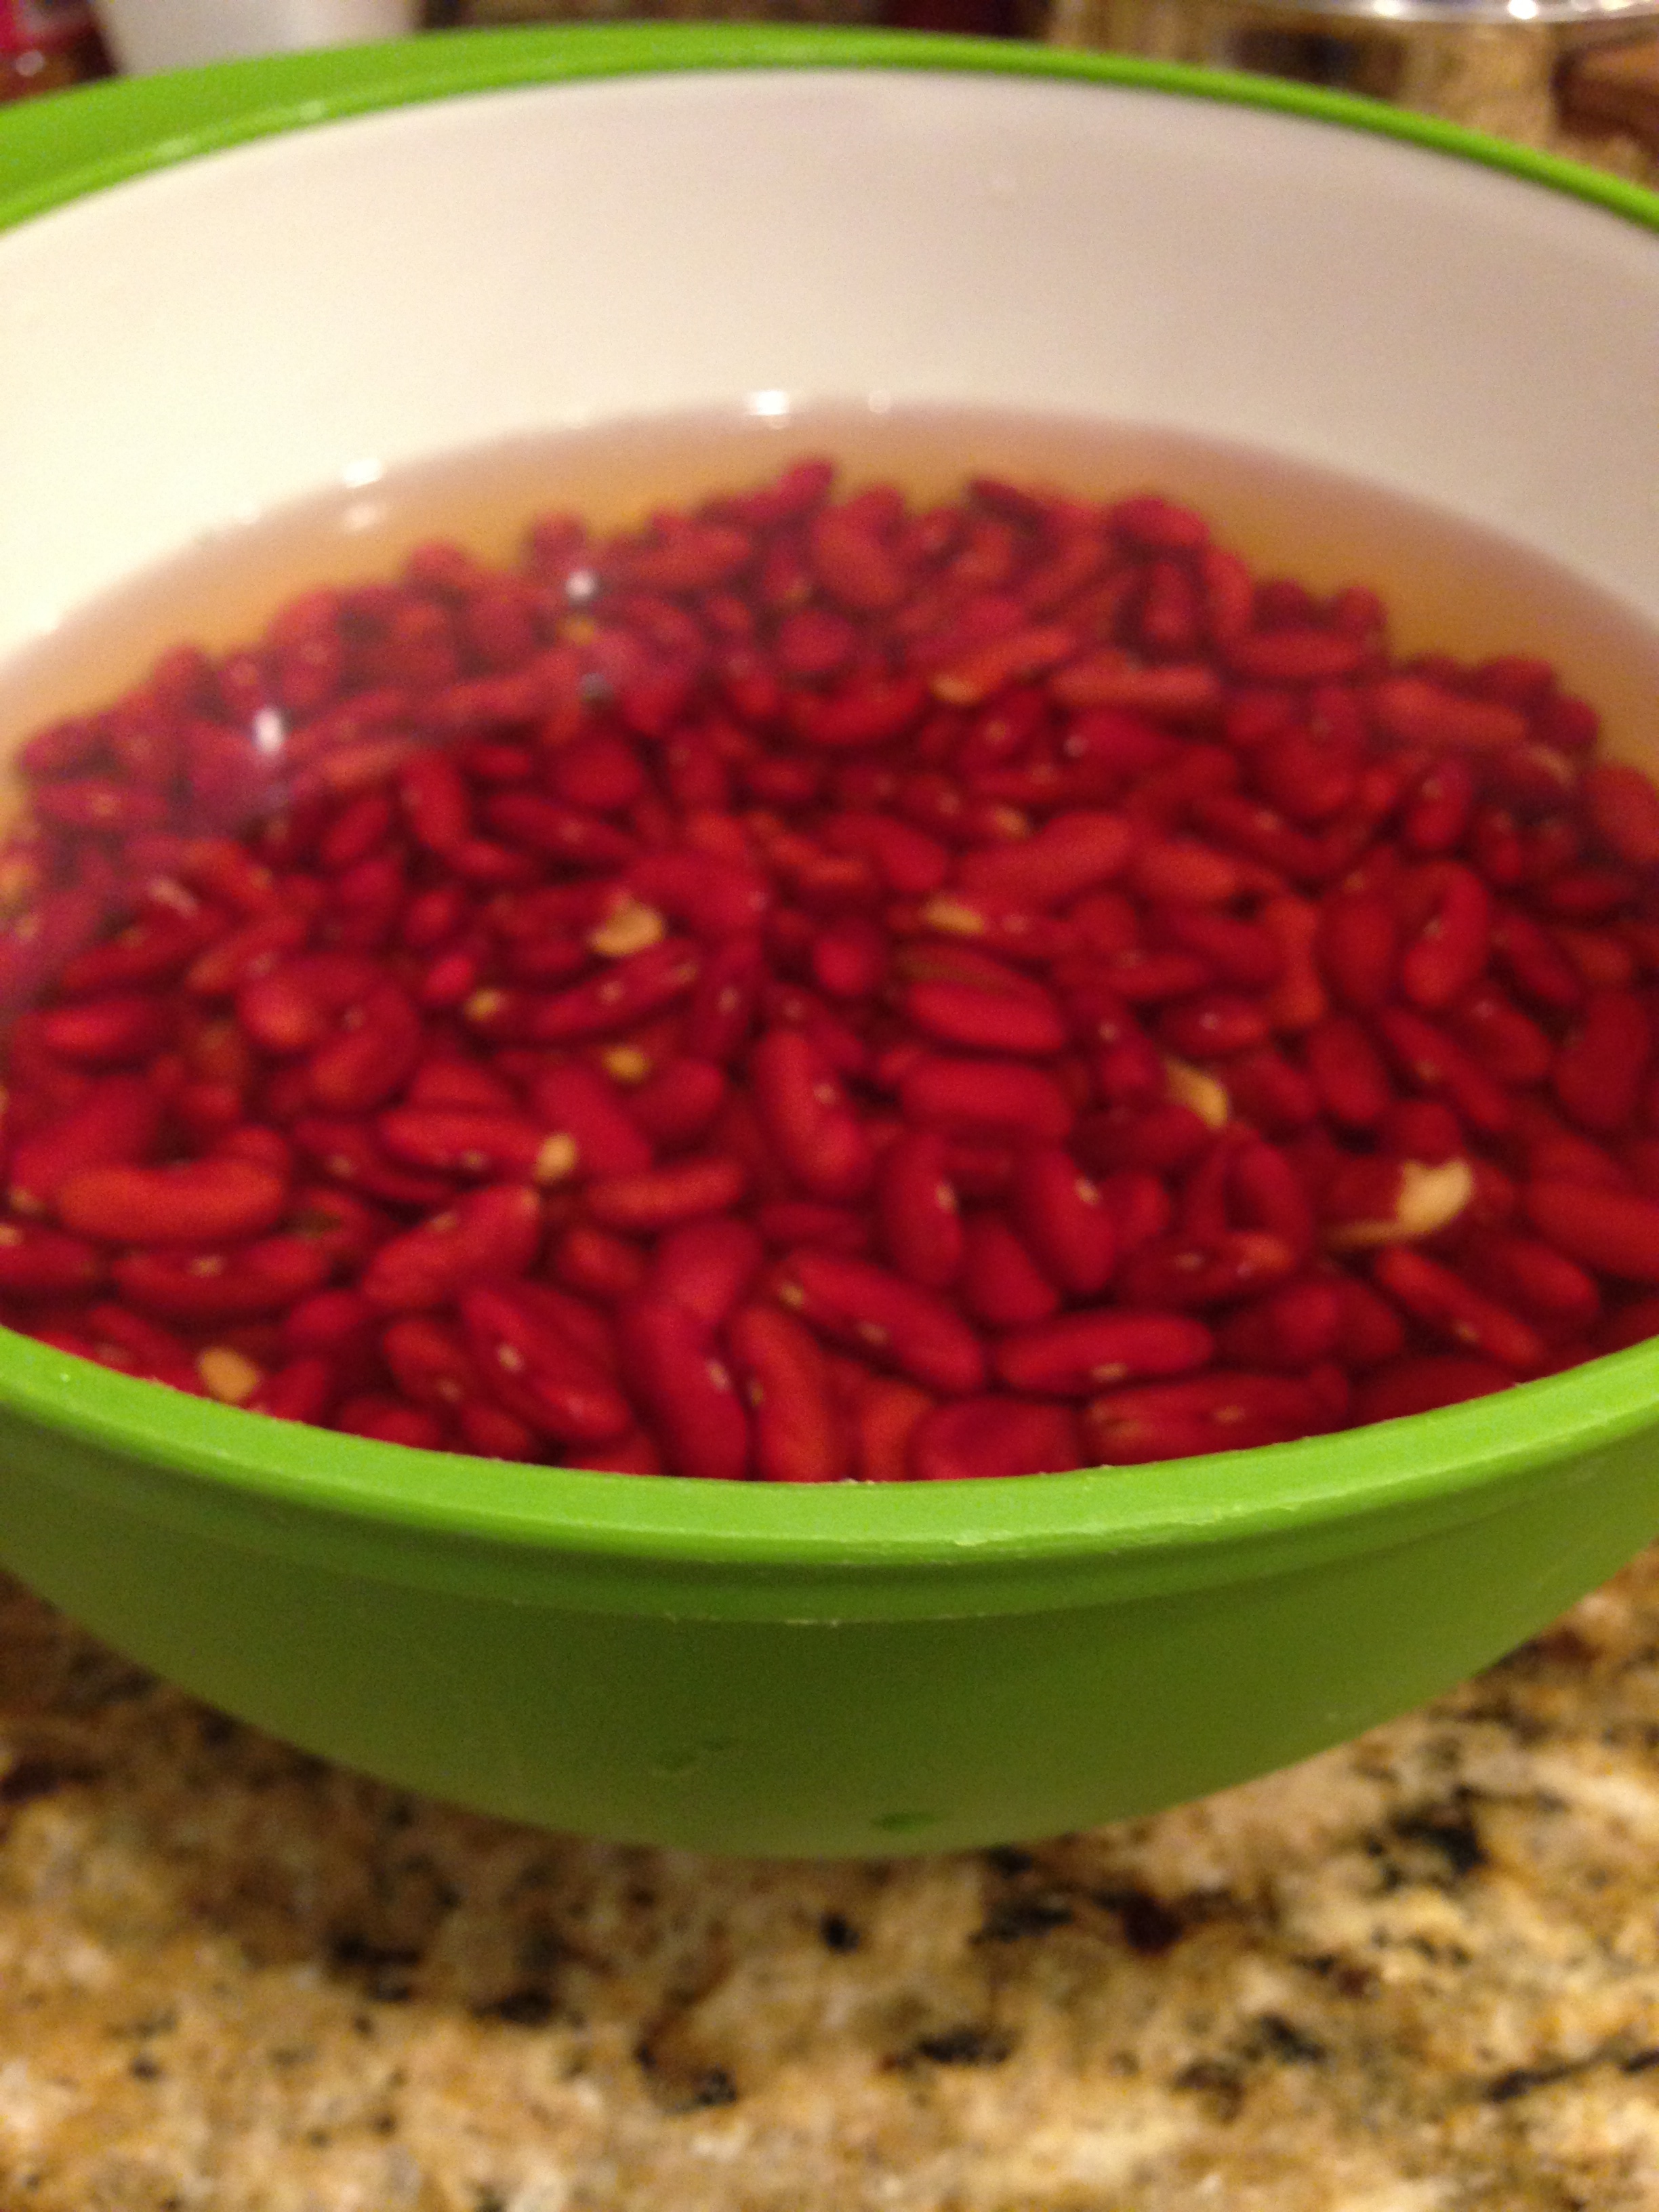
  • 1  1/2cup roasted and crushed peanut powder
  • 1/2 packet flat rice pad thai noodles
  • 1 tbsp water
  • Few drops of lemon
Method
  • In about a litre of ice cold water,  put the rice noodles to soak for 15 min.
  • In the broadest pan  you have, heat 6 tbsp oil.
  • On high flame, add green chillies to the warm oil and saute for 1 min 
  • Add diced onions and saute for 3 min. on high 
  • Add salt to taste.
  • Add  ginger and saute for a min. 
  • Add broccoli florets and stir for amin.
  • Add red peppers and saute for two min.
  • IMG_2463
  • Add green peppers and saute for a min.
  • Add green onions and saute for two min. and remove from flame.
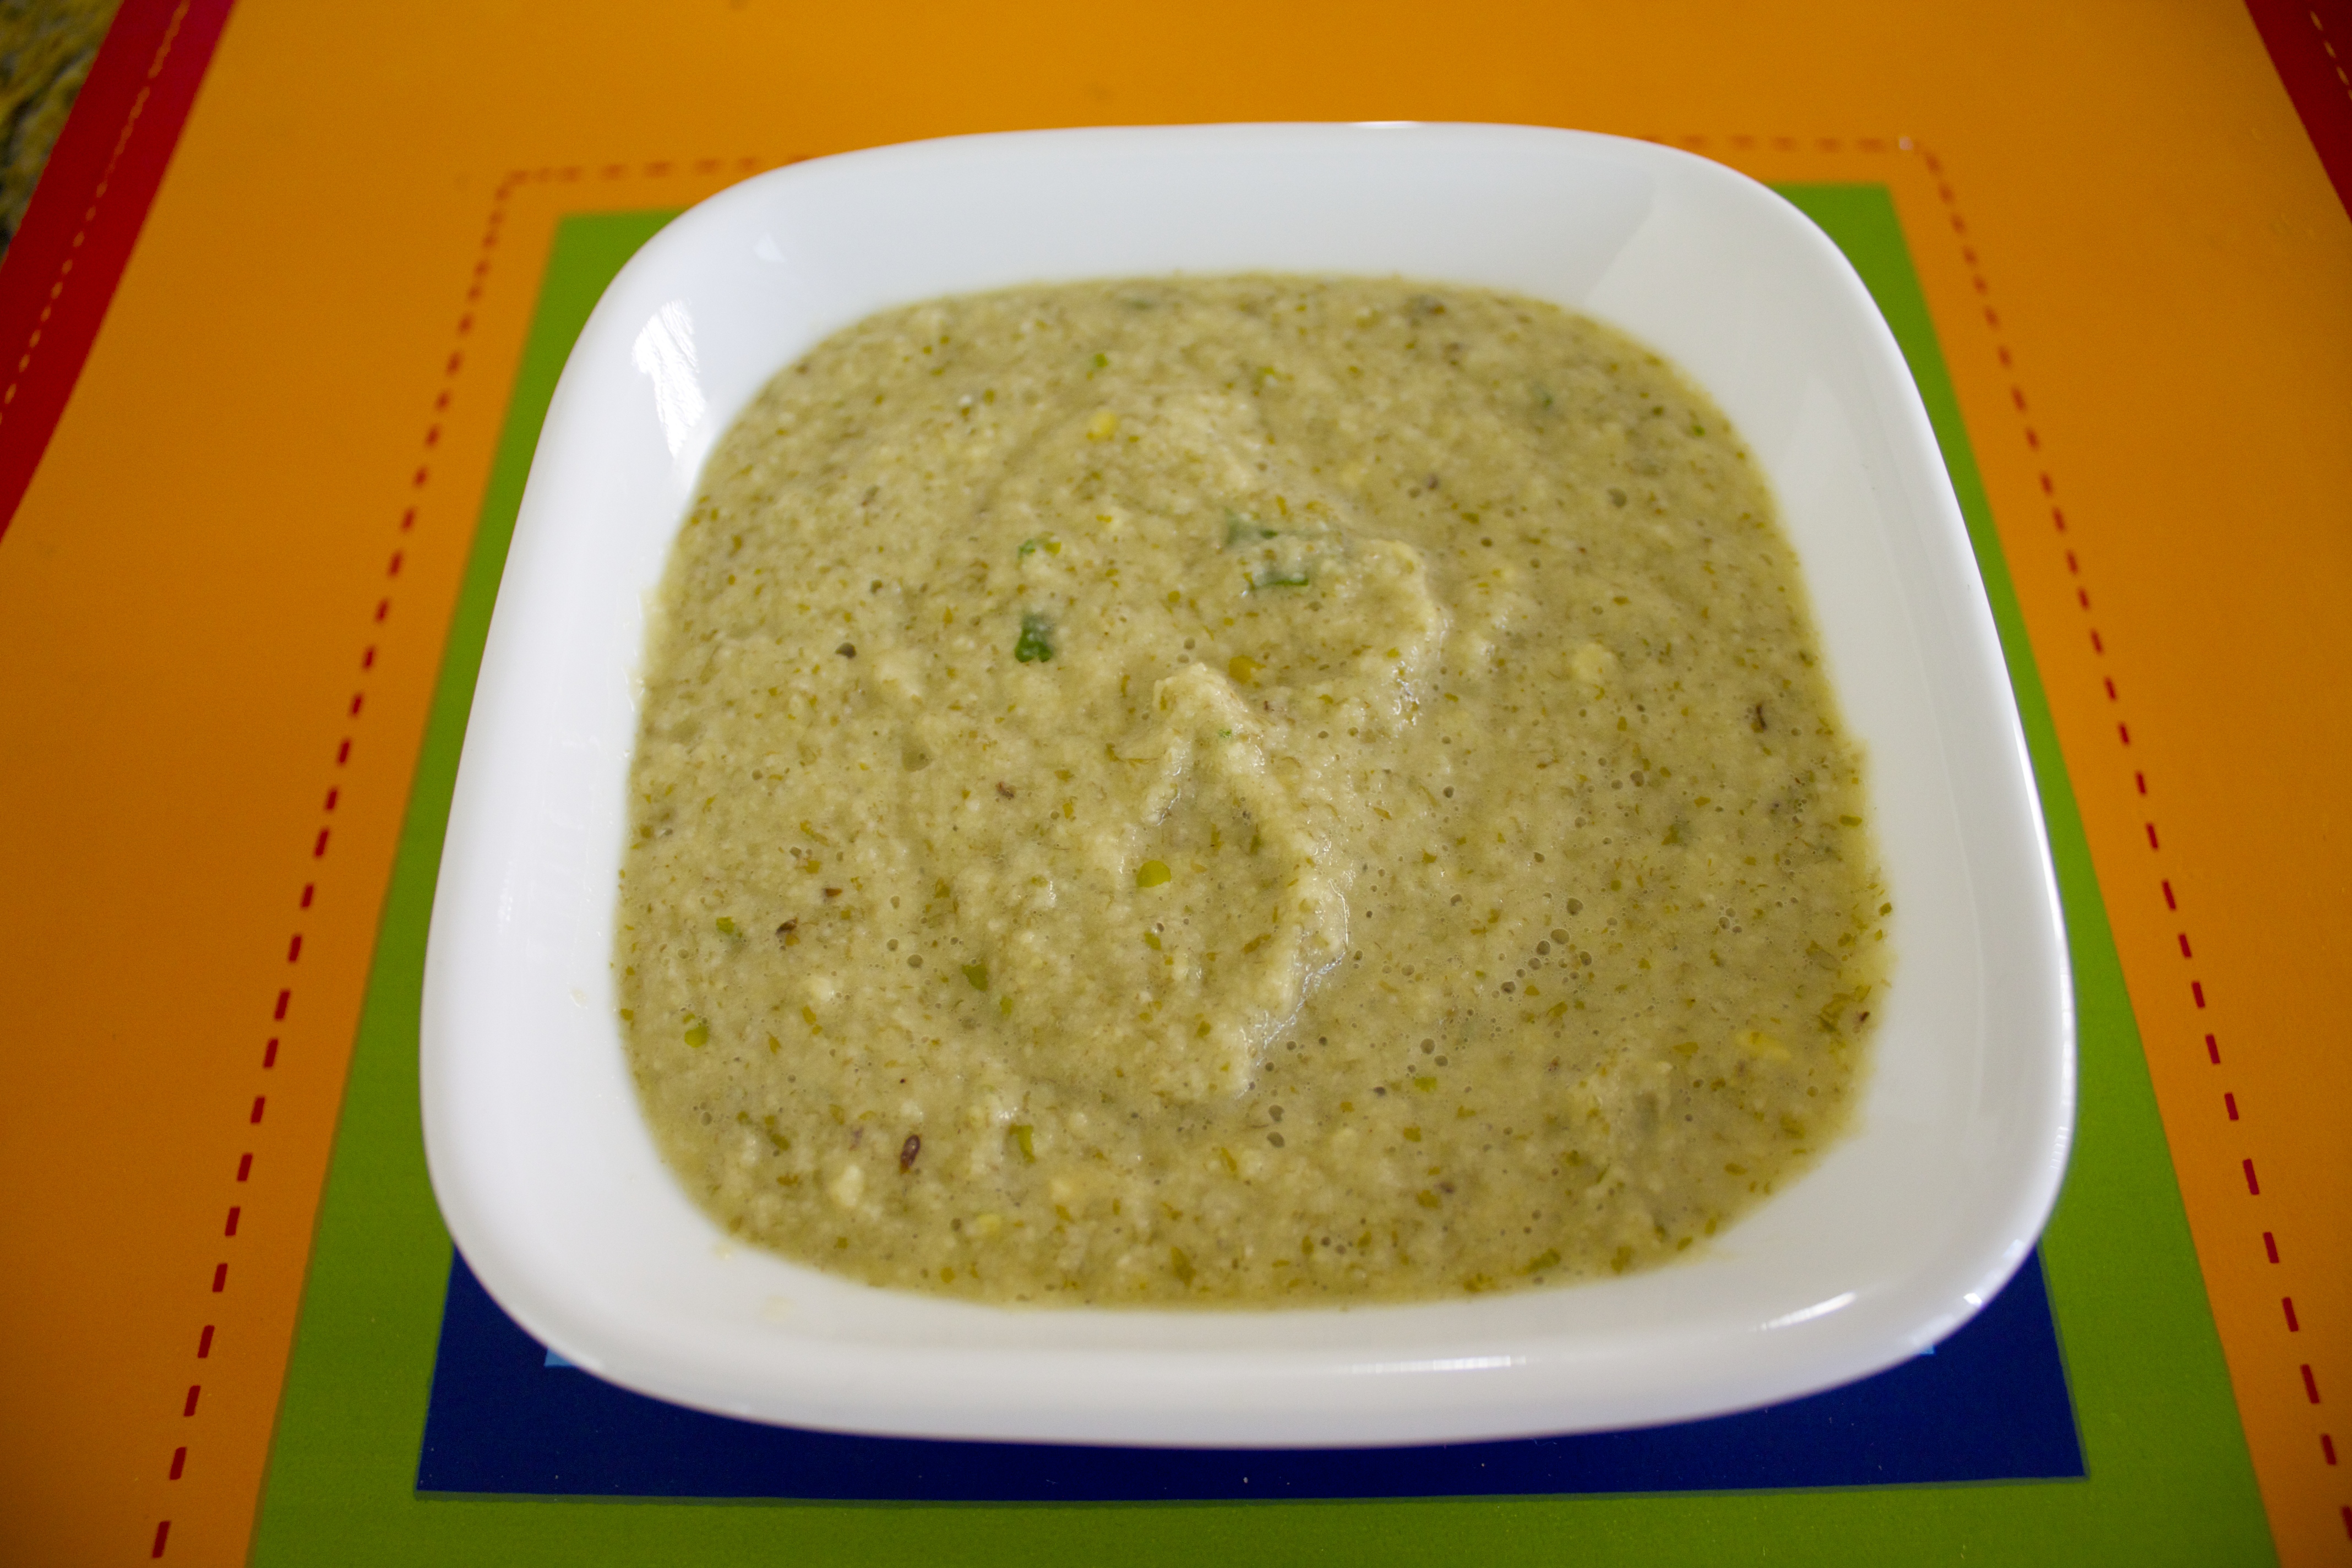
  • Mix  tamarind, one tbsp roasted crushed peanut powder, chilli powder and a tbsp water.
  • Boil a litre of water in a deep pan
  • Add a tbsp oil, salt to taste and pad thai noodles.
  • Boil on high for 5 min.

IMG_2465

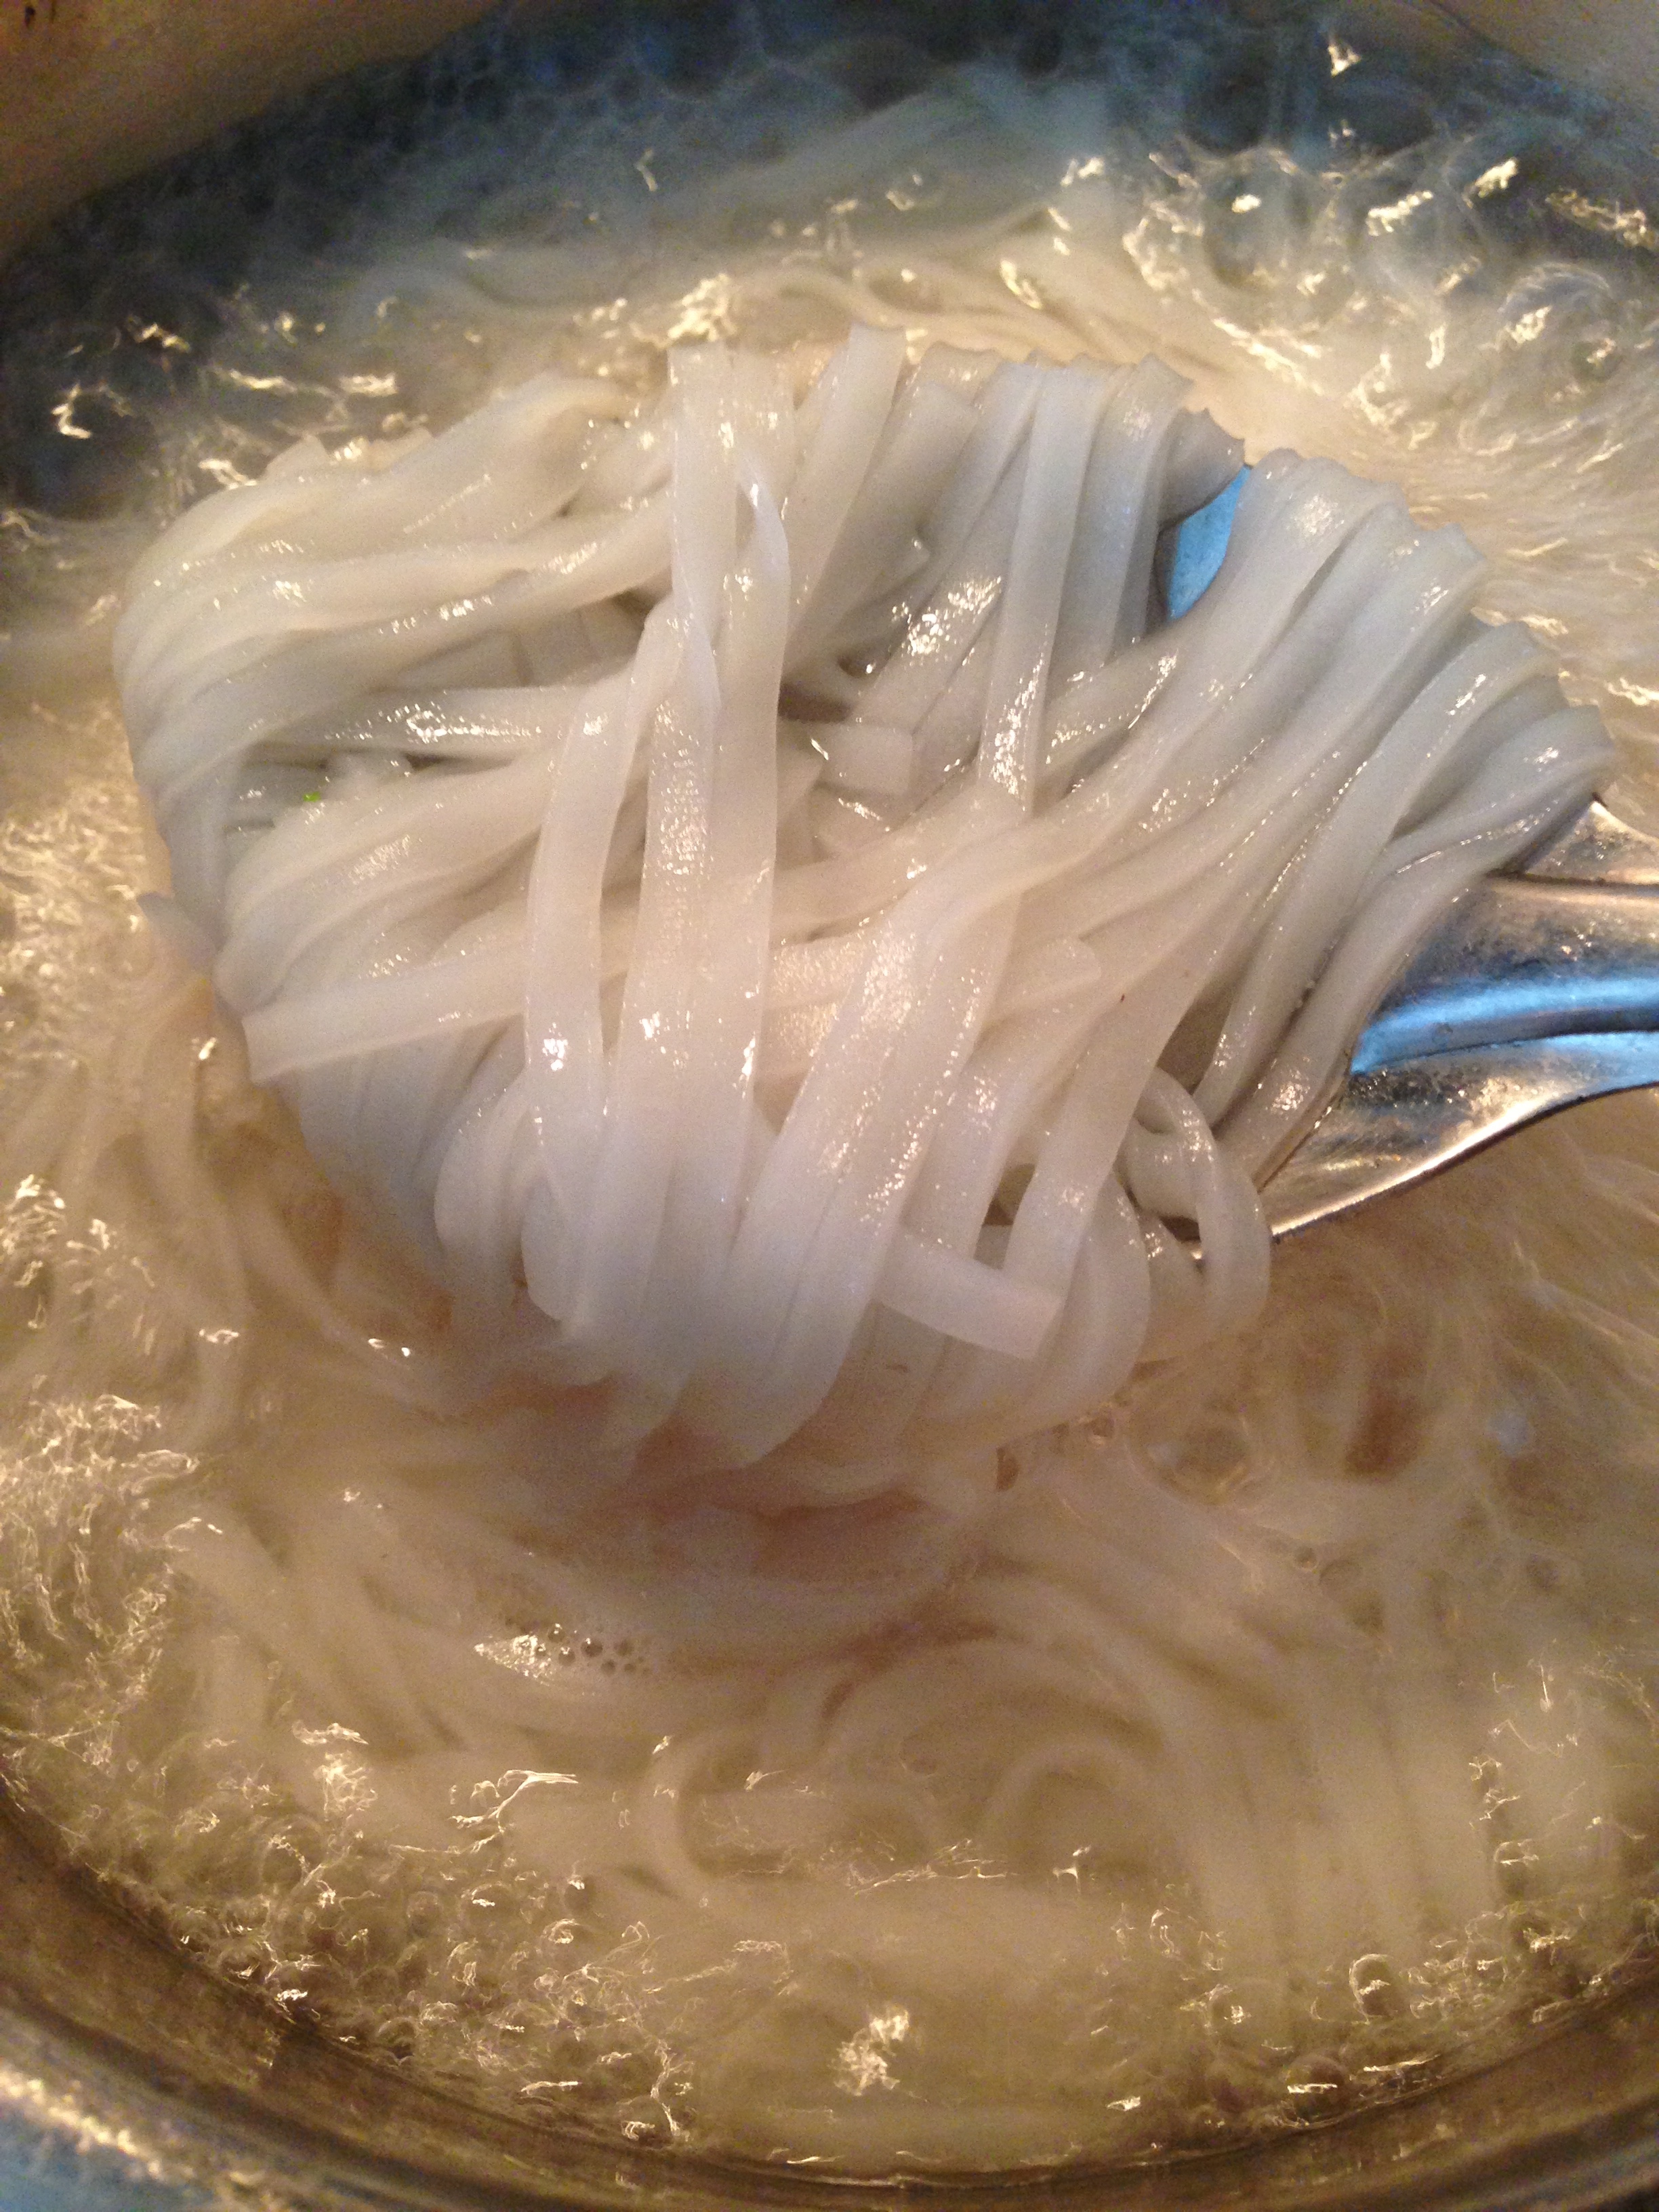
  • Remove from flame, drain the water.
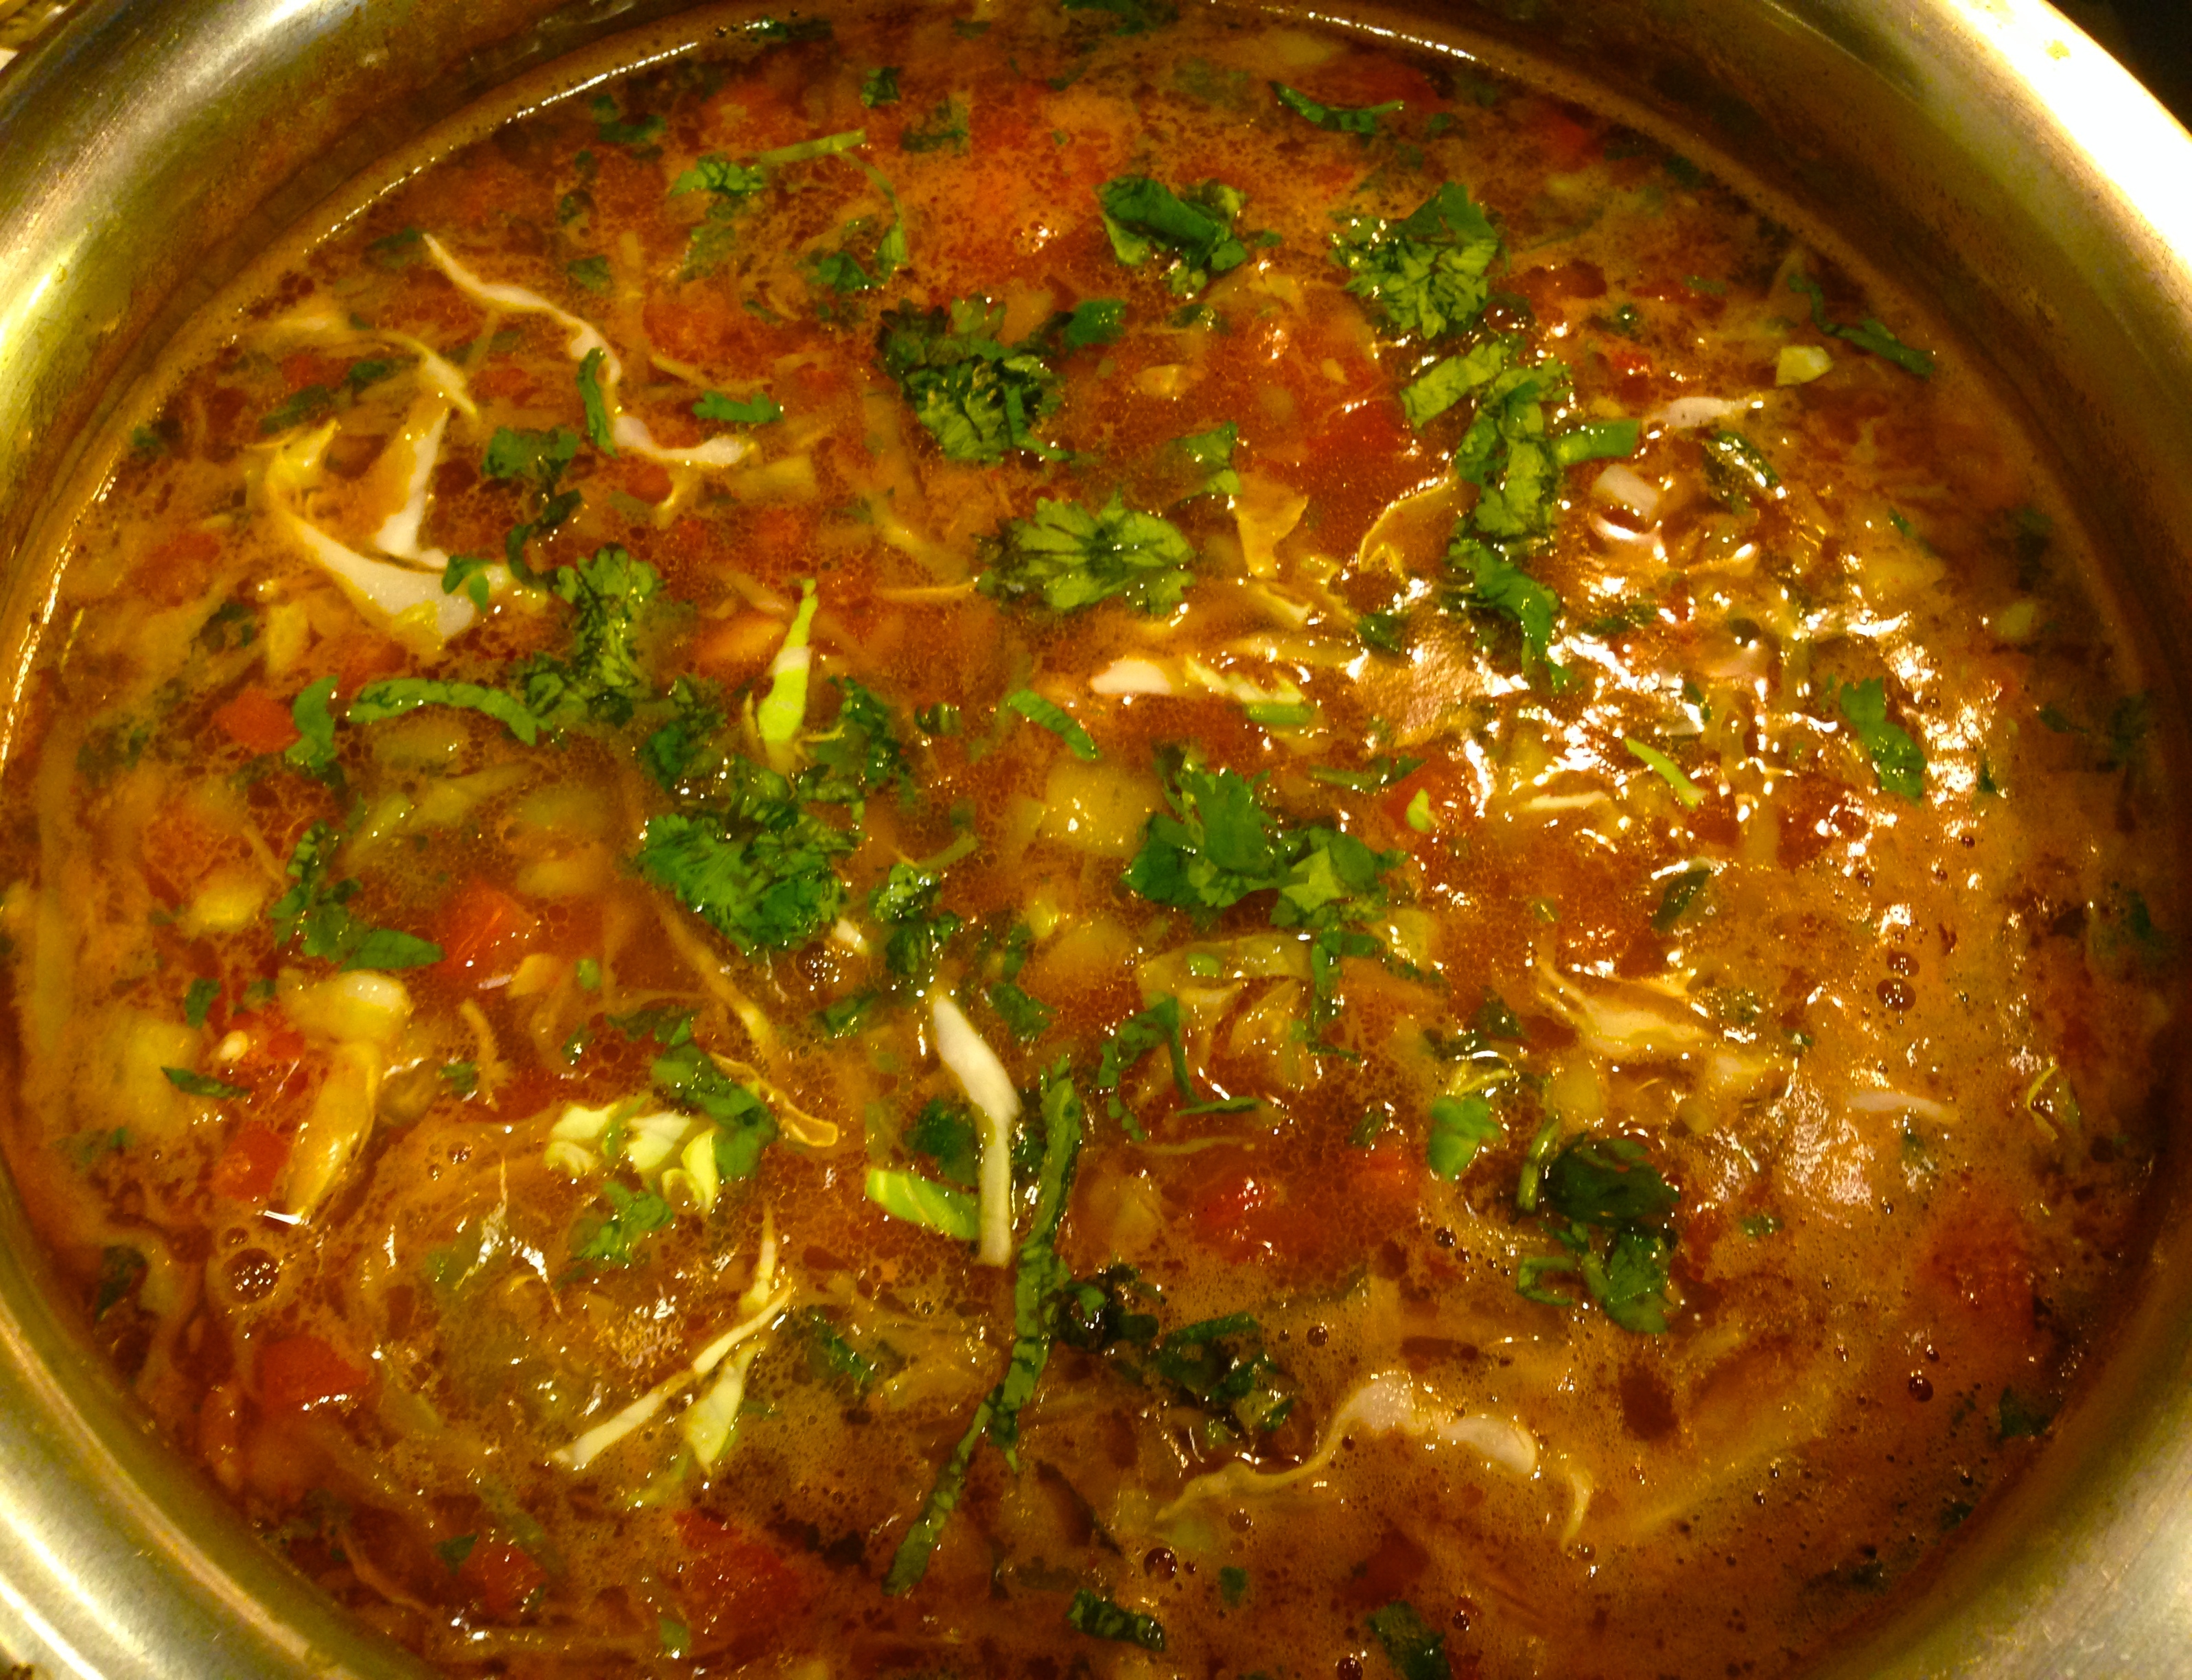
  • Add the rice noodles and tamarind paste to the sauted vegetables.

IMG_2472

  • Add 1 cup roasted and crushed peanuts, 3-4 drops of lemon and mix well .
  • Heat for a 2-3 min 
  • Garnish it with fresh coriander and a sprinkle of peanuts powder and serve hot.

IMG_2468


Tips

Roasted peanut crushed powder can be made in advance. Heat two cups of peanuts in a broad thick pan for 10 min on slow flame. Remove the skin and  pulse it in a blender for a minute to get a crushed consistency. Excess powder can be stored for future used.

Using pasta utensils helps in lifting and mixing the noodles well with the vegetables.  Alternatively you can run cold water to cooked noodles to cool them, so that they will not stick and mix well.

Jain Variation: Exclusion of onions, green onions ginger and carrots.

Variation: Add Fried Paneer cubes as an alternative to Tofu. I personally do not prefer Tofu, so have skipped both Paneer and Tofu.

Instinct Factor

Roasting the peanut powder to the brownness of your desire. I prefer the brown tint to it.

Cooking noodles to your perfection. Rice noodles are pretty soft so they cook fast.

Feel Factor

Tasty noodles with lots of veggies and the crunchy peanuts in between, flavoured with tamarind, ginger and chillies creates a delicious aromatic Thai meal  being cooked and relished in your home. Visually I find  the colors of vegetables against the brown of the noodles and tamarind sauce very attractive and I truly relish this asian flavoured Thai meal , whether its lunch or dinner time!


[shopeat_button]

Posted on

Spicy Rajma Soup with Salad (Red Kidney Beans Soup Salad)

Waiting for snow, enjoying the cold, walking with my friend, feeling first round of snowflakes falling on me, is a pretty good description of my day! Weather and heart often influence the choice of food that is being cooked at  my home. With such a cold, wintry or rainy day, I wanted to make something that is hot and piping, colorful and easy, something between a soup and salad and something that gives a happy and warm feeling to one and all.

A dish like this is the Spicy Rajma Soup Salad. Many of you having ties with Sudan will  know this dish as ” Sudan na Phool”. This dish originated in Sudan.  The Gujaratis living there have created this vegetarian entree of a Sudanese delicacy, and spread it amongst the community. There are special Sudanese kidney beans that are used to make this. But, due to lack of its availability on a regular basis, I often make this with Red Kidney Beans, and hence I would like to rename this as Spicy Rajma Soup Salad . The red kidney beans resemble in shape and color to the original Sudan Phool. Some Indian shops do keep the original Sudan Phool, according  to a friend of mine. 

This is easily a complete meal by itself and it is highly colorful, extremely easy, very nutritious and fulfilling too. It is delicious to taste and enjoyed by non- Indians too. As it is accompanied with bread, this can be a weekend menu or a great entree even if you have a party of ten at home. All it requires is some preparation work by chopping vegetables that can be prepared in advance. Personally, chopping vegetables is a highly therapeutic activity to me, as it brings my wandering mind to focus only on the activity I am doing, and forget about everything else. I enjoy the experience of chopping to the  right size and shape, and when I see saw many different colors and varieties in front of me, the artistic mind of mine is highly satisfied via the vegetables color palette in front of me. Readers familiar with this dish are encouraged to add any variations, if I missed out!

What I like about this dish is that as a host,  you can just present the various vegetables on the table, and the guests can choose the toppings that they want , giving the guests the choice of personalizing this dish to their taste, and reducing the work of the host. And not to mention the joy of seeing the spread of  so many colorful items on the dinner table!  

Recipe : For 4 people

Cooking time: 30 min

Preparation time: 15 min

Soaking time: 4-5 hours

 Ingredients
  • 1 1/3 cup diced tomatoes
  • 2 cup shredded cabbage or thinly sliced
  • 1/2 cup diced green peppers
  • 1 cucumber diced
  • 6 green hot or kashmiri chillies
  • 1/2 cup finely chopped coriander leaves
  • 1/3 cup lemon juice or one lemon juice
  • IMG_2326
  • 1/16  tsp baking soda
  • 1 1/2 tsp red chilli powder
  • 1/2 tsp turmeric powder
  • 1 tbsp coriander powder
  • 1/4 tsp asofoetida
  • salt to taste 
  • 2/3rd cup oil
  • 6 cups of water to cook rajma
  • 4 whistles to cook rajma
  • 2 more cups of water to be added later on
  • 12 buns
  • Fine gram floursev for garnish ( optional)
  • Butter to grease the buns(optional)

Method:

  • Soak the rajma or red kidney beans,  after washing thrice for 4-5 hours.
  • IMG_2323
  • Add 1/2 tbsp salt and baking soda, 6 cups of water and put to cook in a pressure cooker for 4 whistles on a medium flame.
  • Remove from flame and let it cool.
  • As soon as the pressure is released, open and transfer to a broader container and put to heat.
  • IMG_2331


  • Once it heats up, add asofoetida, turmeric, coriander powder, chilli powder, oil, salt and all the diced vegetables along with lemon juice.
  • Stir and cook for 3-4 minutes. 
  • IMG_2337
  • Garnish with sev.
  • Serve warm with buttered bread, plain bread or toasted buns.
  • IMG_2347


Tips

If there is excess water after the red kidney beans are cooked, you can mash a few red kidney beans in the soup so that it will thicken the consistency.

Tomatoes are best, if sliced just before garnishing, as they tend to release the juice and become soft.

I often use V shaped slicer for shredding cabbage, as it makes it quicker and gives me a uniform thickness to cabbage.

Instinct Factor

If you are feeling more colorful, feel free to add some more sweet red and yellow peppers to red kidney beans soup. Since I am used to the taste from India, Green Capsicums were the only choice of capsicum at that point of time.

Look out for the aroma of boiled kidney beans in the whistles to indicate that is done!

Even if the kidney beans are overcooked, they will still taste great in this dish.

Feel Factor

Chases away the chill on a wet rainy or cold day, with the piping hot rajma kidney beans soup with colorful salad and spices. Its a complete meal for an evening with a buttered bread. Has a lot of wow factor when guests see so many colors together and experience the spicy and tangy taste of red kidney beans soup topped with almost raw salad vegetables. Its a happy feeling to relish a highly nutritious and colorful meal.


[contact-form-7 404 "Not Found"]
[shopeat_button]

Posted on

Triranga Idlis (Tricolor Idlis Rice & Lentil Steamed Cakes)

Inspired by the Independence spirit in air, due to the upcoming 65th republic day of India on January 26, I explored bringing this spirit to cooking. There are various events happening around the town, organized by local Indian Community via IAVA and am looking to forward to celebrating this with total patriotic spirit on 26th January via the Republic day celebrations of IAVA. Something that is simple, colorful, healthy and with a good deal of wow factor as well, is the Triranga Idlis. Triranga name is inspired from the  Indian Flag, which is also fondly called as  ” Triranga”, as it is in tricolor, The colors are in the order of orange, white and green. The white portion in the middle also has a blue circle with spokes, known as Ashoka Chakra. The idli colors are based on the flag. The natural color of idlis is white as it is primarily rice based.  To this I have added carrots for orange and spinach for green. Special quarter coin size idli moulds have been used for the coin size idlis, as these are very appealing to kids and also serve as a good finger bite appetizers in a party. And it also represents the size of the Ashoka Chakra in the middle!

Normally the use of carrots and peas is done as a topping on a rava idli( a variation of idli made from semolina) and I always  found this topping very attractive. To make the entire idli colorful, I have mixed the carrots and spinach with the idli dough, so that  it is visually more appealing, and also it disguises the taste of carrots and spinach, in case someone does not find them appealing. And needless to say, I do have members who dislike carrots. so I am hoping this is one way I can get them to eat carrots!

Idlis are very healthy and nutritious item and considered as an important breakfast item, in southern part of India, from where it originated. Its made of rice and black lentil . It texture is soft and fluffy and can be savored with sambhar( lentil soup) or chutney, which is often coconut based. Coriander based green chutney or just melted butter are other good accompaniments with idli. When idlis are fresh and hot, they taste yummy even if they are not accompanied with anything, specially when they are the size of coin shapes, as they just melt like small coin chocolates into your mouth!! The flavour of carrots mixed into the idli dough, tastes very nice. I topped the spinach based idli with gunpowder or hot chilli dry powder to create a contrasting flavour while eating. This dry idli chutney powder is easily available in Indian grocery stores. My challenge here is to have the pure green color on the spinach after the idlis are steamed..This is an area that needs some more thought…If any of you have any suggestions on retaining the green color please share…

And the verdict from the family members- yes to carrots based idlis, so here’s wishing Indian readers, a great patriotic week and day on 26th January 2014!  

Recipe makes:  64 coin size idlis 

Cooking time : 20 min

Preparation time: 15 min

Passive time: 20 min

Ingredients
  • 1 Gits Instant Idli mix
  • 1 cup baby green spinach or chopped spinach
  • 1/2 cup diced carrots
  • Salt to taste
  • Oil to grease
  • Gunpowder or dry idli chutney powder for garnish (optional)
  • Special Equipment: Coin sized idli moulds, or alternatively regular sized idli mould trays and Idli cooker
Method   
  • Put 3 cups of water to boil.
  • Boil chopped spinach for 4 min.
  • Strain the spinach, using a tea strainer, which is easy to lift off.
  • Re use the same water and boil carrots in it for 7 min.
  • Strain the carrots.
  • Grease the idli mould with a few drop of oil. You can skip this step if you would like to cut the calories. The pic here shows idli steamed without the initial grease. Greasing helps to remove the idli smoothly from the mould.
  • Put to boil 1 litre of water inside the idli cooker, and cover the cooker with  a lid. Put this at near high flame, on your second highest burner.
  • Pour the content of the mix into a wide and deep bowl. I often use a Large Prep Bowl.
  • In a separate bowl, mix water and oil.
  • With one hand pour the water/oil mix, at a medium pace in to the large prep bowl, and with the other hand, circularly agitate or stir vigorously the idli mix, as the water is being poured. This step is crucial to idlis being fluffy.
  • Continue doing this for about couple of minutes, and you will see the idli mix rising.
  • Divide the idli dough equally into three bowls.
  • Add spinach to one portion and add carrot to other.
  • Using hand blender or normal blender, thoroughly mix spinach with its portion of idli dough.
  • Do the same for the carrot and idli dough. 
  • Pour this mixture into the idli moulds, almost up to the edge. For coin sized idlis you will need idli moulds of that size. The pic here shows the idli mix poured in a regular size idli mould, as I forgot to take pics of the coin sized idlis..
  • IMG_2377
  • Lower the gas flame, open the idli cooker with caution using a towel or oven glove.
  • Put the idlis moulds with dough, inside the idli cooker
  • Cover with the lid and raise the flame to high.
  • Cook for 20 minutes and then switch off the flame.
  • For further 20  minutes, keep the the cooker closed.
  • Then slowly open the cooker, remove the idli moulds
  • Wait for about 20 seconds, and then using a butter knife slowly release the idlis from its outer edge.
  • Serve with chutney. lentil soup or sambhar,  or eat it with a dash of melted butter/clarified butter(ghee) ,which is also equally delicious.

 IMG_2382


 Tips

Instead of carrots, you can even add tomato puree about 1 tbsp to get the orange color and different flavor. I prefer using the instant dough mix, but the same can be added in relative proportion to the fermented dough recipe too.

Instinct Factor

The amount of water needed in the idli mix depends on the water hardiness of your area. Increase the water content if idlis are hard and reduce if they are too wet  and slippery after cooking.

Feel Factor

Have fun by adding colors of your choice to an  otherwise regular dish in white. A visually appealing, healthy, kid friendly idlis and a new way of presenting the well known rice lentil idlis. The texture of idlis is soft and smooth. The spinach idli has a little dense flavour, while carrot is light and fun, and plain white idlis is the original light fluffy healthy meal in a lot of households.  

[contact-form-7 404 "Not Found"]
Posted on

Green Lentil Dosa Crepes

The texture of green lentil dosa, is similar to the salted crepes known in the western world. A combination of split skinned green and yellow lentils with green chillies, lucknowi mithi fennel seeds and coriander creates an inviting and refreshing flavor on a crispy crepe. Traditionally dosas are rice and black lentil based and requires fermentation time. This recipe comes from Rajasthan, where it is known as Dal Childa and is often considered as a healthy breakfast option. It does not need fermentation time, has a lot more fibre and is good protein booster. When served with a yogurt accompaniment, it aids the lentils to become protein. They are easy to make as they don’t stick to the pan and so can be easily lifted and cooked. The texture and taste of this dosa or childa may remind you of Adai, a southern indian delicacy.

This can be a great dinner option too, as it is  light, fulfilling to taste, easy to make  and fennel seeds and coriander add a refreshing taste that gives it a unique flavor.


Recipe Makes 12-15  Dosa Crepes 

Cooking Time: 20 min

Preparation Time: 5 min

Soaking TIme : 2 hours

Ingredients
  • 1 cup split green lentils(skinned and split moong dal)
  • 1 cup yellow split lentils(yellow moong dal)
  • 4-5 green chillies
  • 2 tbsp chopped coriander
  • 1/2 tsp fennel seeds (lucknowi mithi saunf)
  • Salt to taste
  • Pinch of asofoetida
  • Oil to grease.
Method
  • Mix both the lentils in  a pan, and wash them thrice in plenty of water, draining water everytime.
  • Add  4 cups of water and soak for 2-3 hours.
  • Remove half of the remaining water from the soaked lentils.
  • In a mixer/food processor, grind the lentil along with the balance water for about 4-5 min.
  • Add  chopped chillies and grind for further 2 min.
  • Remove the lentil mix from the food processor into a bowl.

IMG_2388


  • Add salt, asofoetida, chopped coriander and fennel seeds and mix thoroughly.
  • Put a thin round pan/griddle  to heat on medium high flame.
  • Grease the pan with dots of oil
  • Take 1/3 rd cup of lentil mix and pour it in the center.
  • Use a crepe tool or use a hollow spoon with round base and spread it evenly into 7-8 inch circle.
  • IMG_1742
  • Make sure that there are no lumps in the center.
  • Dot with oil on the edges of the crepe dosa and also a few dots on the top.
  • Cook on a medium flame and wait for the edges to turn golden brown.
  • Using a spatula, release the crepe from the sides first.

IMG_1743


  • Then flip it over and cook on the other side till golden brown spots appear.

IMG_1746

  • Roll the crepe and serve with green chutney or plain yogurt or pickle.


Tips

The pan should be well heated in order to have a nice uniform brown color.

The consistency of lentil mix paste, if found too thick, can be diluted with some extra water.

If you prefer crepes with a very soft texture,  add 1 tsp gram flour and 1 tbsp yogurt after the grinding of the lentils. 

Instinct Factor

Watch for the browning of the edges of the dosa to know that it  is done. And start releasing if from the edges and then go to the center to lift off. 

Feel Factor 

When combined with green chutney or pickle, it is possible to consume multiples of these at a time, as they are thin and light and somehow the guilt of calories is overshadowed by the fact that this is a good protein booster that you are consuming. Also it is closest to satisfying the craving for a Dosa, that can be made fresh easily and quickly, at your convenience.

[contact-form-7 404 "Not Found"]


Posted on

Sabudana (mildly spiced Tapioca Pearls)

Sabudana or better known as Tapioca Pearls,  is an integral part of meals on holy fasting days in India, as it is  considered to be one of the purest form of starch. In the western world, we often see this as  a part of pudding, or bubble tea, but in Maharashtra, India, this is a staple breakfast item. Often it has potatoes added to the item, but I decided to exclude them, as it is already loaded with starch, and also follow my Jainism belief of avoiding root vegetables. Not having potatoes, also makes it faster to prepare!

Often people admire this dish, but are wary of cooking it, as it has a reputation of becoming sticky. The trick of getting it right and feeling every individual pearl as you savor this dish, lies in the soaking and not cooking! The flavor of green chillies and crushed peanuts, keeps it light and it is a  fulfilling breakfast dish and a favorite in my family. It is so easy to cook, you probably would not mind cooking it, even if you have an  early morning flight to catch!

Recipe : 3 people

Cooking time:  15 min

Preparation time: 7 min

Soaking time : Overnight or 8/10 hours


Ingredients
  • I cup Tapioca Pearls or Sabudana
  • 3/4 cup of crushed roated peanut powder
  • 1 tbsp oil
  • 2 small green chillies, finely chopped
  • 1/4 tsp cumin seeds
  • Pinch of Asofoetida
  • 4-5 curry leaves
  • Few drops of lemon
  • Coriander leaves to garnish
Method
Washing/Soaking
  • Take the broadest pan you have
  • Put the Tapioca pearls in to wash.
  • Fill the pan with water and very gently rinse the seeds.
  • Remove the dirty water. Repeat this process thrice.
  • The fourth time , fill so that the water level appears to be a thinly coated layer atop the Sabudana.
  • Cover it with a lid and let it soak for 8/10 hours.

Cooking

  • Add the roasted crushed peanuts to the soaked sabudana and mix it thoroughly with gentle hands.
  • Heat the oil in a broad pan over a medium high flame.
  • Crush the cumin seeds in your palm and add to oil
  • Wait for it to become golden brown.
  • Add finely chopped green chillies and stir
  • Add curry leaves (gently crushed) to the oil.
  • Add a pinch of asofoetida
  • Add the sabudana/peanut mix to the oil and gently stir for a minute.
  • Add salt to taste and stir for another minute.
  • Sprinkle few drop of water on the top.
  • Cover with a lid and put on slow medium flame to cook for 1o minutes, gently stirring after 5-7 minutes.
  • Squeeze a few lemon drops, stir , cover and cook for 2- 3 minutes.
  • Switch off the flame, and let it rest for 5-7 minutes.
  • Garnish it coriander and serve with yogurt or savor it alone.


Tips

Using a thick bottom vessel for cooking Tapioca will not let it stick at the base.

Instinct factor

Gauging the water level  for soaking of  Sabudana.

Feel factor

There is always a feeling of accomplishment,when you have each and every Tapioca Pearl  well cooked, soft, and remaining as an individual pearl. The crushed peanut flavor with spices is simply yum and  I prefer to eat this with plain yogurt. This dish feels like a fusion of Indian/Thai Cuisine.


IMG_2112


[contact-form-7 404 "Not Found"]


[shopeat_button]

Posted on

Rice/Bengal Gram Dal Pulao

As a Jain follower, we have certain days of the month where we avoid green vegetables totally, and eat only grains/lentils/fruits/dried fruits.  This implies a compulsory high fruit and protein rich diet, that leads to healthy living. This dish is one of my favorites to make on these kinds of days. The yogurt soup has the flavor of spiced up buttermilk, which is light on the stomach and can be quickly done in under five minutes and served instantly.

It recently dawned on me that eating only lentil & grain based diet on such days, leaves me a lot of time at hand to spare, as chopping vegetables, sauteing and cleaning up after that is  reduced. This definitely gives me more time on such days, particularly to catch up on my non-fiction reading.  In my opinion, this  is how religion sometime succeeds  through rituals,  in  simplifying  your daily tasks and routines.

Today’s selection is a Rice/Chana Dal (Bengal Gram Dal) Pulao. The traditional name of this dish is Baraj and this dish also happens to be a favorite rice pulao of my sister. The pulao is fragrant and spicy with the sweetness of cinnamon and zing of the cloves and black pepper. Chana dal is found to be extremely useful for diabetic patients per http://www.mendosa.com/chanadal.html

Recipe: 3 people

Cooking time : 20 min

Preparation time:  20 min

Ingredients by Volume
  • 1 cup rice
  • 3/4 cup chana dal (Bengal Gram)
  • 1/2 tbsp clarified butter (Ghee)
  • 10 cloves
  • 10 whole black pepper
  • 1 large stick of cinnamon
  • 2 dried red chillies
  • 6 whole cashews
  • pinch of asofoetida
  • salt 3/4 tbsp approx.
  • 4 cups of water

Method

  • Wash the rice thrice in plenty of water, in fresh water every time.
  • Add the bengal gram dal.
  • Add 4 cups of water to the rice/dal mix and let it soak for half an hour.
  • In a small frypan, put ghee to heat on medium high flame.
  • Once the ghee melts, add cloves.
  • Wait for cloves to become big.
  • Add cinnamon stick and wait for it to double in size.
  • Add dried red chillies to this.
  • Stir for 30 seconds
  • Add cashews and stir till golden brown.
  • Add pinch of asafoetida
  • Remove from flame.
  • Add the above seasoned tempering to the rice/lentil mix.
  • Cook the rice/dal/tempering mix on medium high flame for 4 whistles.
  • When its done, you should smell the aroma of ghee/cinnamon/cloves.
  • Switch off the flame when done, and let it rest for 15 minutes.
  • Serve with plain yogurt or yogurt soup.[aio_button align=”none” animation=”none” color=”yellow” size=”small” icon=”search” text=”Recipe” relationship=”dofollow” url=”http://cookingbyinstinct.com/yogurt-soup-spiced-buttermilk/”]
Tips

If you do not have the rice cooker that whistles, you can use the electric rice cooker with the same proportion of water. Alternatively, you can put the same in an open deep pan with about 3 cups of water on  a slow to medium flame and cover it with a lid and cook till rice and dal are soft and excess water evaporates.

Instinct factor

When cooking in a pan, feel the rice/dal  for its softness, and trust yourself on the aroma of the cooked rice.

Feel factor

A fragrant aromatic combination of buttered rice flavored with bengal grams, cinnamon, cloves, dried red chillies and black whole peppers is a simple meal that is also considered to be a complete everyday meal in many Indian households, specially when combined with yogurt.

[contact-form-7 404 "Not Found"]

 
[shopeat_button]

Posted on

Idlis (Steamed Rice/Lentil Cake) using Instant Mix

Hot steamed  rice Idlis with chutney is a great weekend breakfast and can be made easily even if you do not have fermented dough at your disposal . From the various instant mixes available, the one I have found best to work at  all times is Gits Idli mix, available in most Indian Grocery Stores or even can be ordered from Amazon too! Often we have found this to be a better  option than eating restaurant Idlis, where the Idli dough might be stale or over fermented and sour. This is a very easy recipe for an extremely healthy nutritious breakfast, and  an ideal choice to swap donut or a muffin for a healthy Idli – per SFGate article http://healthyeating.sfgate.com/nutrition-idli-2667.html.

 Recipe :  18 Idlis

Cooking time 40 min

Preparation time 7 min

Special Equipment needed- Idli cooker with idli mould plates [aio_button align=”none” animation=”bounce” color=”brown” size=”small” icon=”shopping-cart” text=”Shop” relationship=”dofollow” url=”http://www.amazon.com/Happy-Stainless-Steel-Cooker-Maker/dp/B008PY88AM/ref=sr_1_4?ie=UTF8&qid=1386471001&sr=8-4&keywords=idli+maker”]


Ingredients by Volume

  • 1 pack Gits  Idli mix (200gms  or 7 oz) [aio_button align=”none” animation=”bounce” color=”brown” size=”small” icon=”shopping-cart” text=”Shop” relationship=”dofollow” url=”http://www.amazon.com/Gits-Idli-Mix-200g/dp/B004XTCMEG”]
  • 2 cups water
  • 1 tbsp oil
  • Oil to grease the idli mould


Method
  • Grease the idli mould with a few drop of oil. You can skip this step if you would like to cut the calories. The pic here shows idli steamed without the initial grease. Greasing helps to remove the idli smoothly from the mould.
  • Put to boil 1 litre of water inside the idli cooker, and cover the cooker with  a lid. Put this at near high flame, on your second highest burner.
  • Pour the content of the mix into a wide and deep bowl. I often use a Large Prep Bowl.
  • In a separate bowl, mix water and oil.
  • With one hand pour the water/oil mix, at a medium pace in to the large prep bowl, and with the other hand, circularly agitate or stir vigorously the idli mix, as the water is being poured. This step is crucial to idlis being fluffy.
  • Continue doing this for about couple of minutes, and you will see the idli mix rising.
  • As soon as you see white foam and the dough rising, pour this mixture into the idli moulds, almost up to the edge.
  • Lower the gas flame, open the idli cooker with caution using a towel or oven glove.
  • Put the idlis moulds with dough, inside the idli cooker
  • Cover with the lid and raise the flame to high.
  • Cook for 20 minutes and then switch off the flame.
  • For further 20  minutes, keep the the cooker closed.
  • Then slowly open the cooker, remove the idli moulds
  • Wait for about 20 seconds, and then using a butter knife slowly release the idlis from its outer edge.
  • Serve with chutney or eating it with a dash of melted butter/clarified butter(ghee) is also equally delicious.

 Tips

If you have left over idlis, you can cut them into 1/3 inch wide strips, and fry them in deep oil to golden brown color at medium to high flame.. This is a crunchy idli snack bite and you can top it with chaat masala or black pepper. Idlis  are great for school lunches, meals or appetizers.

If you do not have access to Idli cooker, you can try the same in  Aebleskiver pan. Put water  in a deep pan. lay the Absekier pan on top, and this should be wider then the water pan, so that steam does not get lost.  Cover the Absekier pan with a dome kind of lid so that the steam is trapped inside.

Instinct Factor

The water hardiness determines the quantity of water you need for the mix. This recipe is based on the US density of water. If the Idlis are not soft, you can modify, to add 1/4 cup more water and hopefully this should make it more fluffier.

Feel Factor

A feel good breakfast, as besides it  being healthy, easy and extremely nutritious, it has a light and fluffy look and taste and also gives you extra relaxing time on a weekend morning !

[contact-form-7 404 "Not Found"]
[shopeat_button]

Posted on

Snowflake Chocolate Strawberries

Snow Flakes Strawberry

Watching snowflakes falling is a highly mesmerizing moment for me, and on a cold winter day, a bar of chocolate is always desirable. So, I thought of making a romantic moment come alive, with strawberries, chocolate and coconut snowflakes! The crunchy cold coconut on chocolate was a delightful taste to linger and savor on.

Recipe :  20 Strawberries

Ingredients
  • 1  (3.5) oz  bar of milk chocolate bar
  • 1/3rd  bar of  (3.5) oz of  dark/semi sweet chocolate
  • 2 tbsp shredded dry coconut
  • 1 pound washed strawberries
  • Toothpicks
  • Styrofoam /Thermocol  Thick sheet (12″ * 18″ in dimension at least 1/3rd ” thick)
Method
  • Take a microwave safe bowl- preferably a glass one.
  • Break the milk chocolate bar into small pieces into the microwave bowl.
  • Heat the milk chocolate at  high power setting
  • Stir at every 30 seconds until completely melted.
  • Remove from microwave.
  • Break the 1/3rd dark/semisweet bar into half.
  • Add them to the already melted chocolate and keep stirring .
  • Stir till no lumps are left and its a smooth flowing mixture.
  • Pour the mixture into a deep small bowl, so as to easily dip the strawberry.
Dipping the Strawberries
  • Take a toothpick, and insert into the  strawberry from the top till 2/3 of the way.
  • Hold the strawberry from the toothpick and dip it 2/3 of the way into the mixture.
  • Swirl the strawberry 3-4 times to get a thick coating of chocolate
  • Turn it upside down , and keep swirling till the tail of the strawberry is invisible.
  • You can tilt the strawberry a  little bit, to make the tail invisible.
  • Then insert the upside down strawberry into the styrofoam sheet , till it remains steady and straight.
  • Repeat for all remaining strawberries.
  • Sprinkle the desiccated dry coconut onto the strawberries to give the snowflake effect.
  • Refrigerate the Styrofoam Sheet containing strawberries for couple of hours.
  • Remove the toothpicks before serving the chilled strawberries

Tips

If the chocolate mixture cools and starts thickening, you can microwave it for 10 sec, stir and re- use. Make sure your strawberries are firm, so as to hold the toothpick.  Better to sprinkle more coconut then less, as it will fall off. You can also keep the leaves on  the strawberries,  to give the Godiva Strawberries Look!

Instinct Factor

Swirling technique comes with practice, but if you have ever roasted marshmallows on fire, you are well trained to dip the chocolates!

Feel Factor

Classy  romantic dessert readily available in your kitchen!


[contact-form-7 404 "Not Found"]


[shopeat_button]

Posted on

Vegan Chocolate Chip Cookies

Welcoming fall with the aromatic smell of cookies baking in your home, puts you in the mood of holiday cheer and honing your baking skills. It inspires you to try something new this season. The recipe is my teenage daughter’s favorite and whenever she feels like exploring in the kitchen, this is her go to recipe. Achieving this measurement went through rounds of trial and error, but the end result was loads of smiles and baking memories!

Recipe :  15 Cookies

Cooking time  : 30 minutes

Preparation time : 15 minutes

Ingredients
  • 2 cups unbleached all purpose flour [aio_button align=”none” animation=”bounce” color=”gray” size=”small” icon=”shopping-cart” text=”Shop” relationship=”dofollow” url=”http://www.kingarthurflour.com/shop/items/king-arthur-unbleached-all-purpose-flour-5-lb”]
  • 3/4 cup canola oil
  • 1  1/2 cup. brown sugar
  • 2 teaspoons baking powder
  • 2 teaspoon vanilla imitation essence
  • 1/2 teaspoon salt
  • 2 1/2 teaspoon dark cane syrup
  • 1/2 teaspoon cinnamon powder
  • 60ml water
  • 1/3 cup chocolate chips
Method
  • Mix everything , make 15 round balls
  • Flat the rounds and  place on baking tray lined with parchment paper.
  • Keep 2 inches difference between two flat rounds
  • Put some chocolate chips on top of the flat round
  • Pre heat convection oven at 375 degrees
  • Bake for 5 min  on top rack
  • Rotate 180 degrees
  • Bake 4 min on the bottom rack
  • Rotate again 180 degrees and move to top rack
  • Back for next 2 min
  • Open the oven for 10 sec
  • Bake for another 3 min
  • Remove from oven
  • Shift cookies on cooling rack
  • Cool for 5 min
  • Store the cookies in airtight container.

Tips

Storing immediately in  airtight container will keep it fresh and moist. Rotating cookies keeps the baking even at all levels.

Instinct Factor

Brown color to your desire. the cookies will darken a bit after cooling.

Feel Factor

Perfect start to Fall baking and Holiday Celebrations with soft crunchy cookies!


[contact-form-7 404 "Not Found"]
[shopeat_button]