Posted on

Khandvi Bengal Gram Rolls

Khandvi Bengal Gram Rolls is a delicacy from Gujarat. It is often a staple item in Jain Gujarati family for sure. This is often a part of the menu when a Jain household is observing its no vegetable day. On these days, items are often made from lentils.  This is very easy to make, but looks quite complicated, and that is the cool part of this recipe. I have listed the traditional Jain way of making this, which does not use buttermilk, as often mentioned in other recipes.  A  Jain follower observes not to mix Bengal Gram and Buttermilk together, unless the buttermilk is cooked first. I’ve also seen my mother make this with lemon, as we observed this rule very strongly when growing up.  I feel the lemon in it, and it gives it an ultra smooth and thin texture that looks more delicate and elegant, as compared to what is commercially available.

When I got married, this is one of the appetizers my in-laws were curious to know if I could make it! This delicacy is a signature hallmark of a Jain Gujarati family.

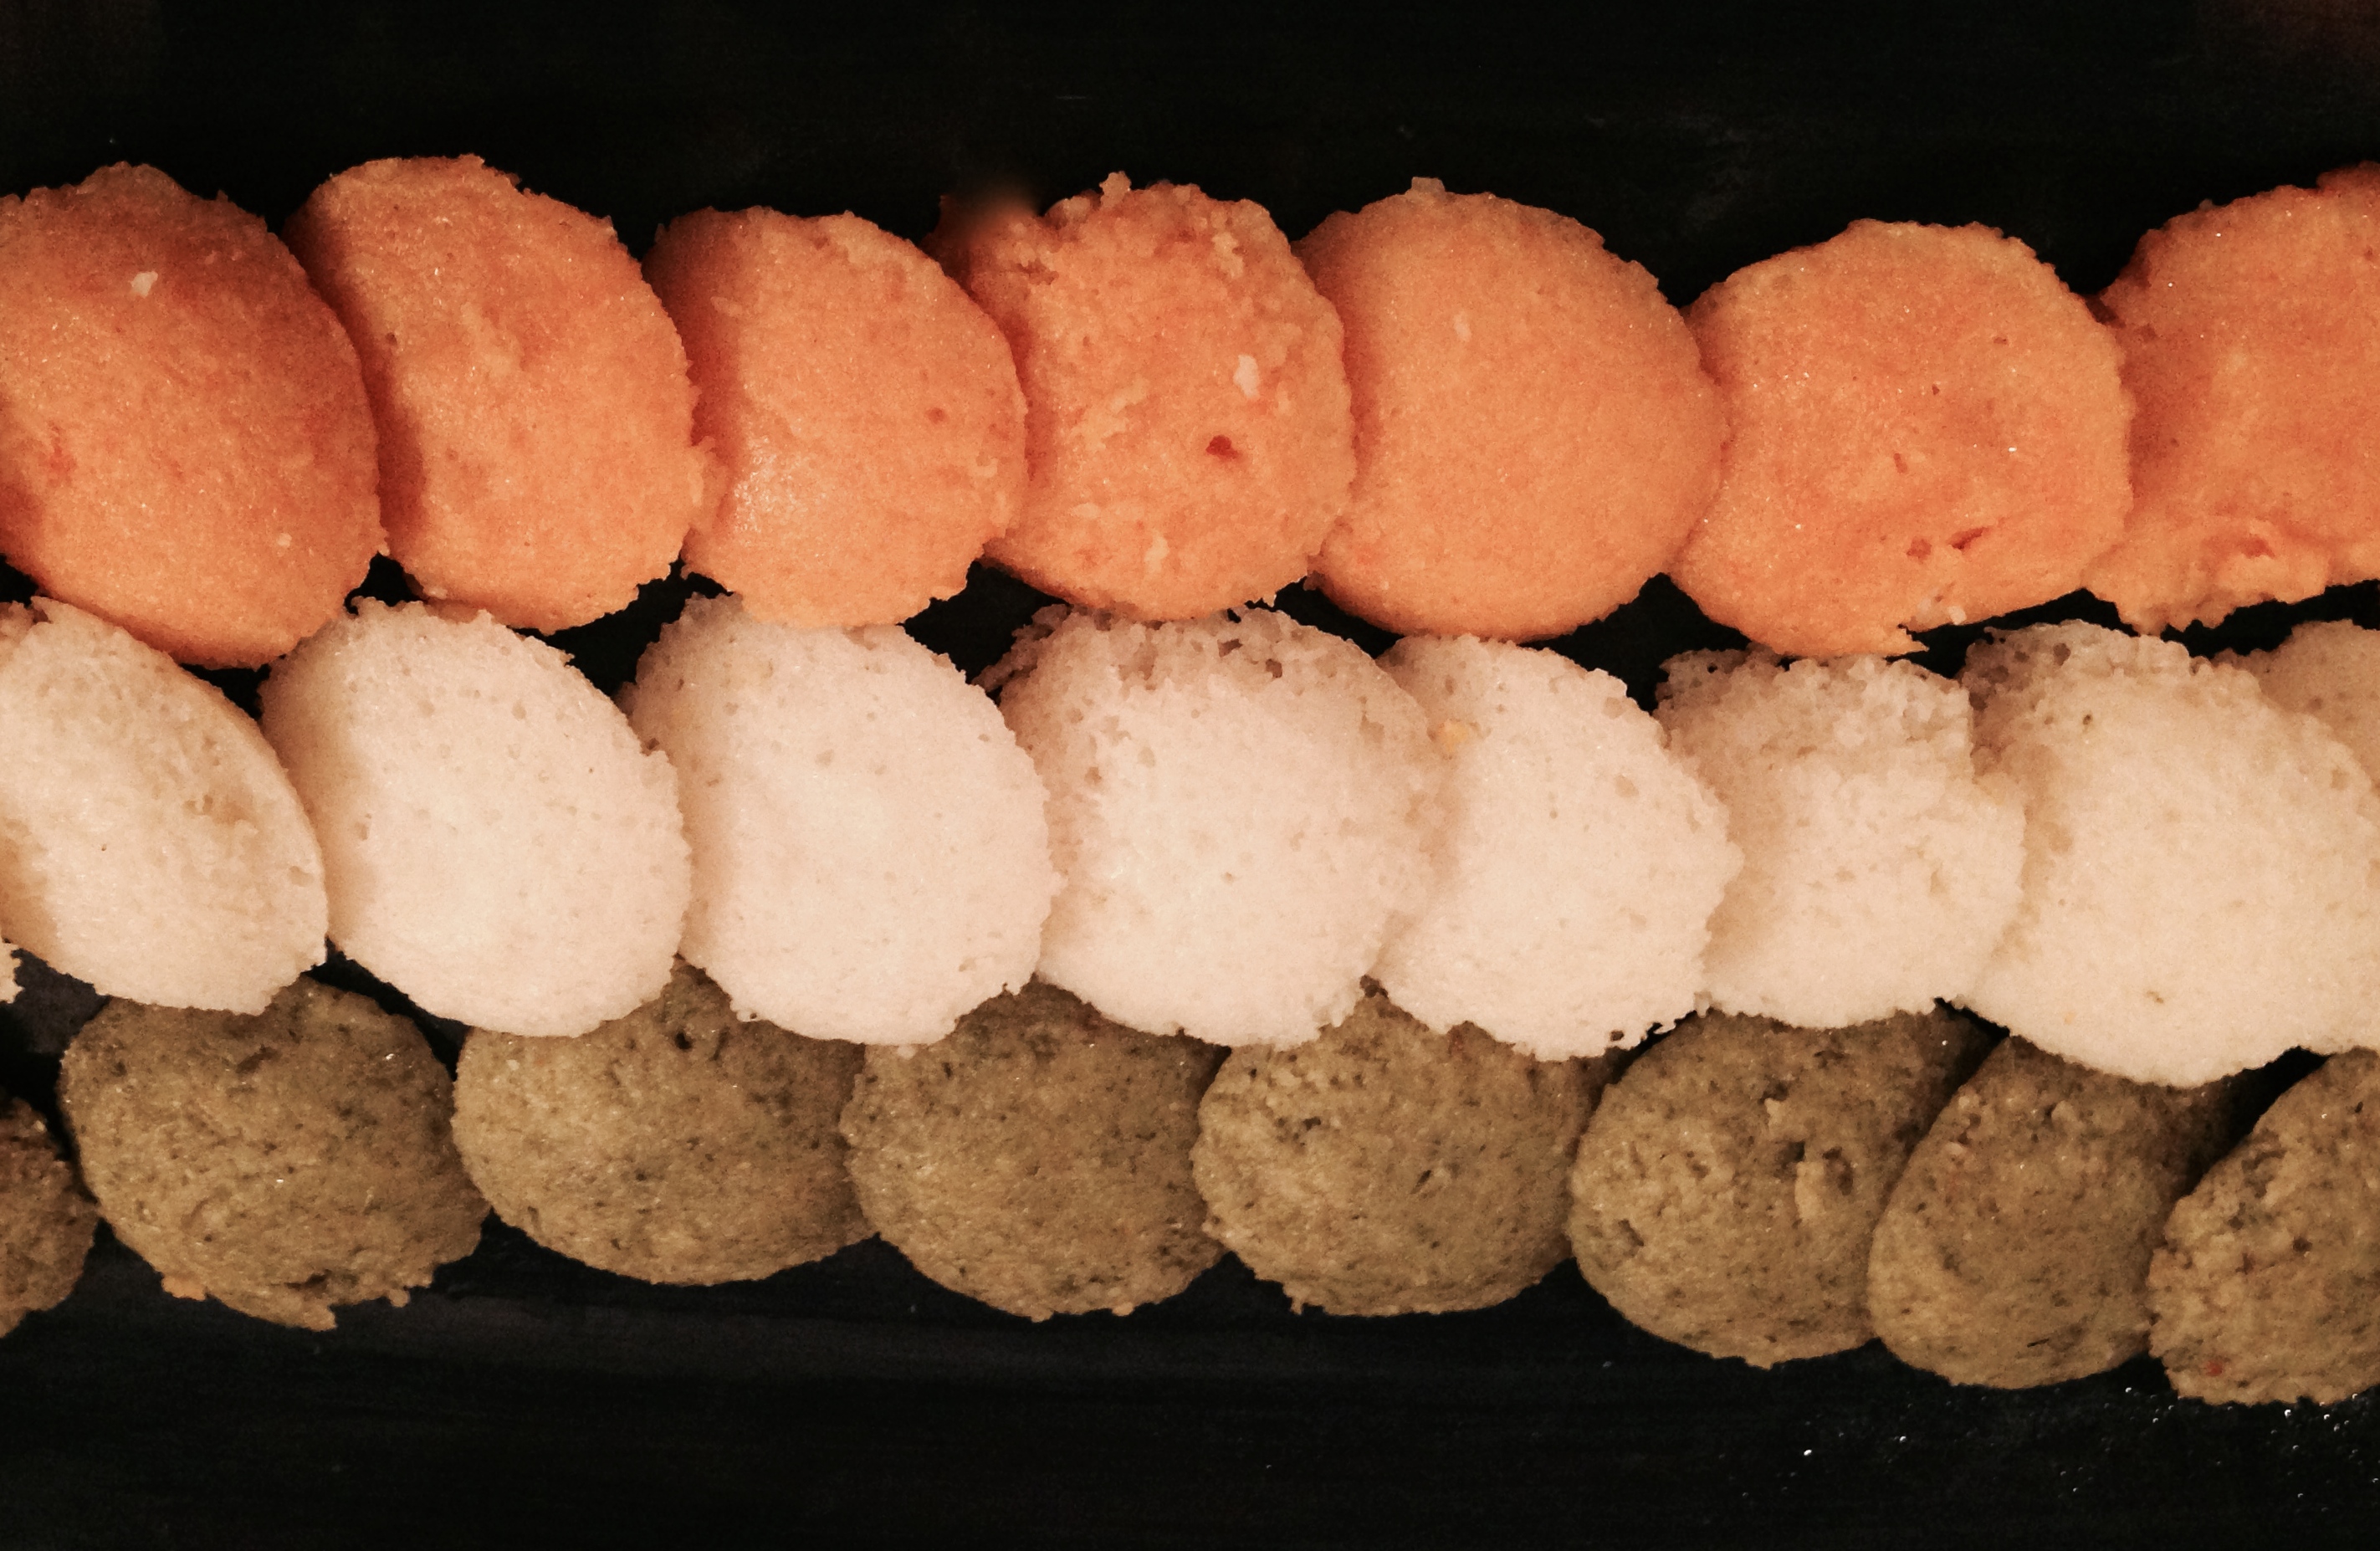
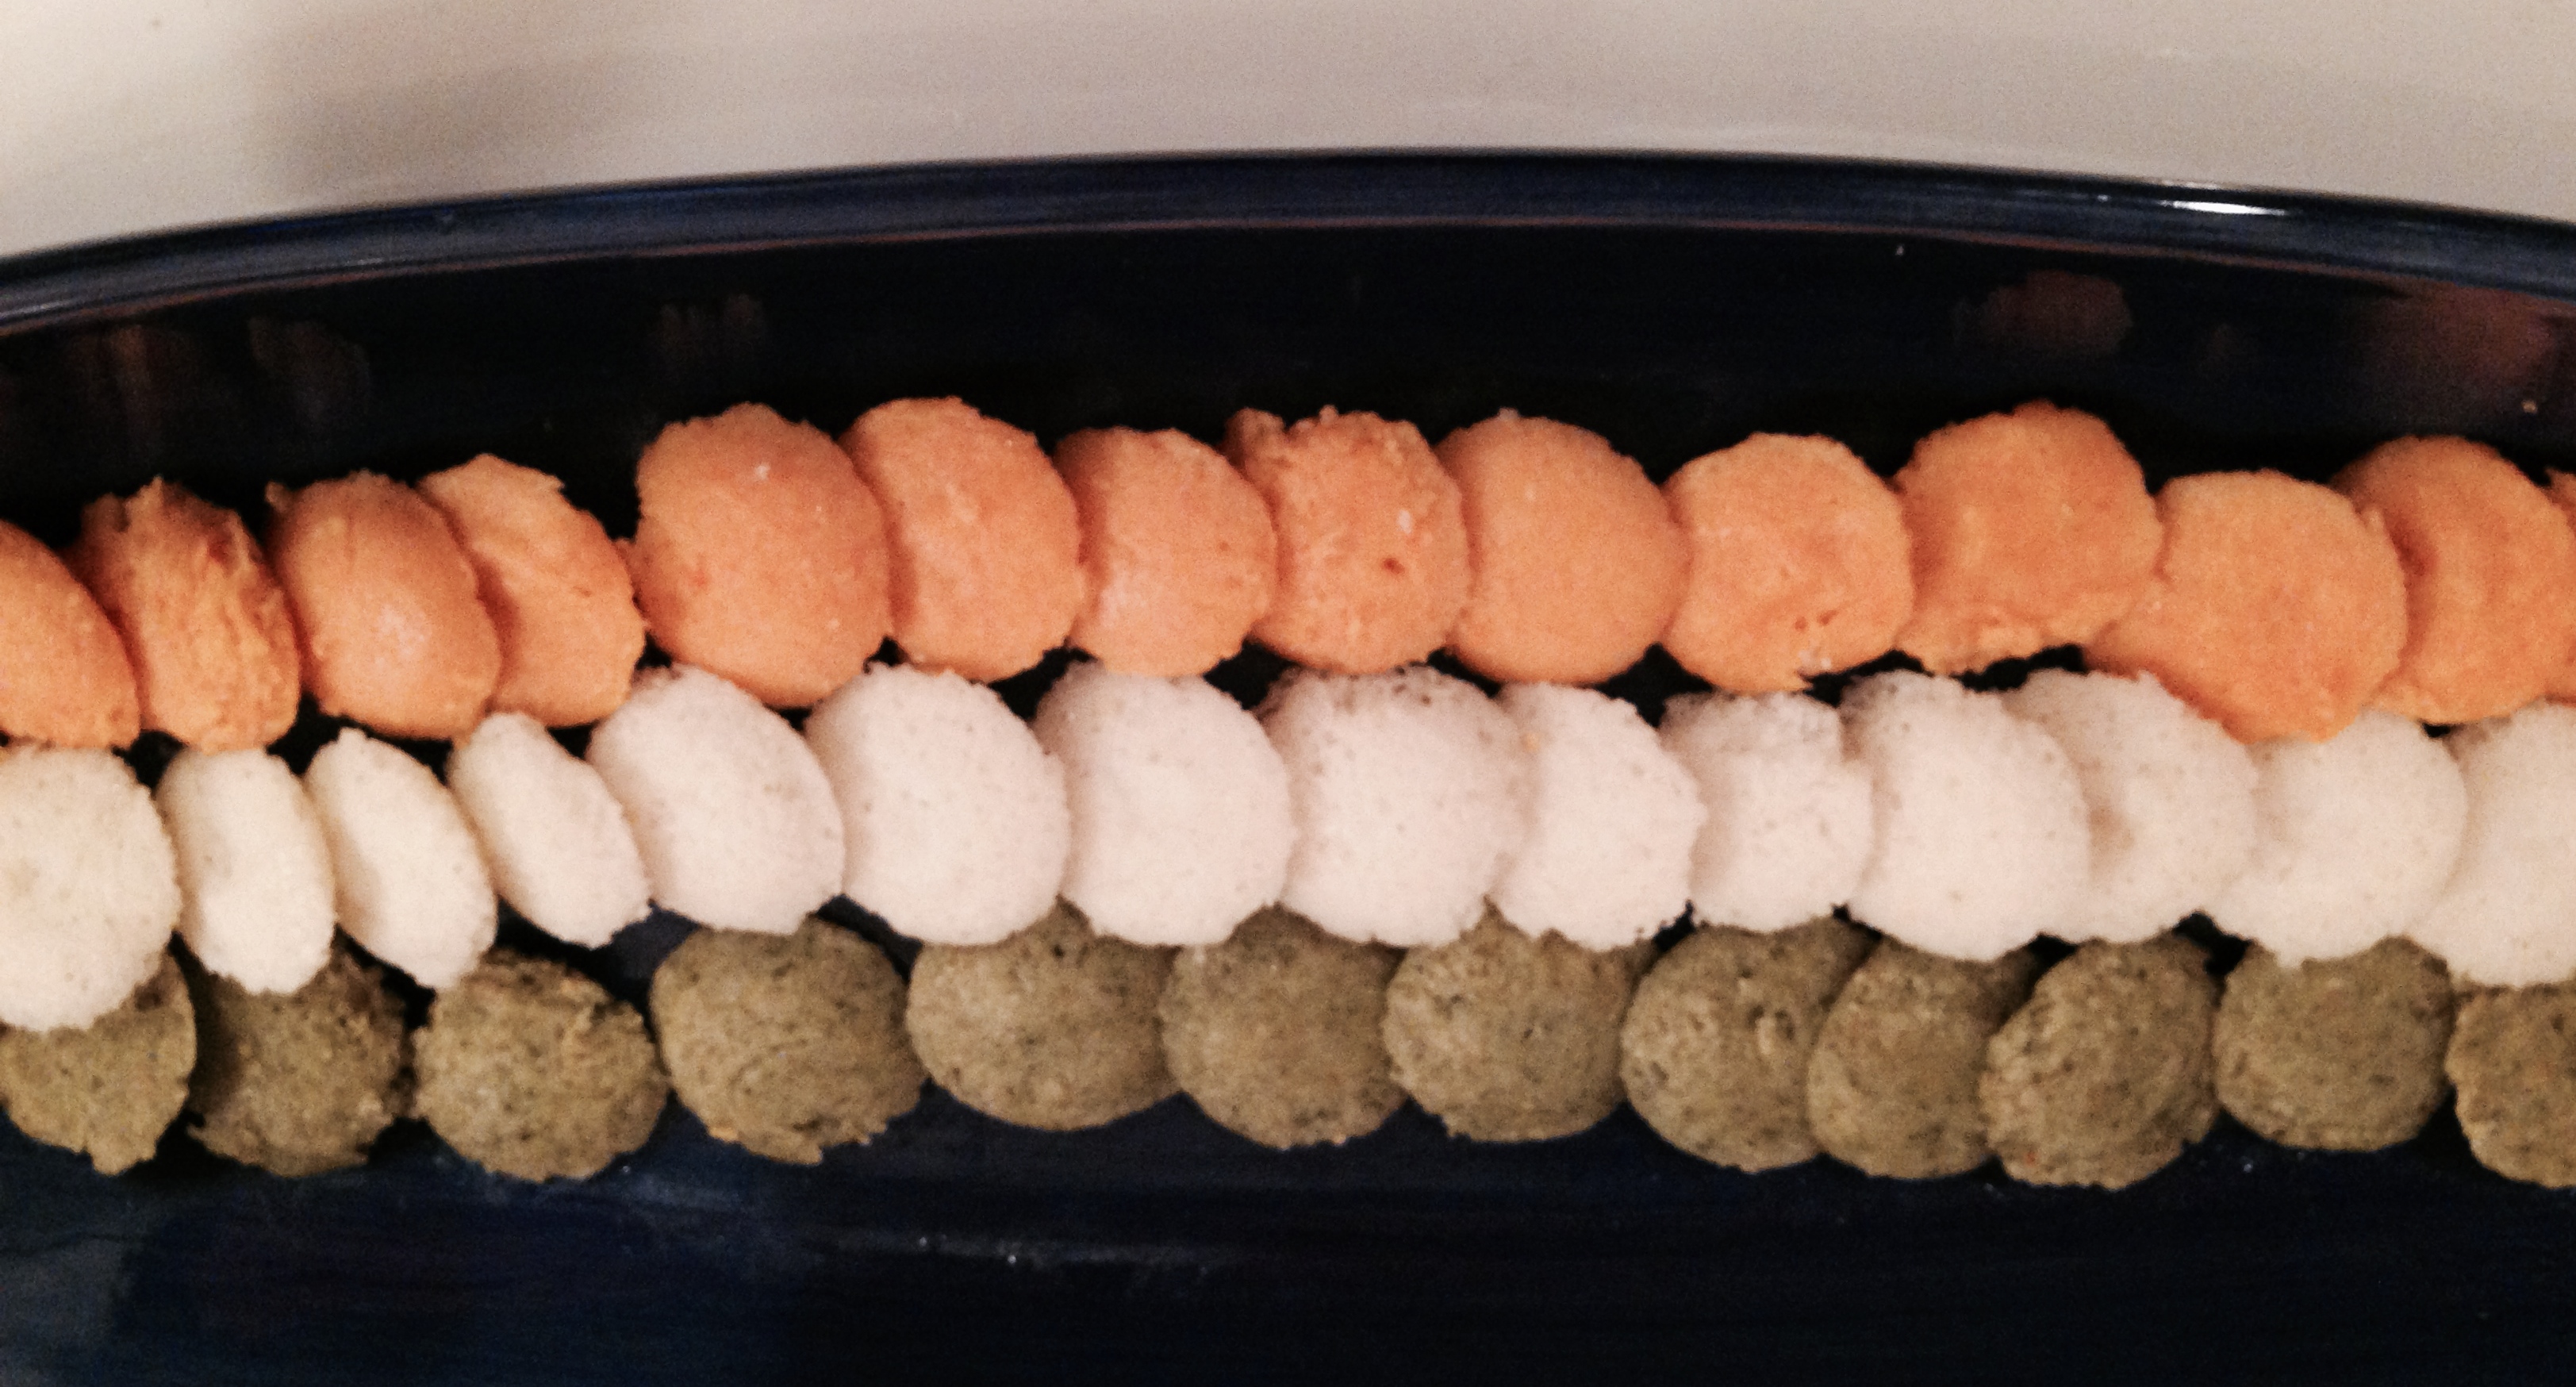
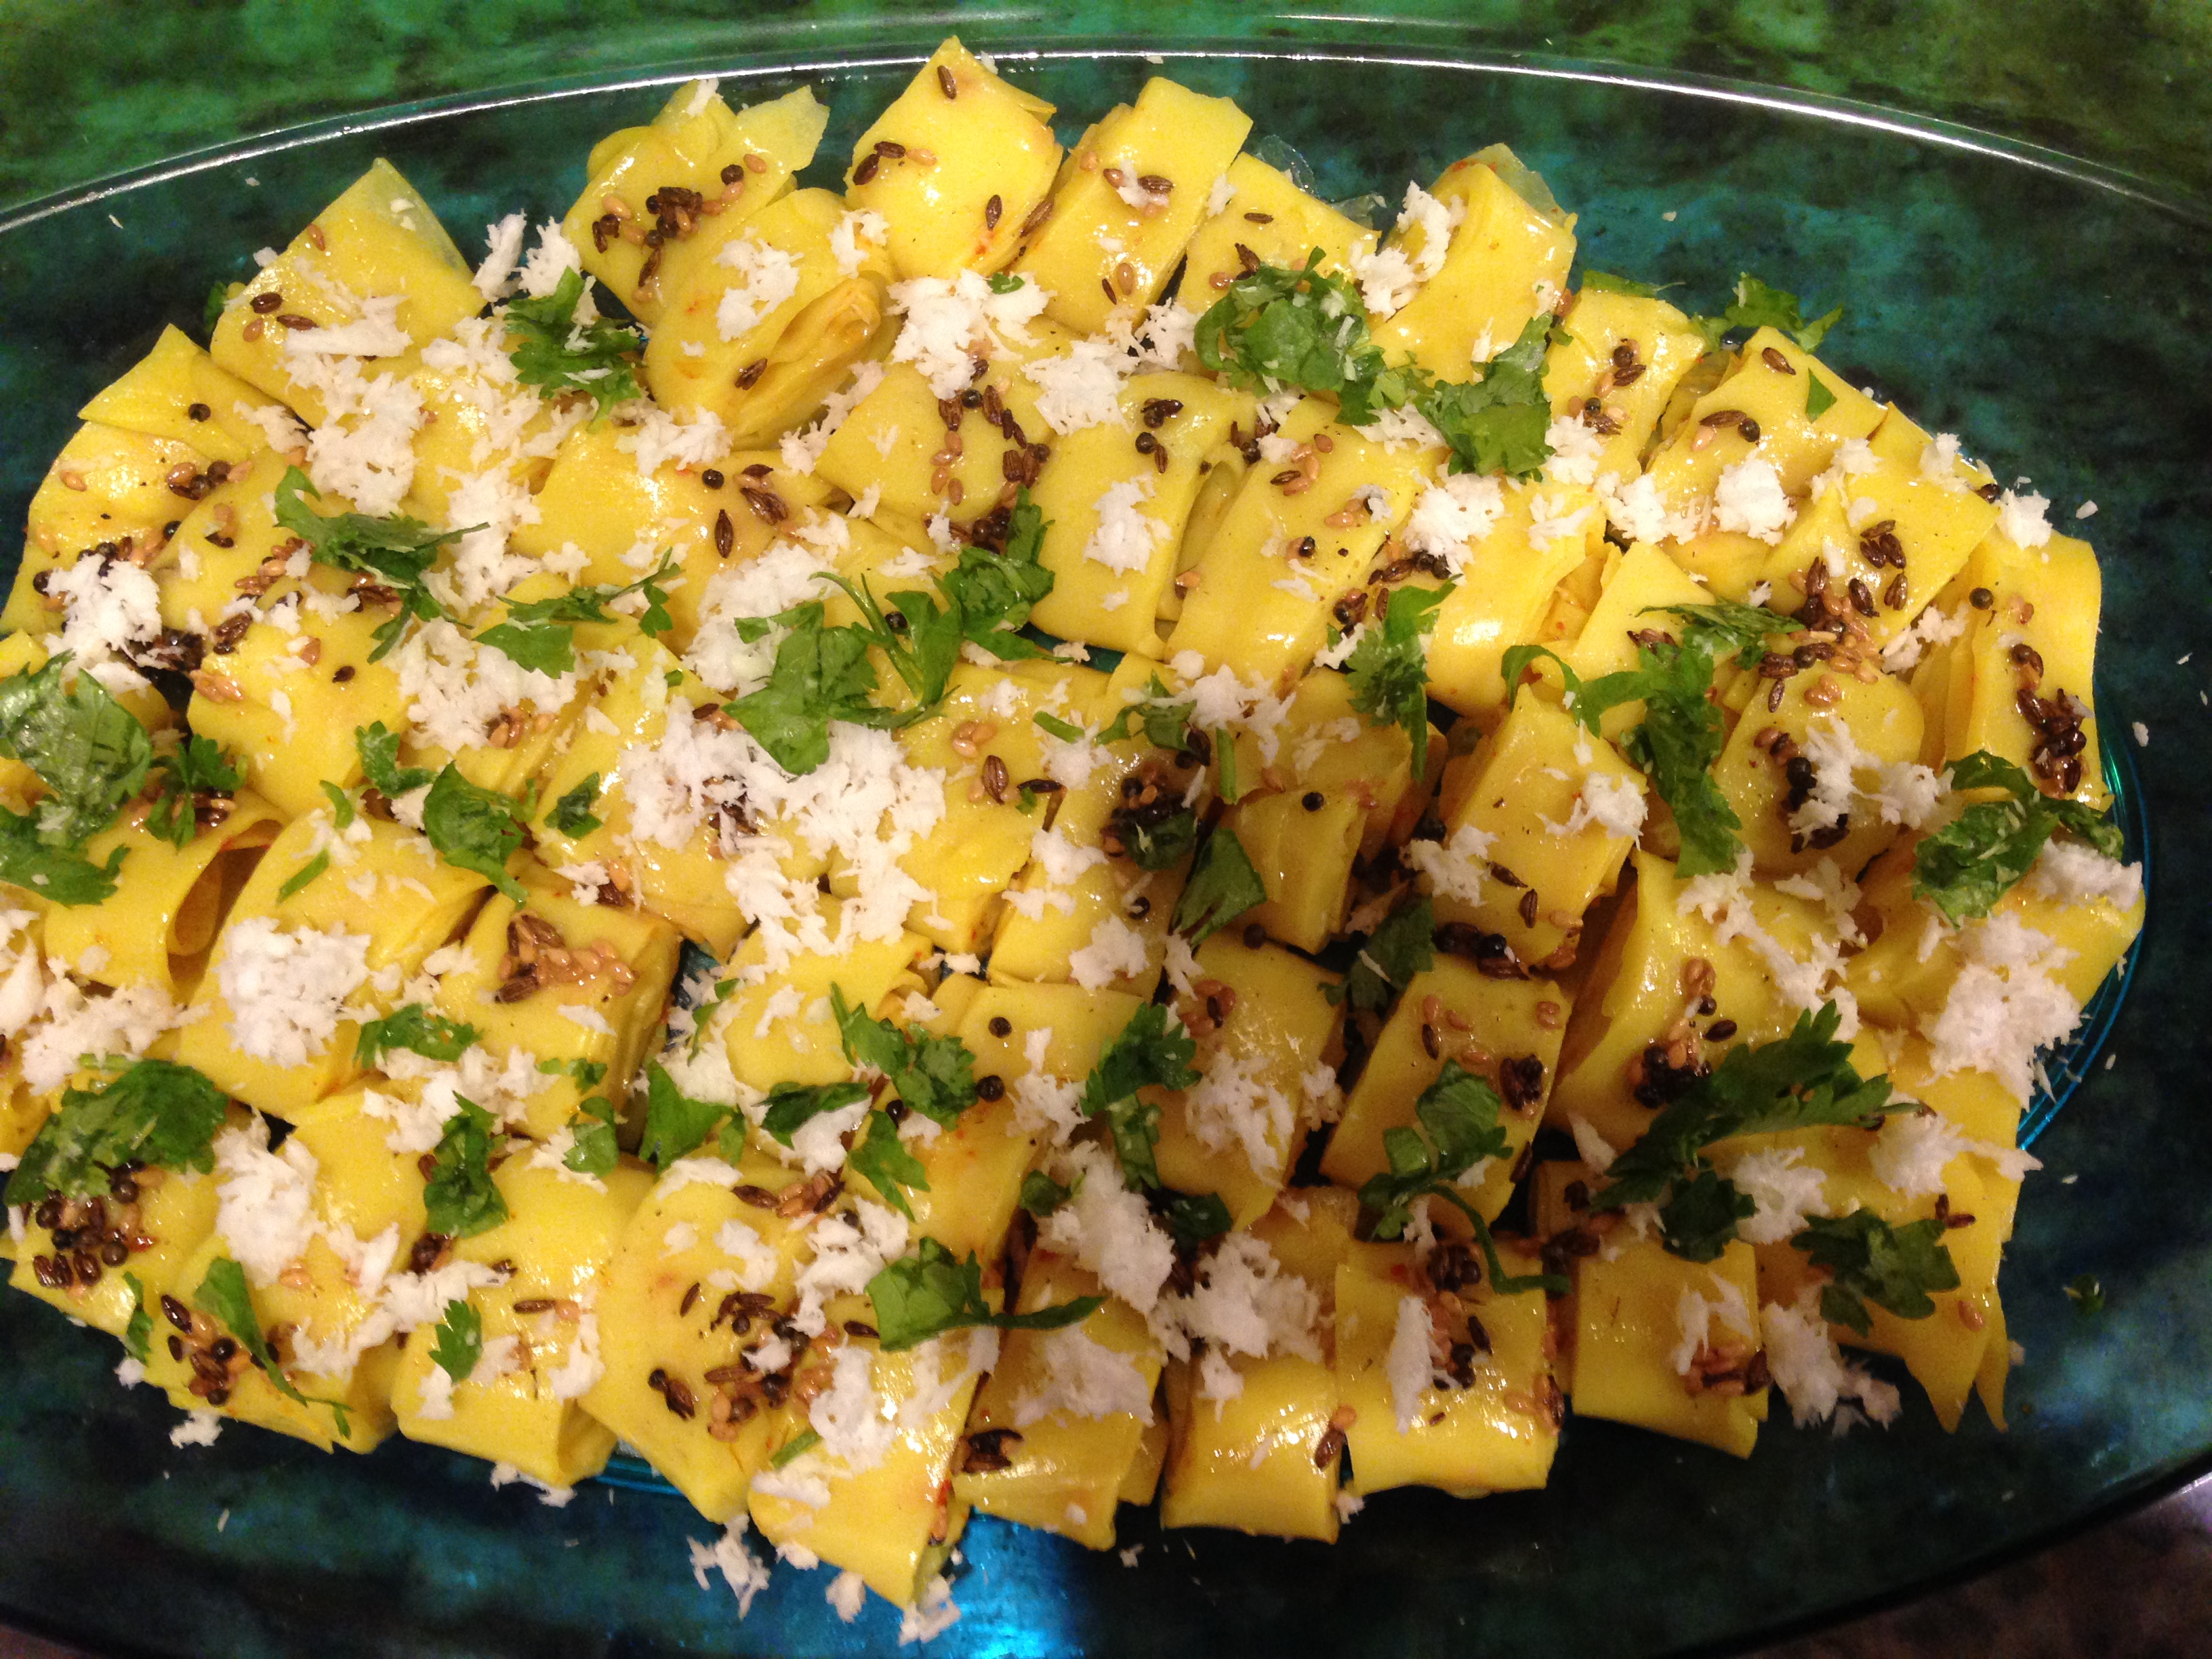
The texture of bengal gram rolls, is soft, smooth and the oil garnish on the top with mustard seeds crackling, gives it a slightly crunchy flavour over a smooth roll. Due justice can be done only by tasting this super yum delicacy. It is  truly enjoyed by most people as kids like the roll look and adults will enjoy this finger food appetizer anytime.

 Recipe makes 60 pieces about 1/2 inch in size.
Ingredients

For Khandvi Rolls

  • 1 cup besan bengal gram flour
  • 2 tbsp lemon  juice
  • 1/8 tsp asofoetida
  • 1/3 tsp turmeric powder
  • salt to taste
  • 1/4 tsp chilli powder
  • oil to grease

For Garnishing

  • 1 tsp mustard seeds
  • 1 tsp cumin seeds
  • pinch of asofoetida
  • 2 tbsp coriander chopped
  • 2 tbsp fresh/frozen coconut grated (or dry coconut can also be used)
  • 3 tbsp oil 
  • 5 green chillies chopped(optional)
  • 3-4 green curry leaves(optional)

4 flat dishes about 8-10 inches in diameter.


Method:
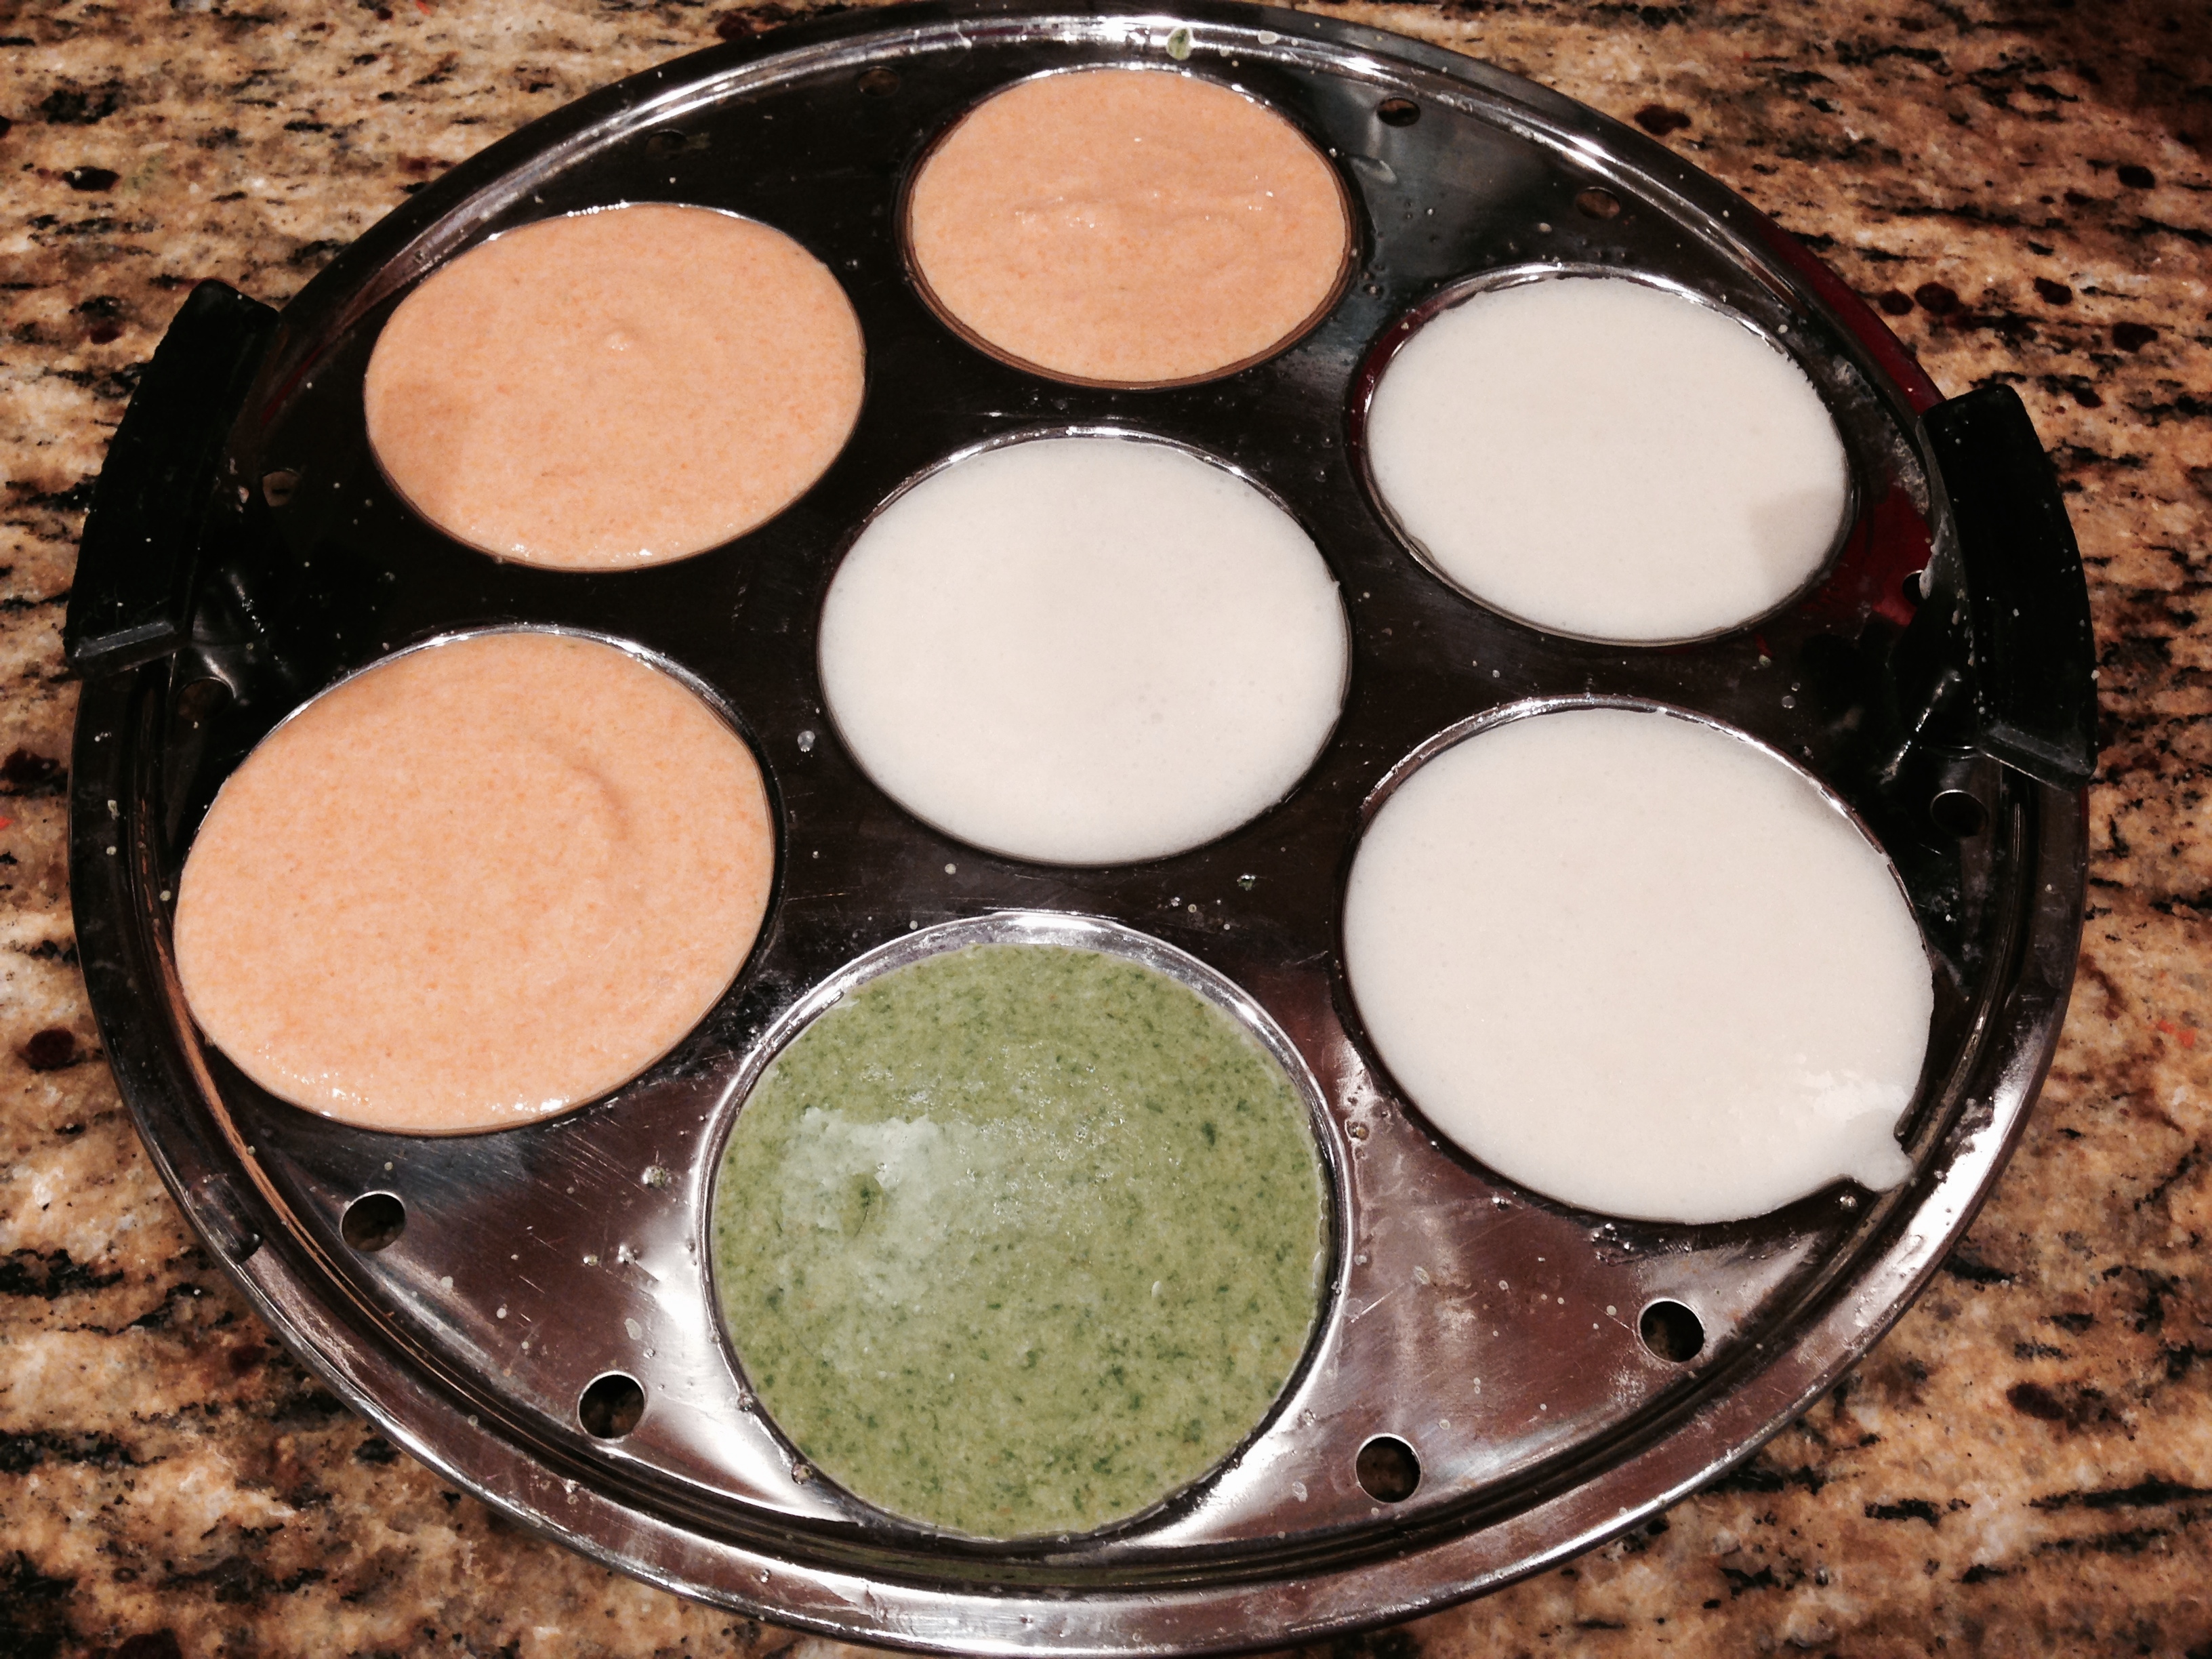
  • Grease the dishes with oil on the front and back of the dish with oil. Both the sides of the dishes can be used to spread the Bengal Gram Roll paste. If you do not feel comfortable using the back of the dish, you will need more dishes.
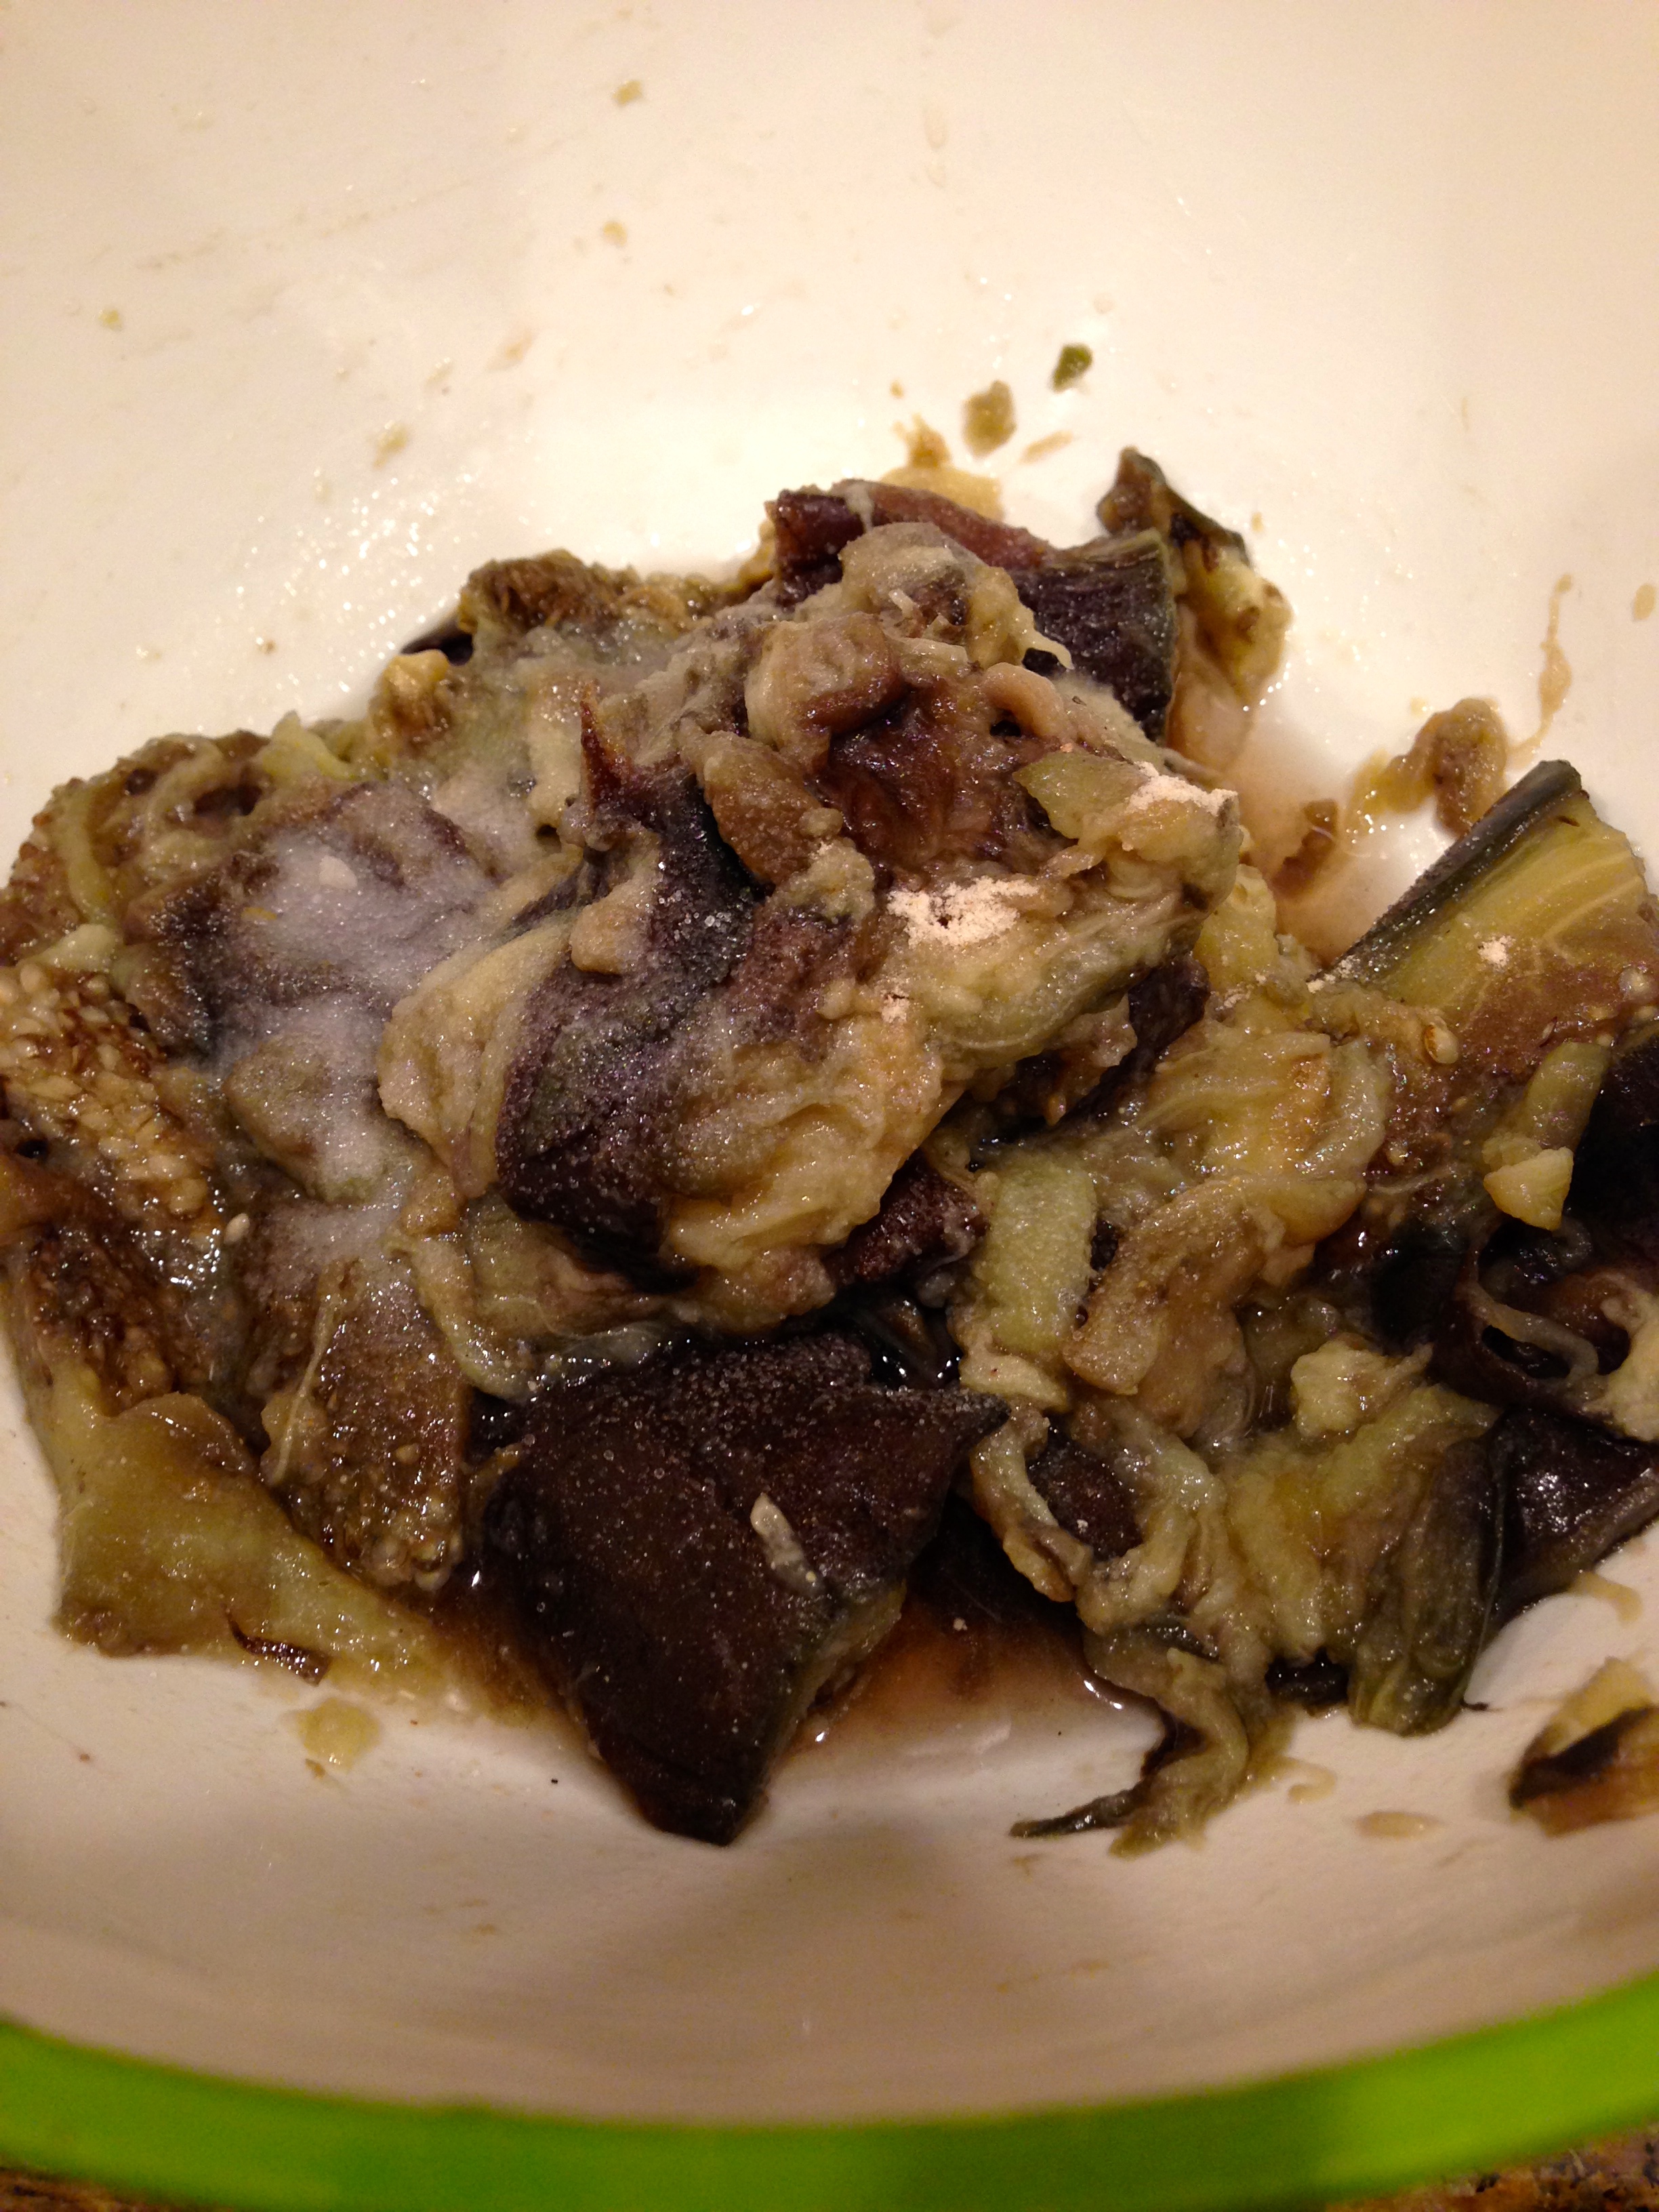
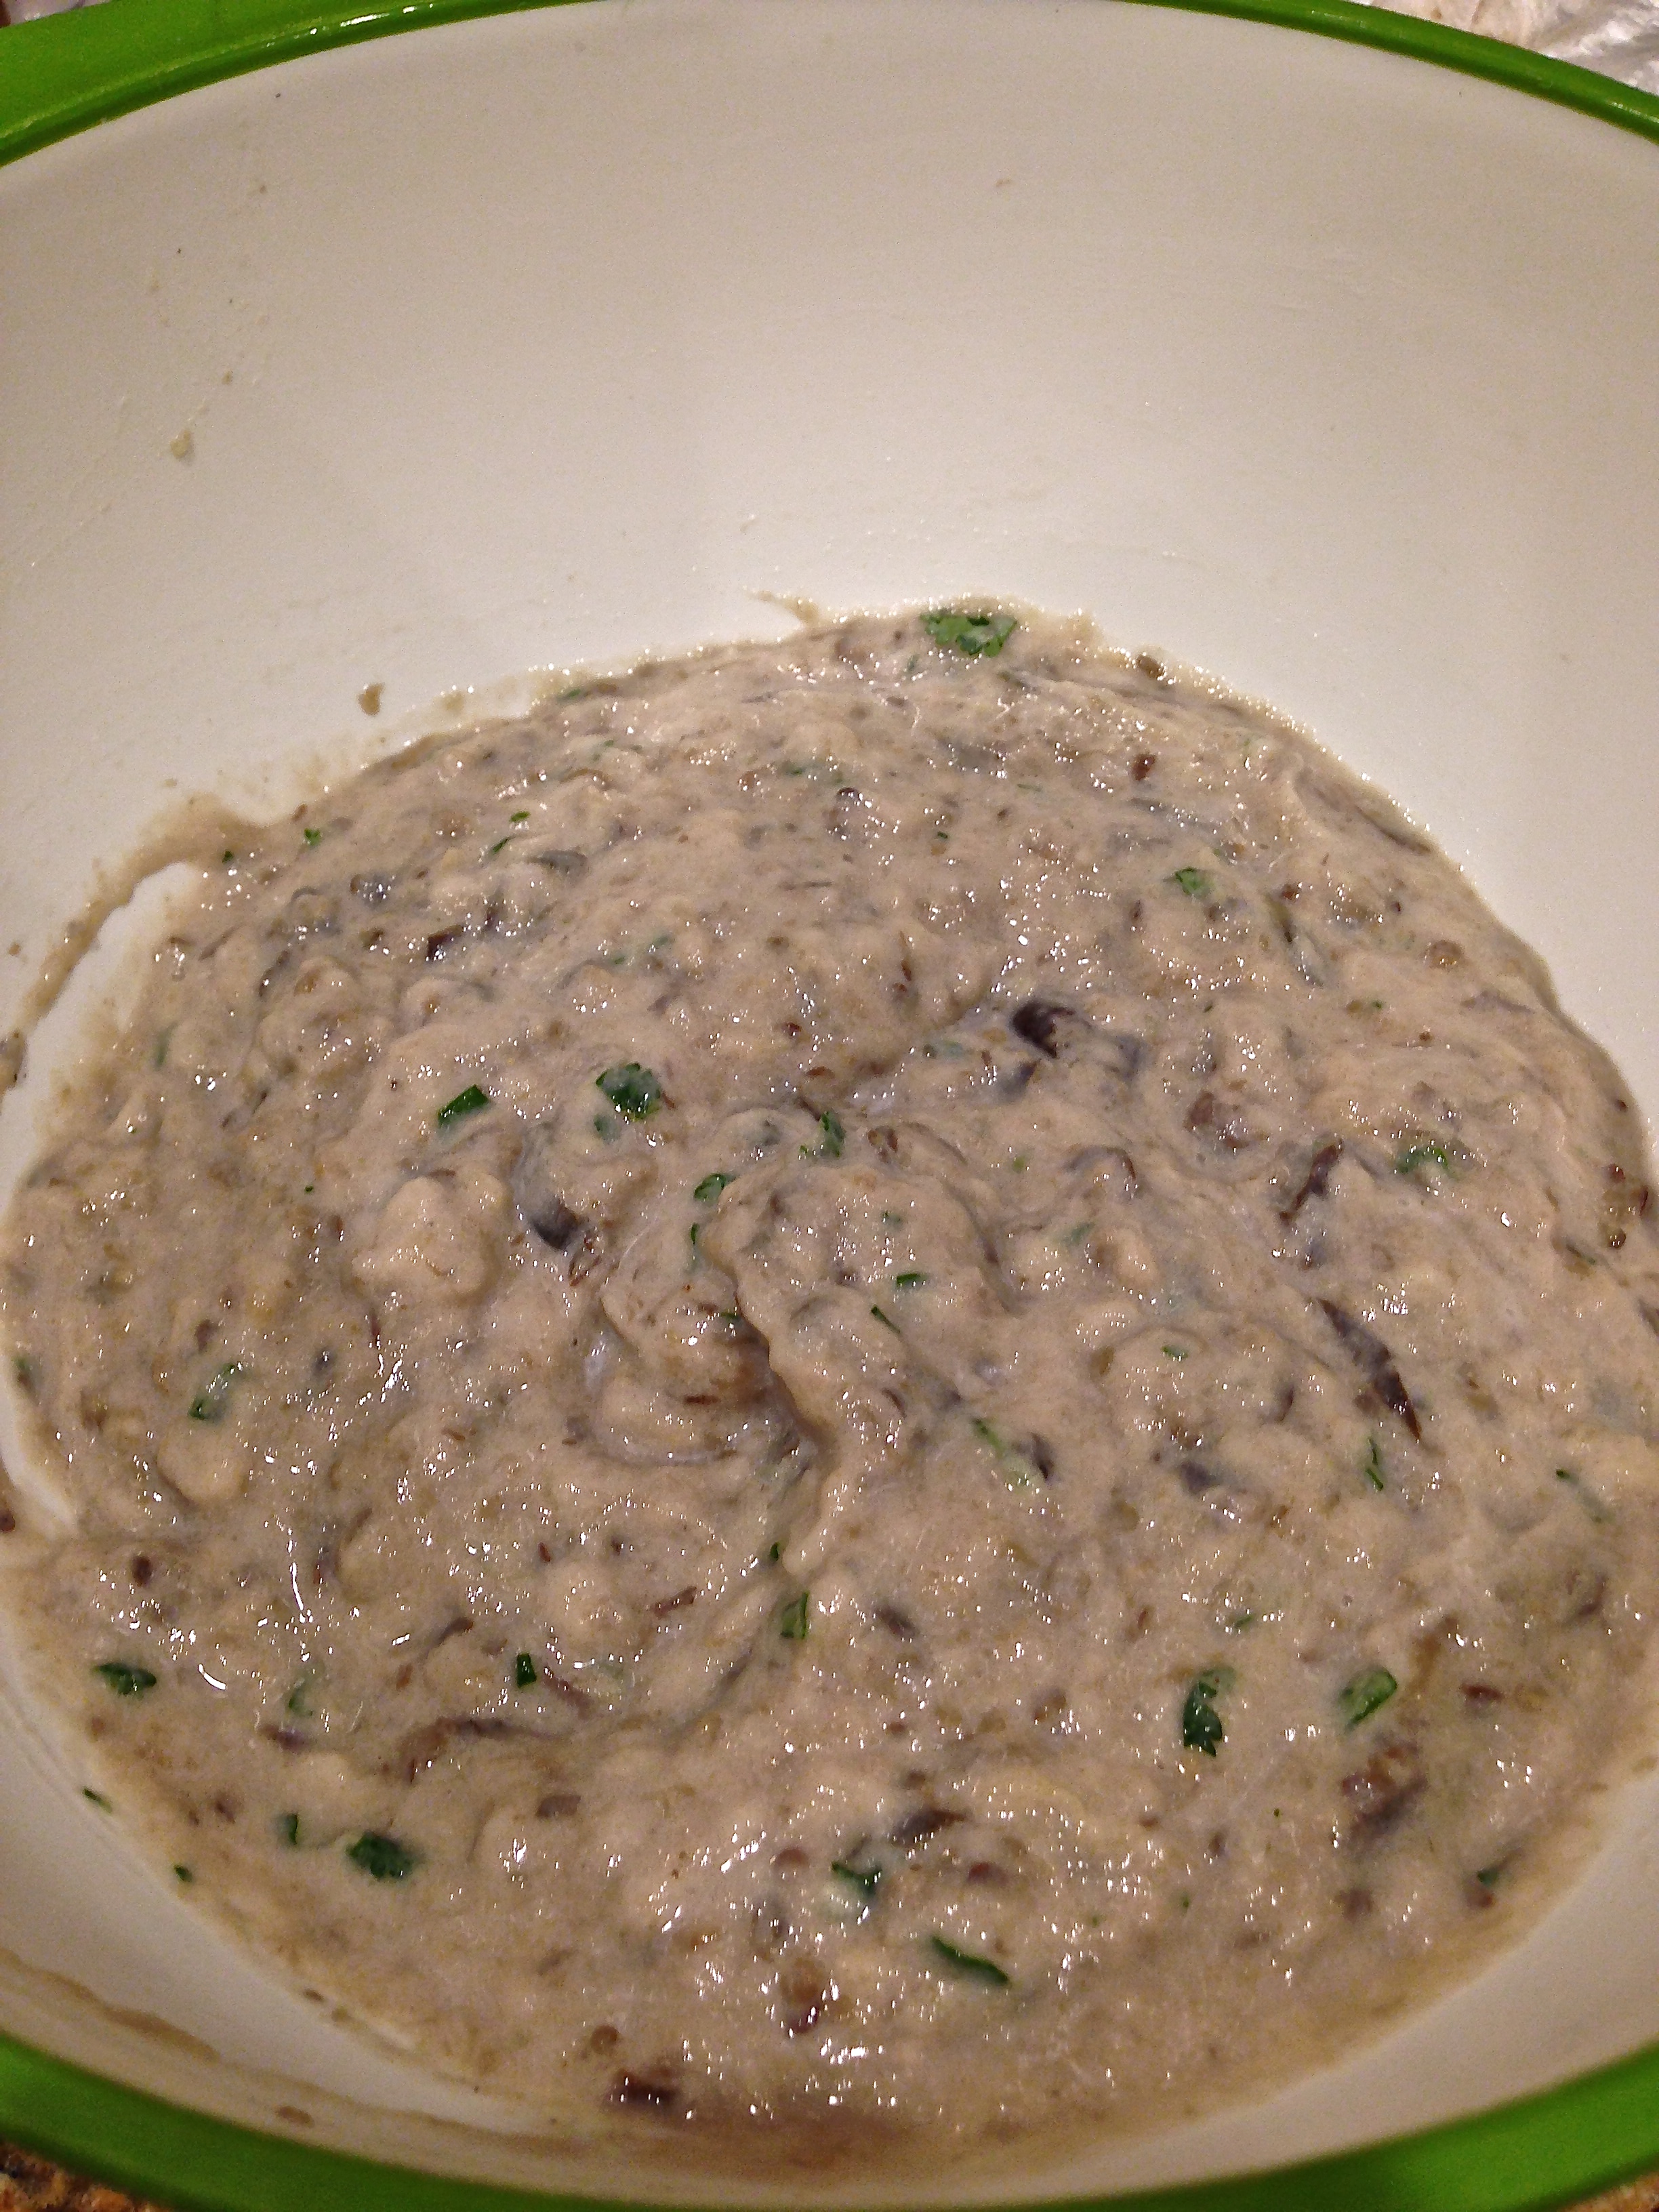
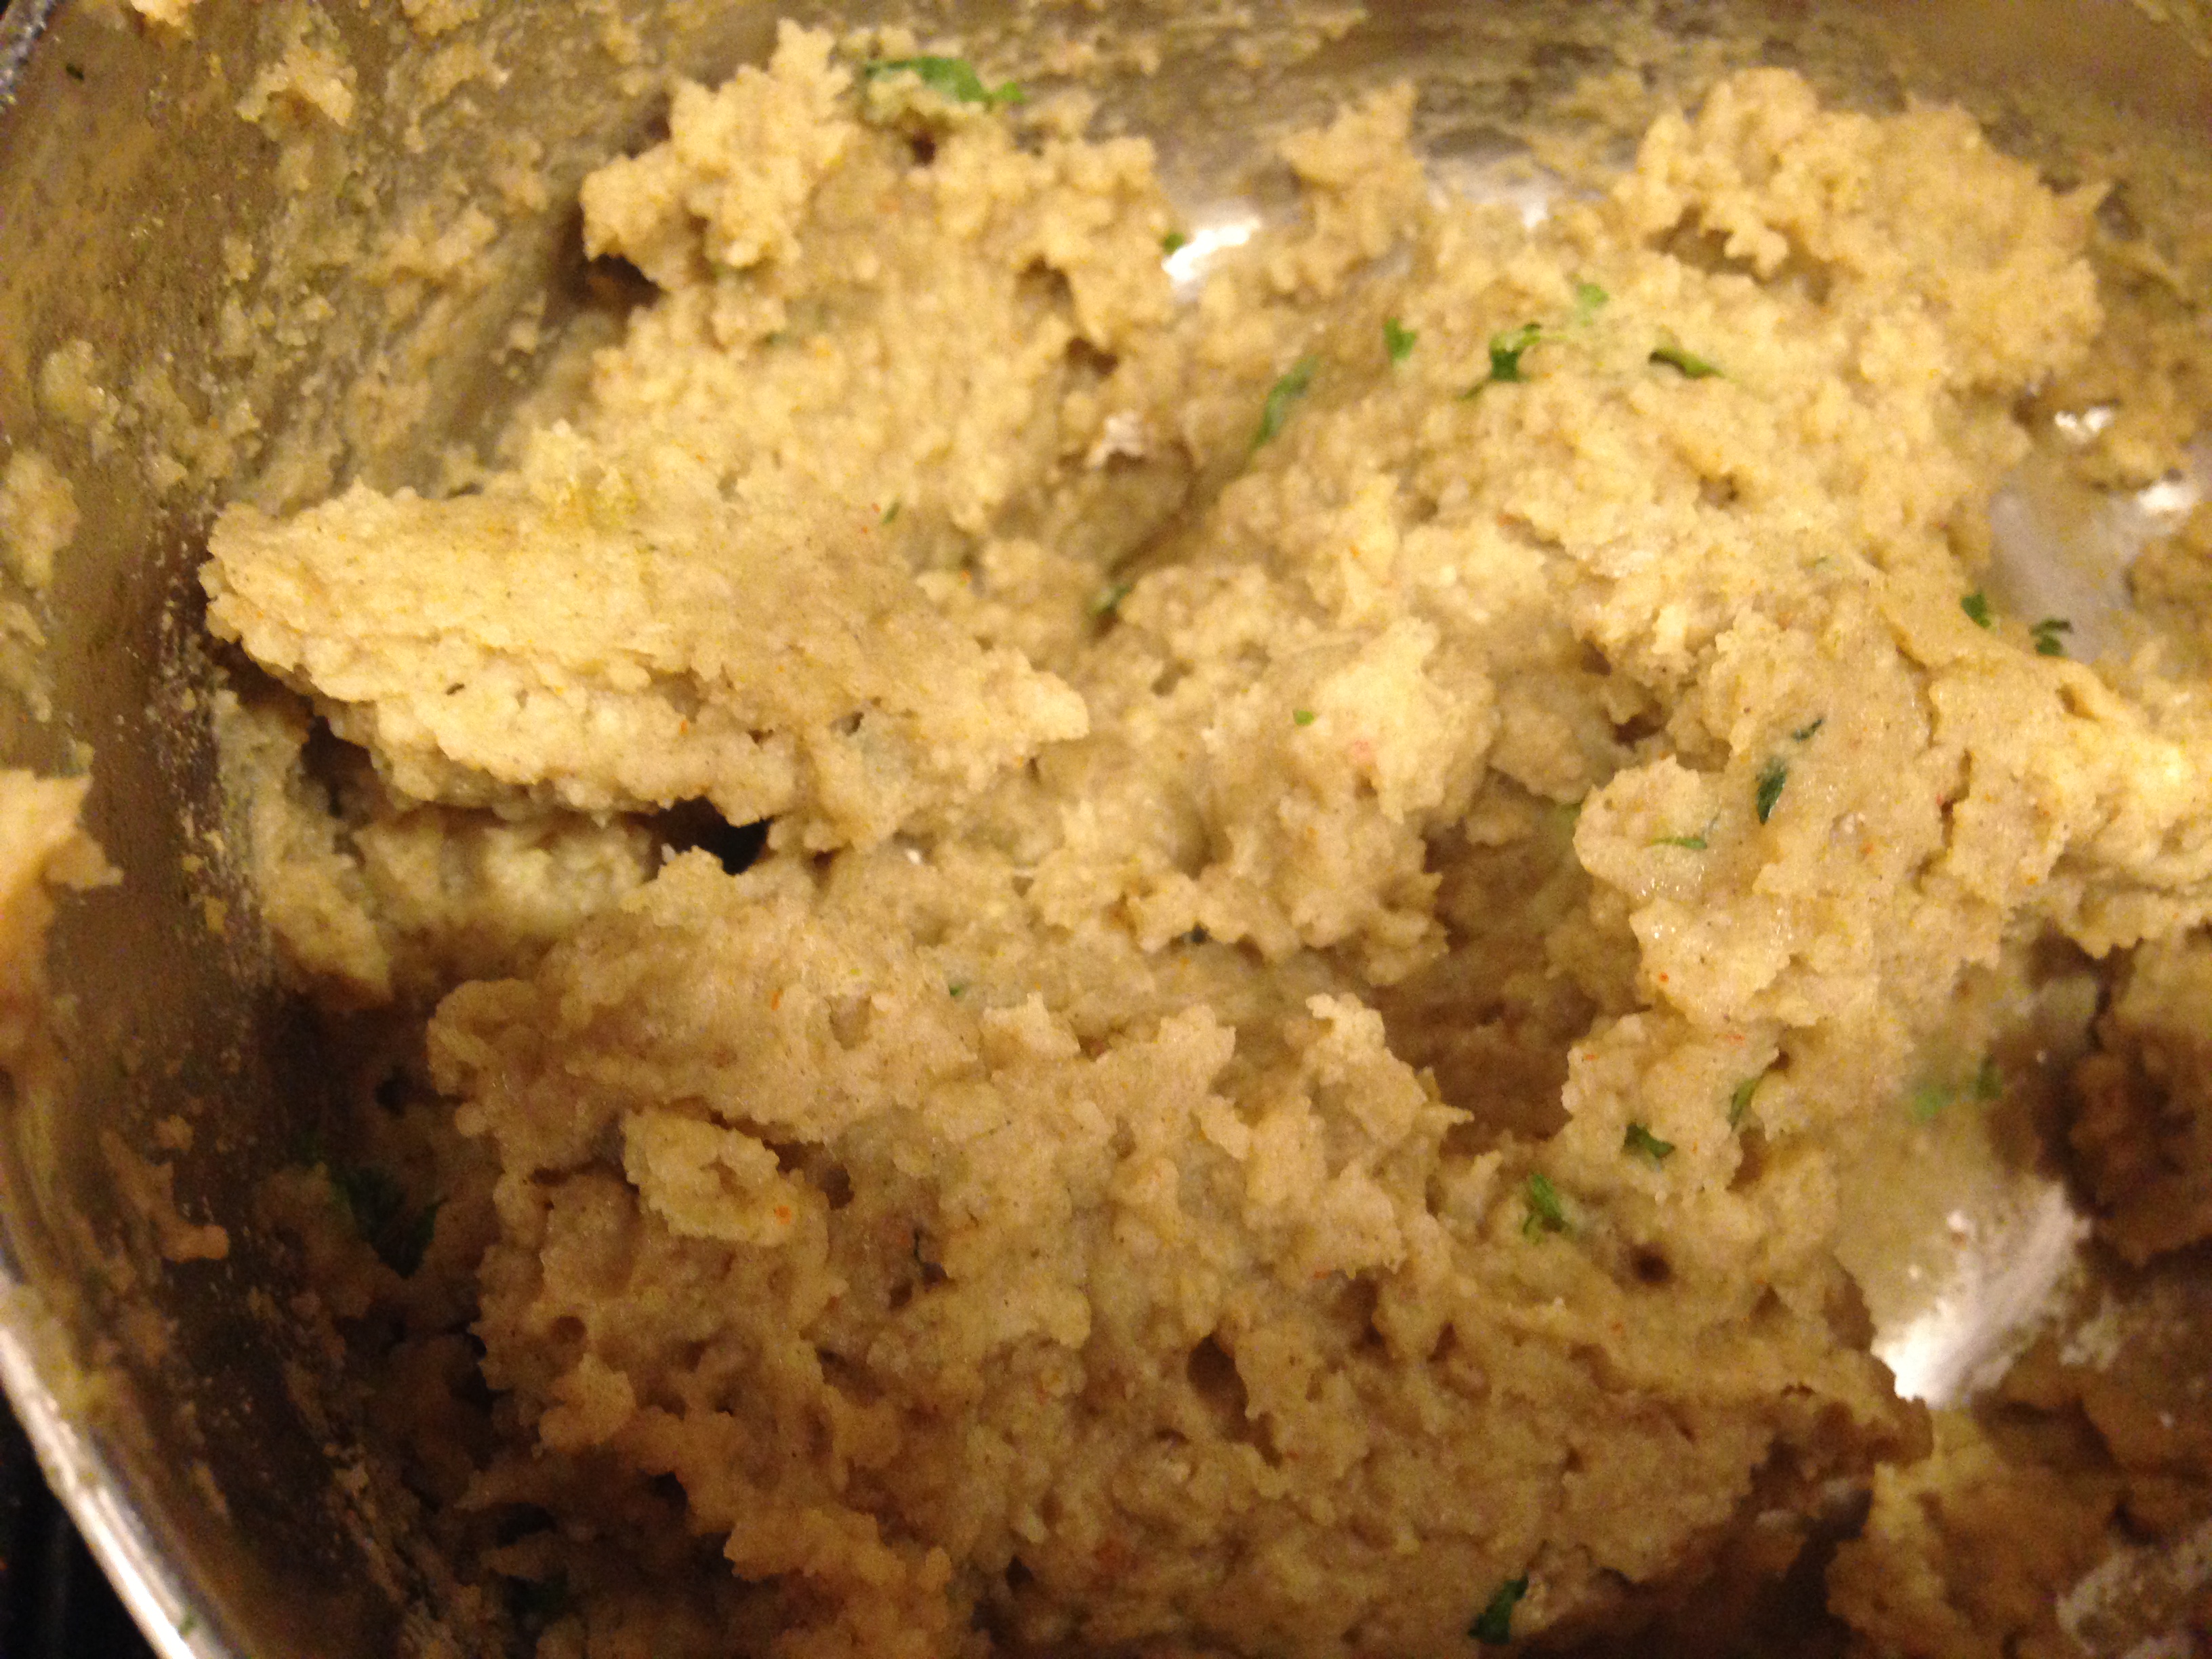
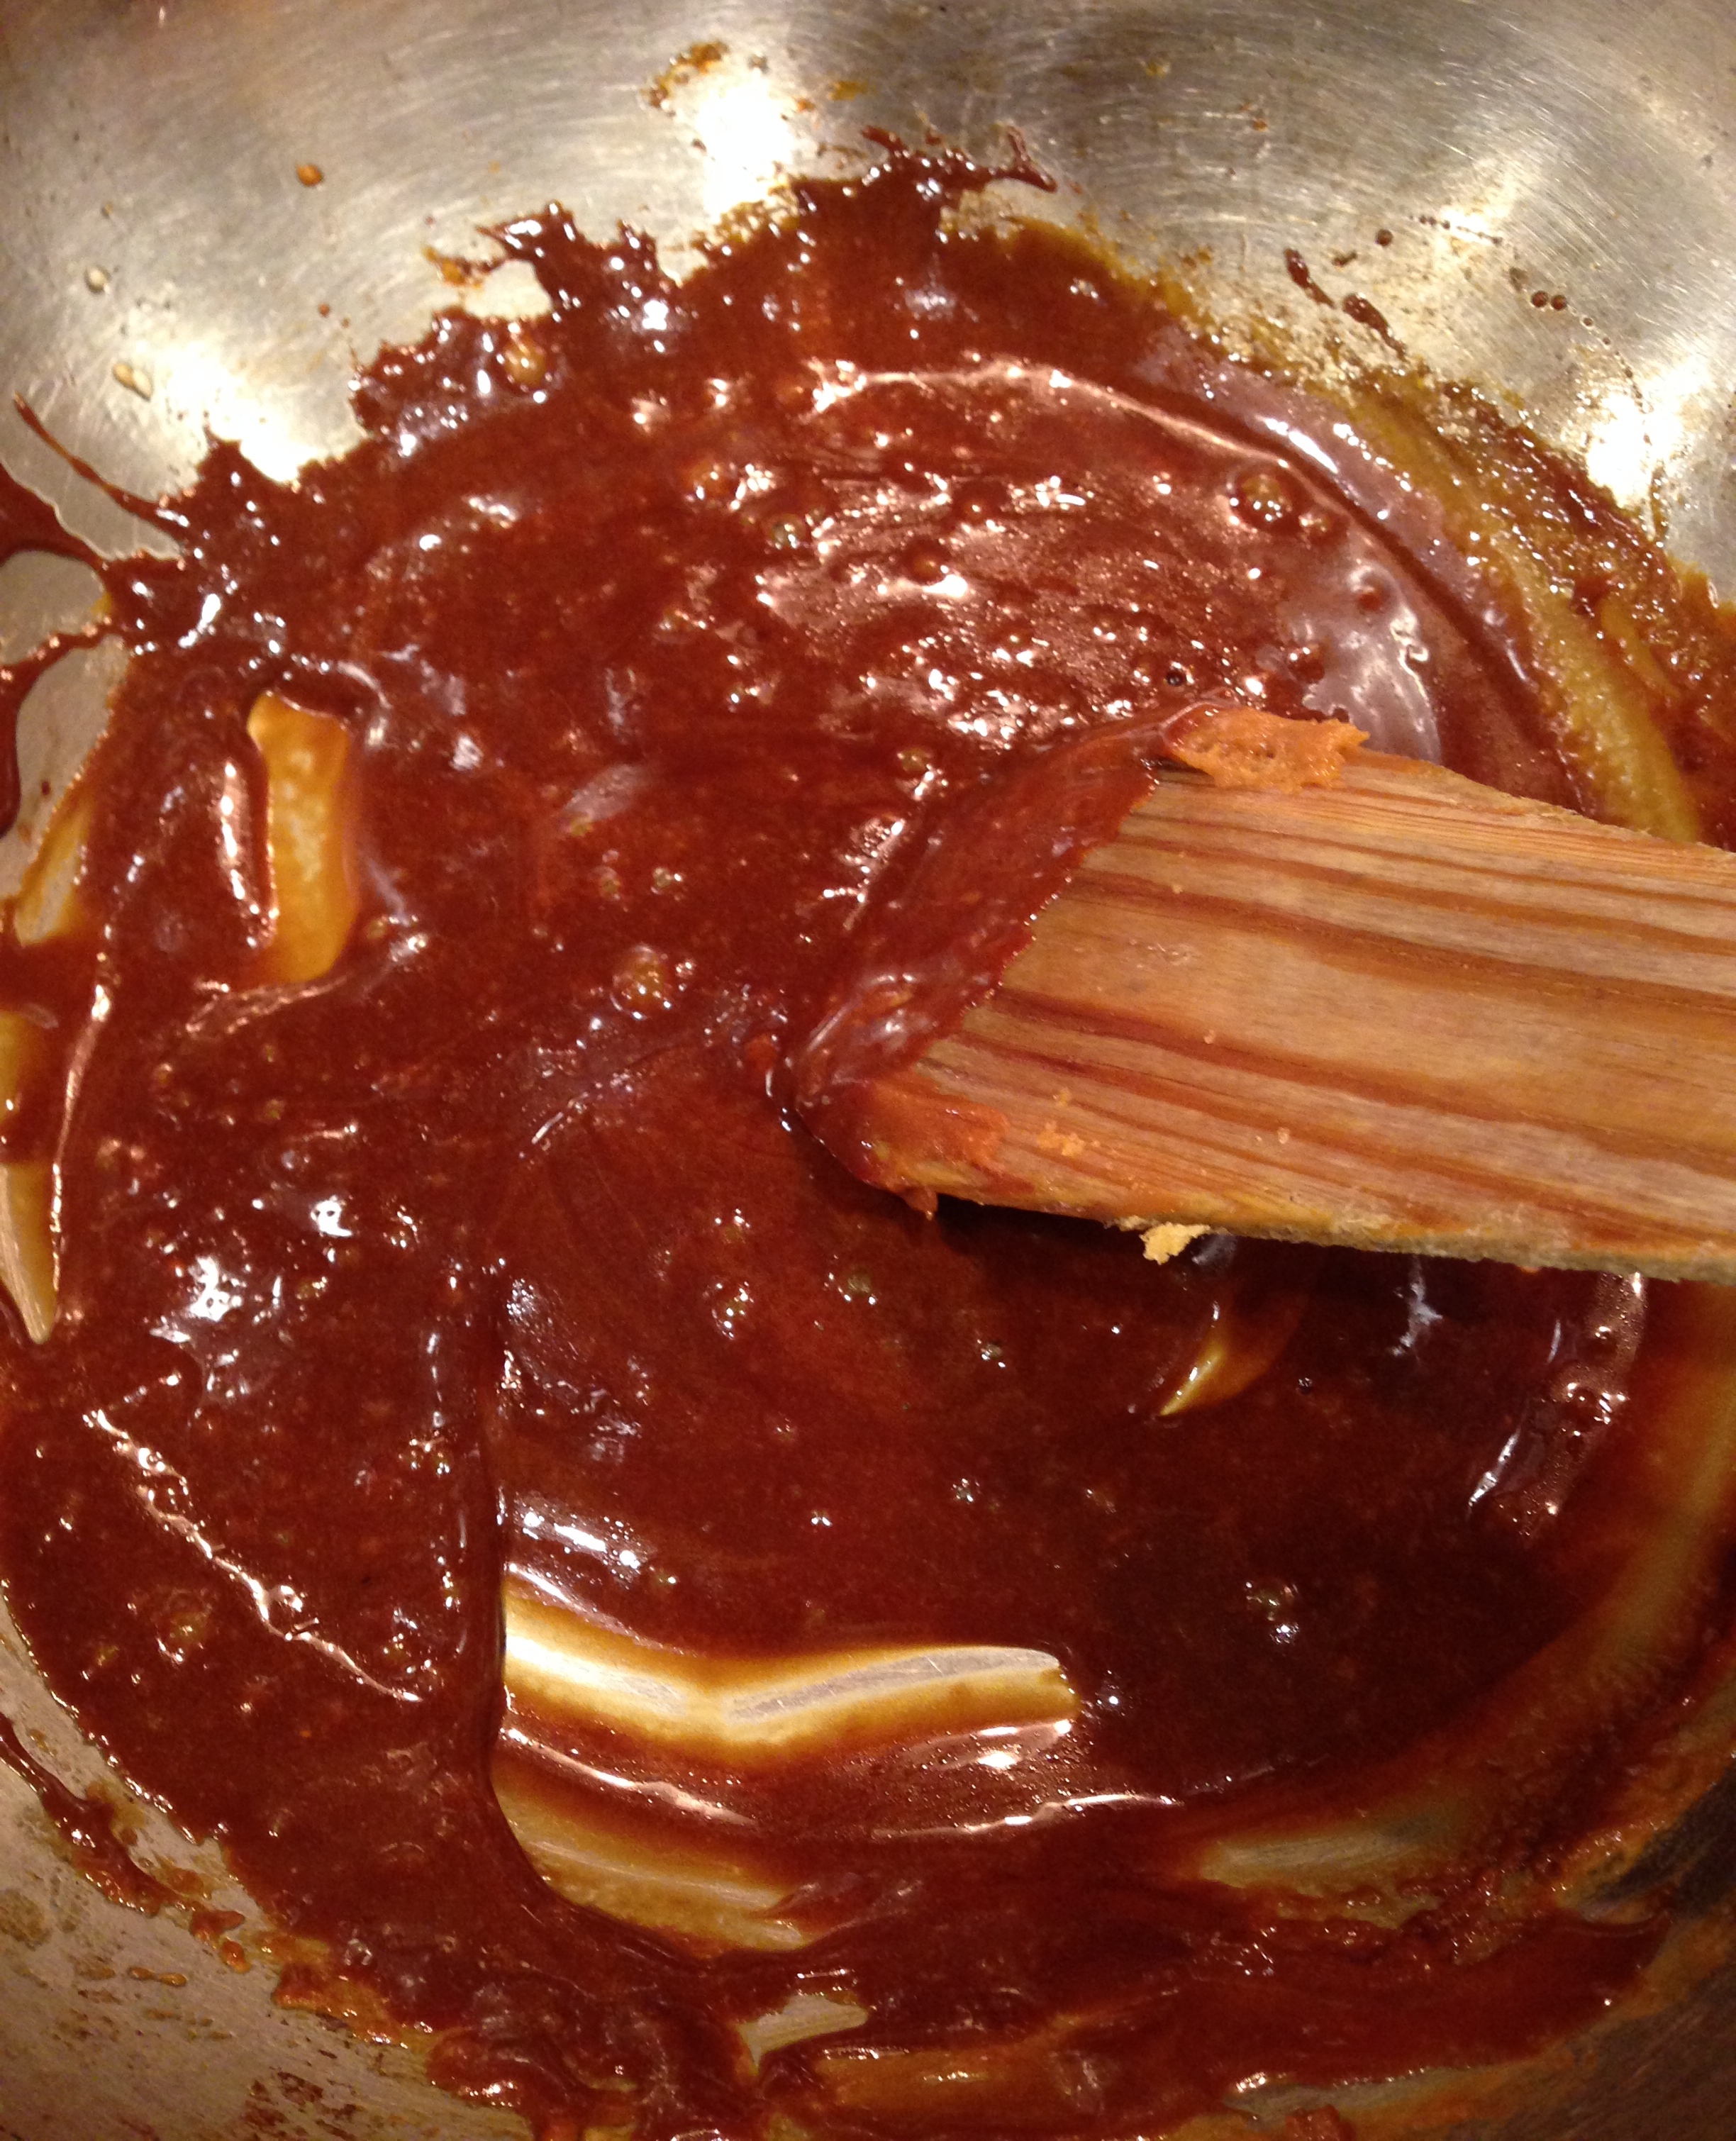
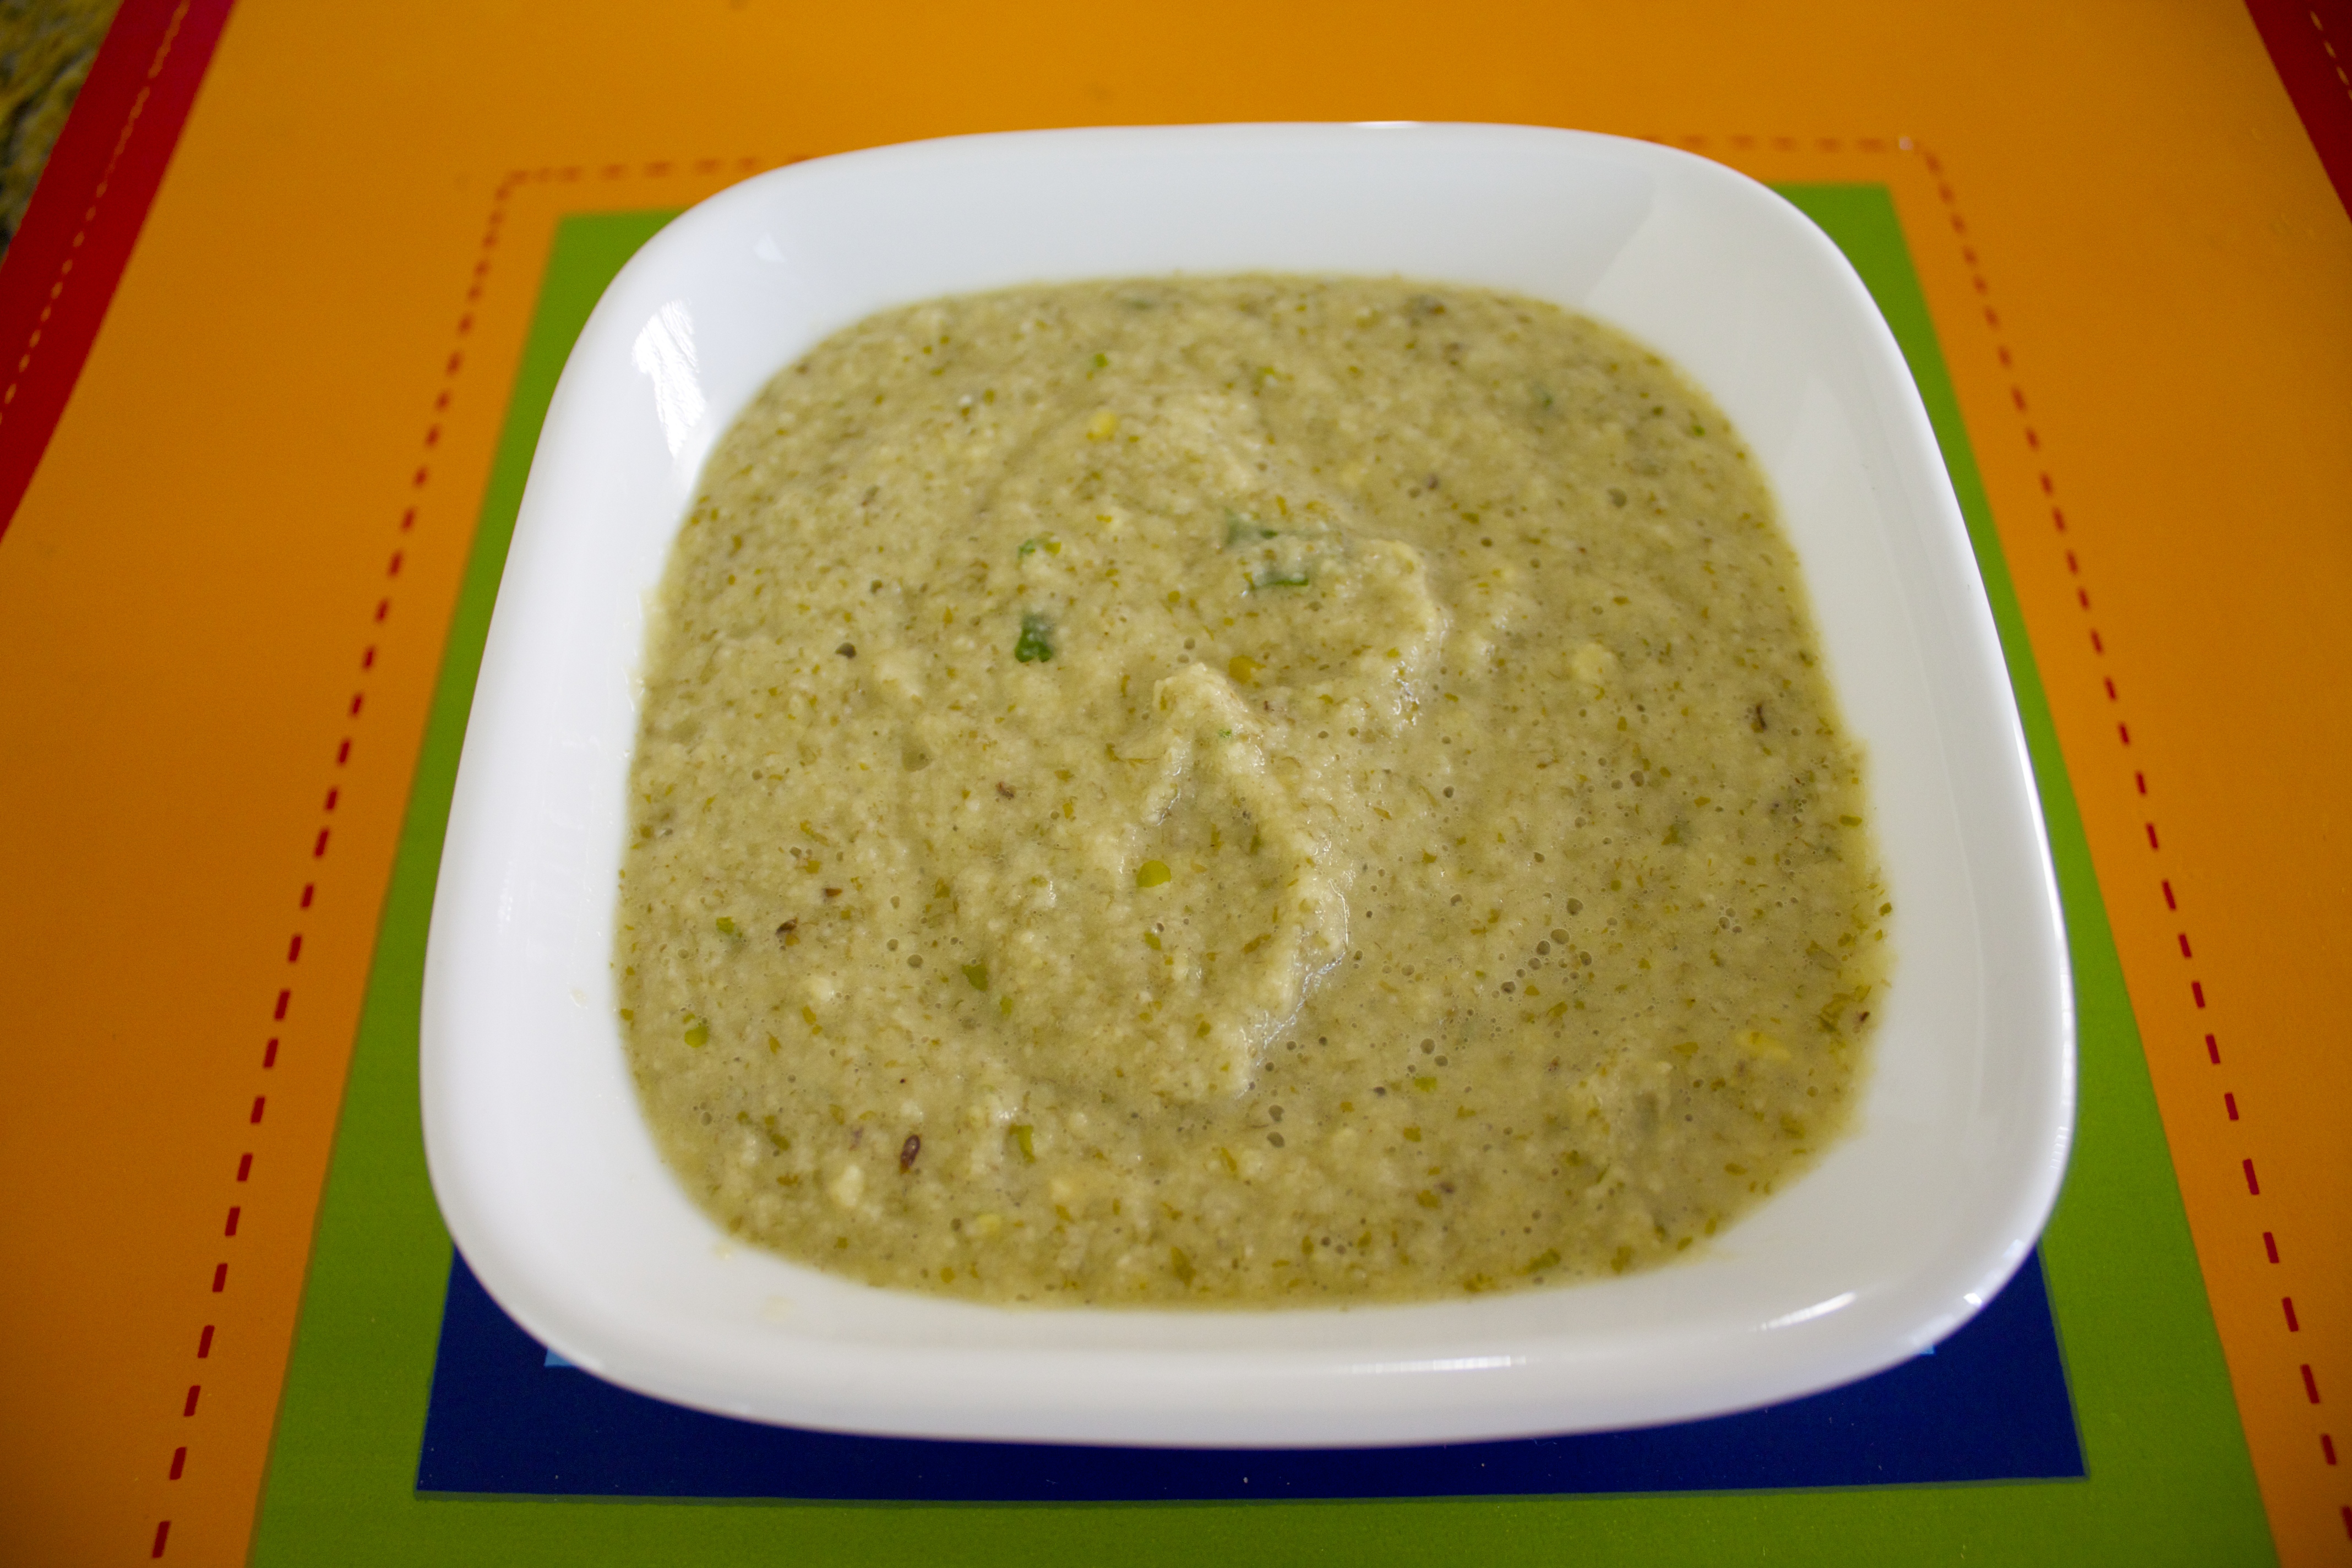
  • In a broad thick bottom pan, mix besan bengal gram flour, water, lemon juice, asofoetida, salt and turmeric powder till no lumps are left. This is the mix for making the khandvi bengal gram rolls.
  • Put it to heat on a medium flame, stirring constantly.IMG_2250
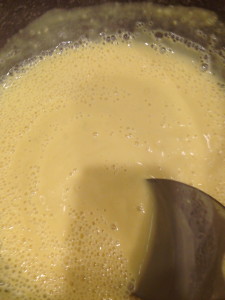
  • Keep stirring constantly until it thickens to a paste around 8-10 minutes later.
  • The paste will start leaving the edges of the vessel.

IMG_2253


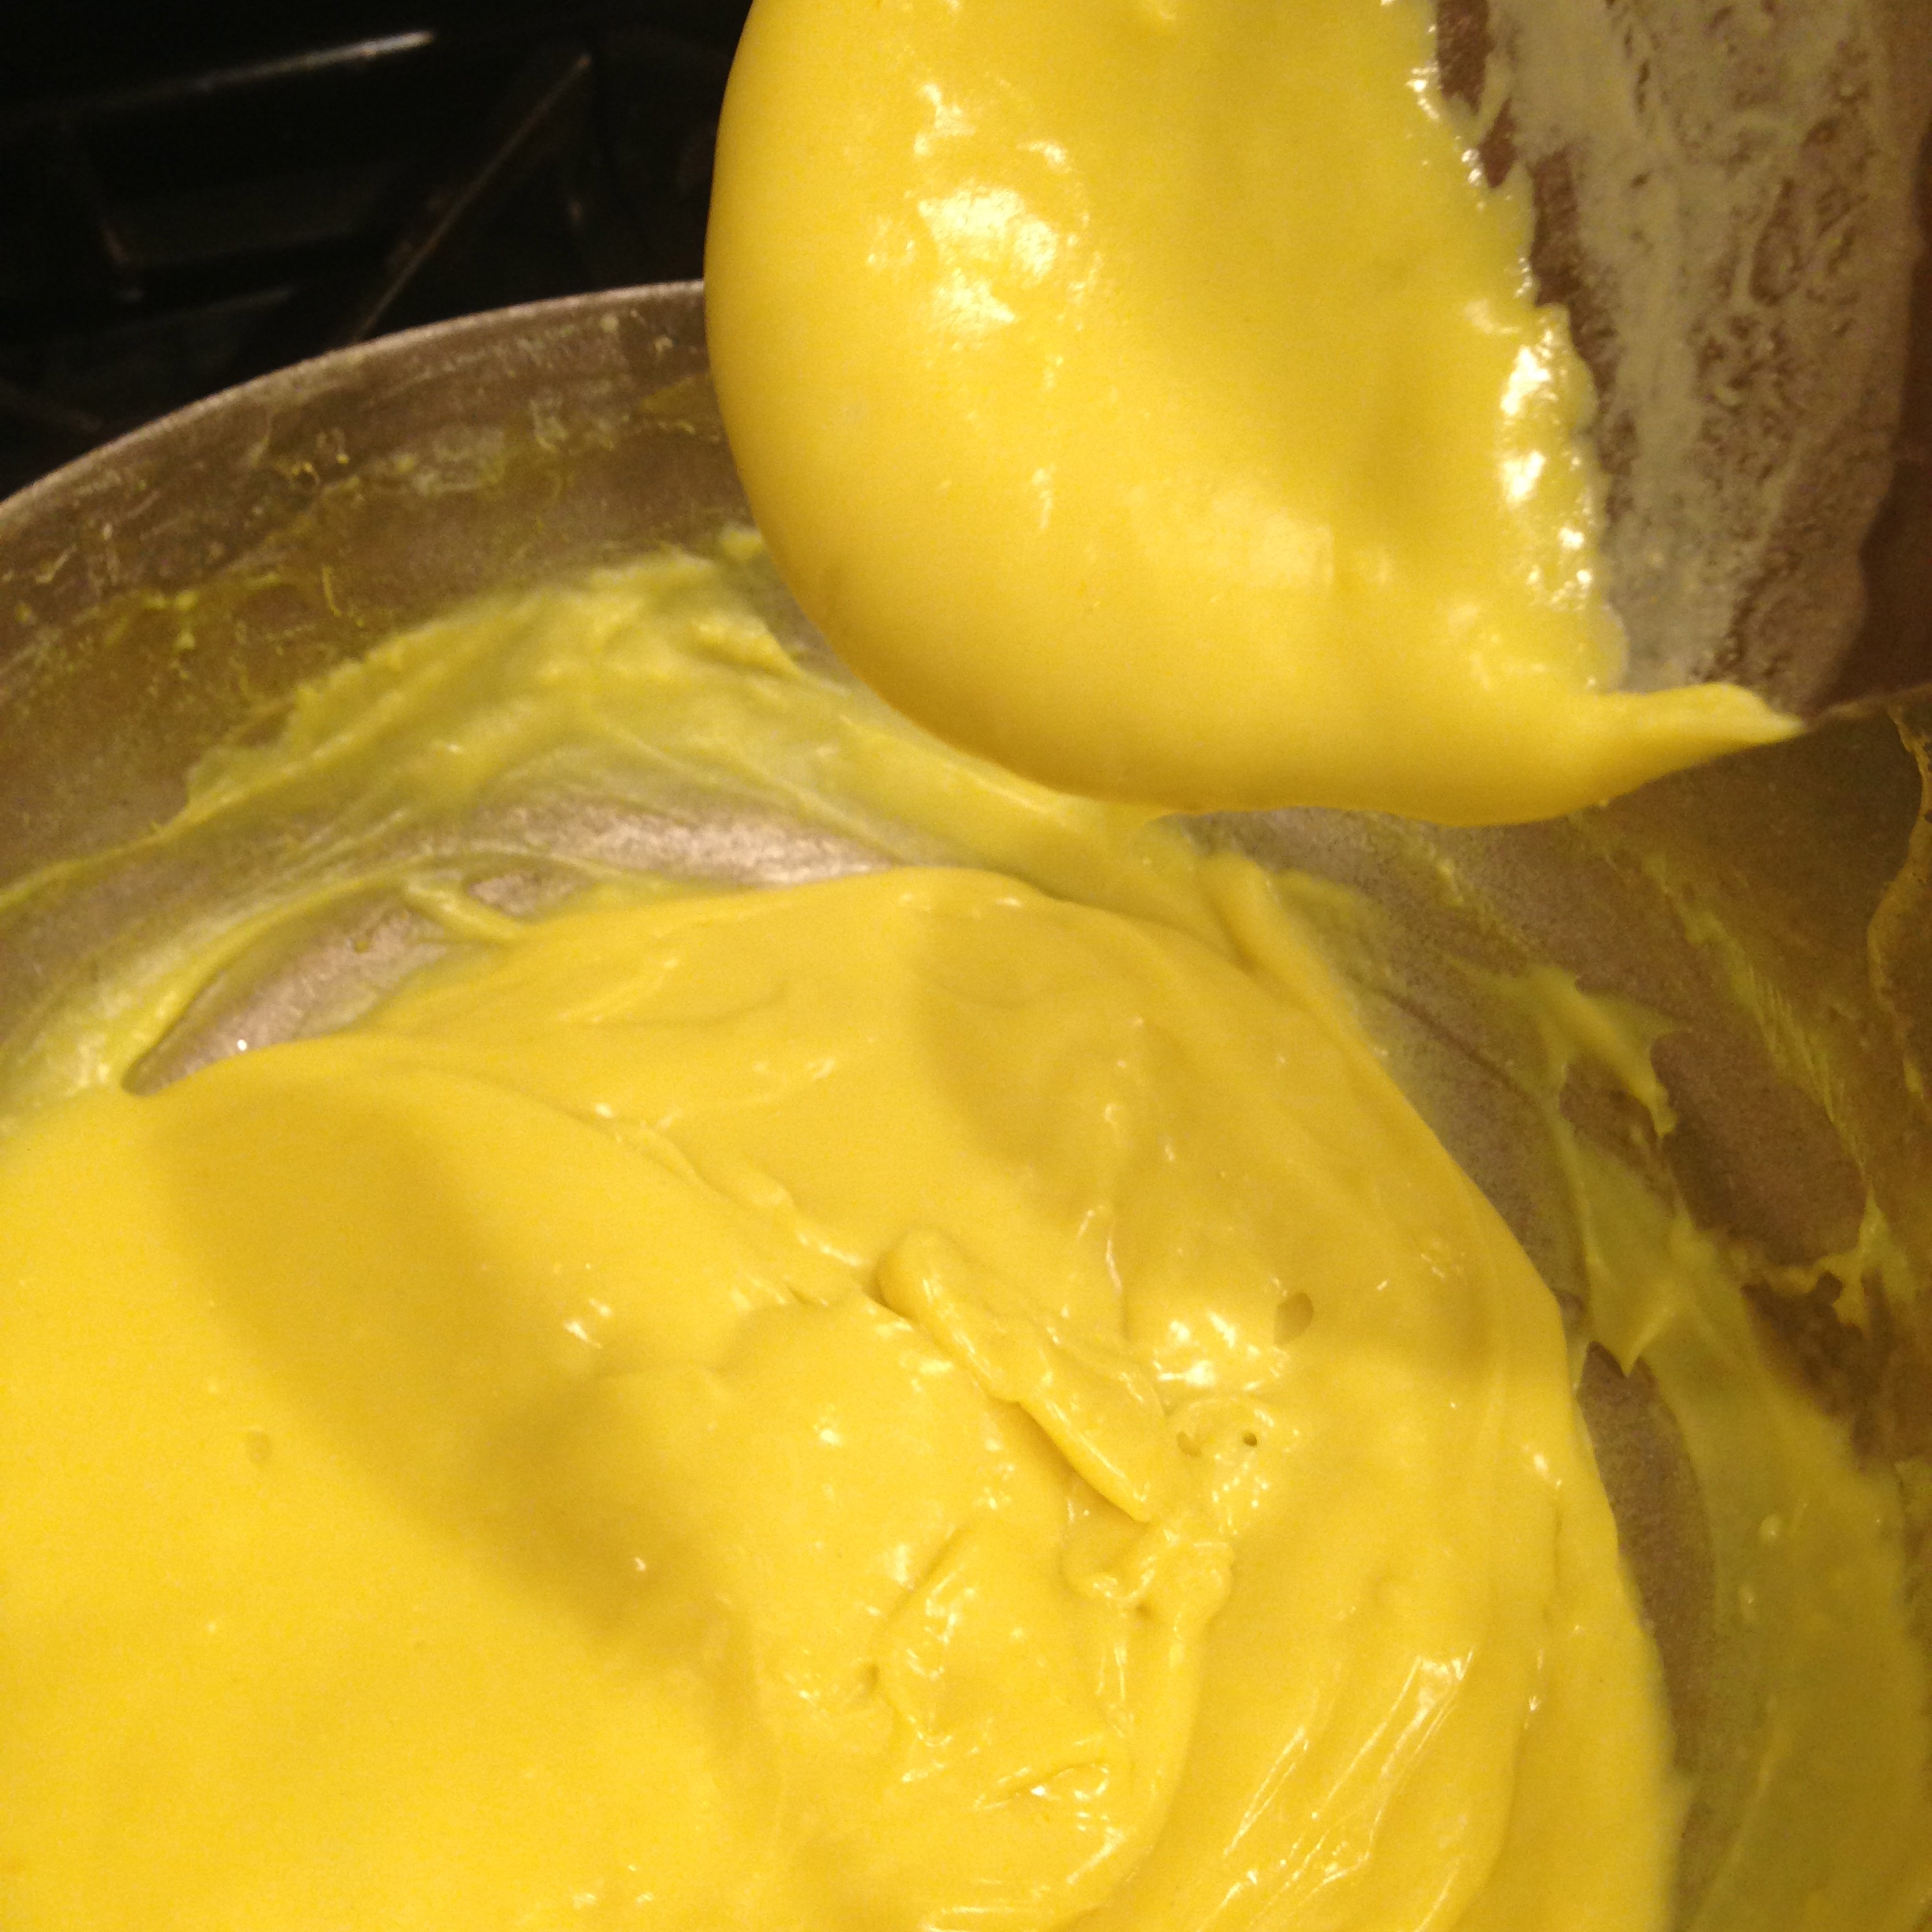
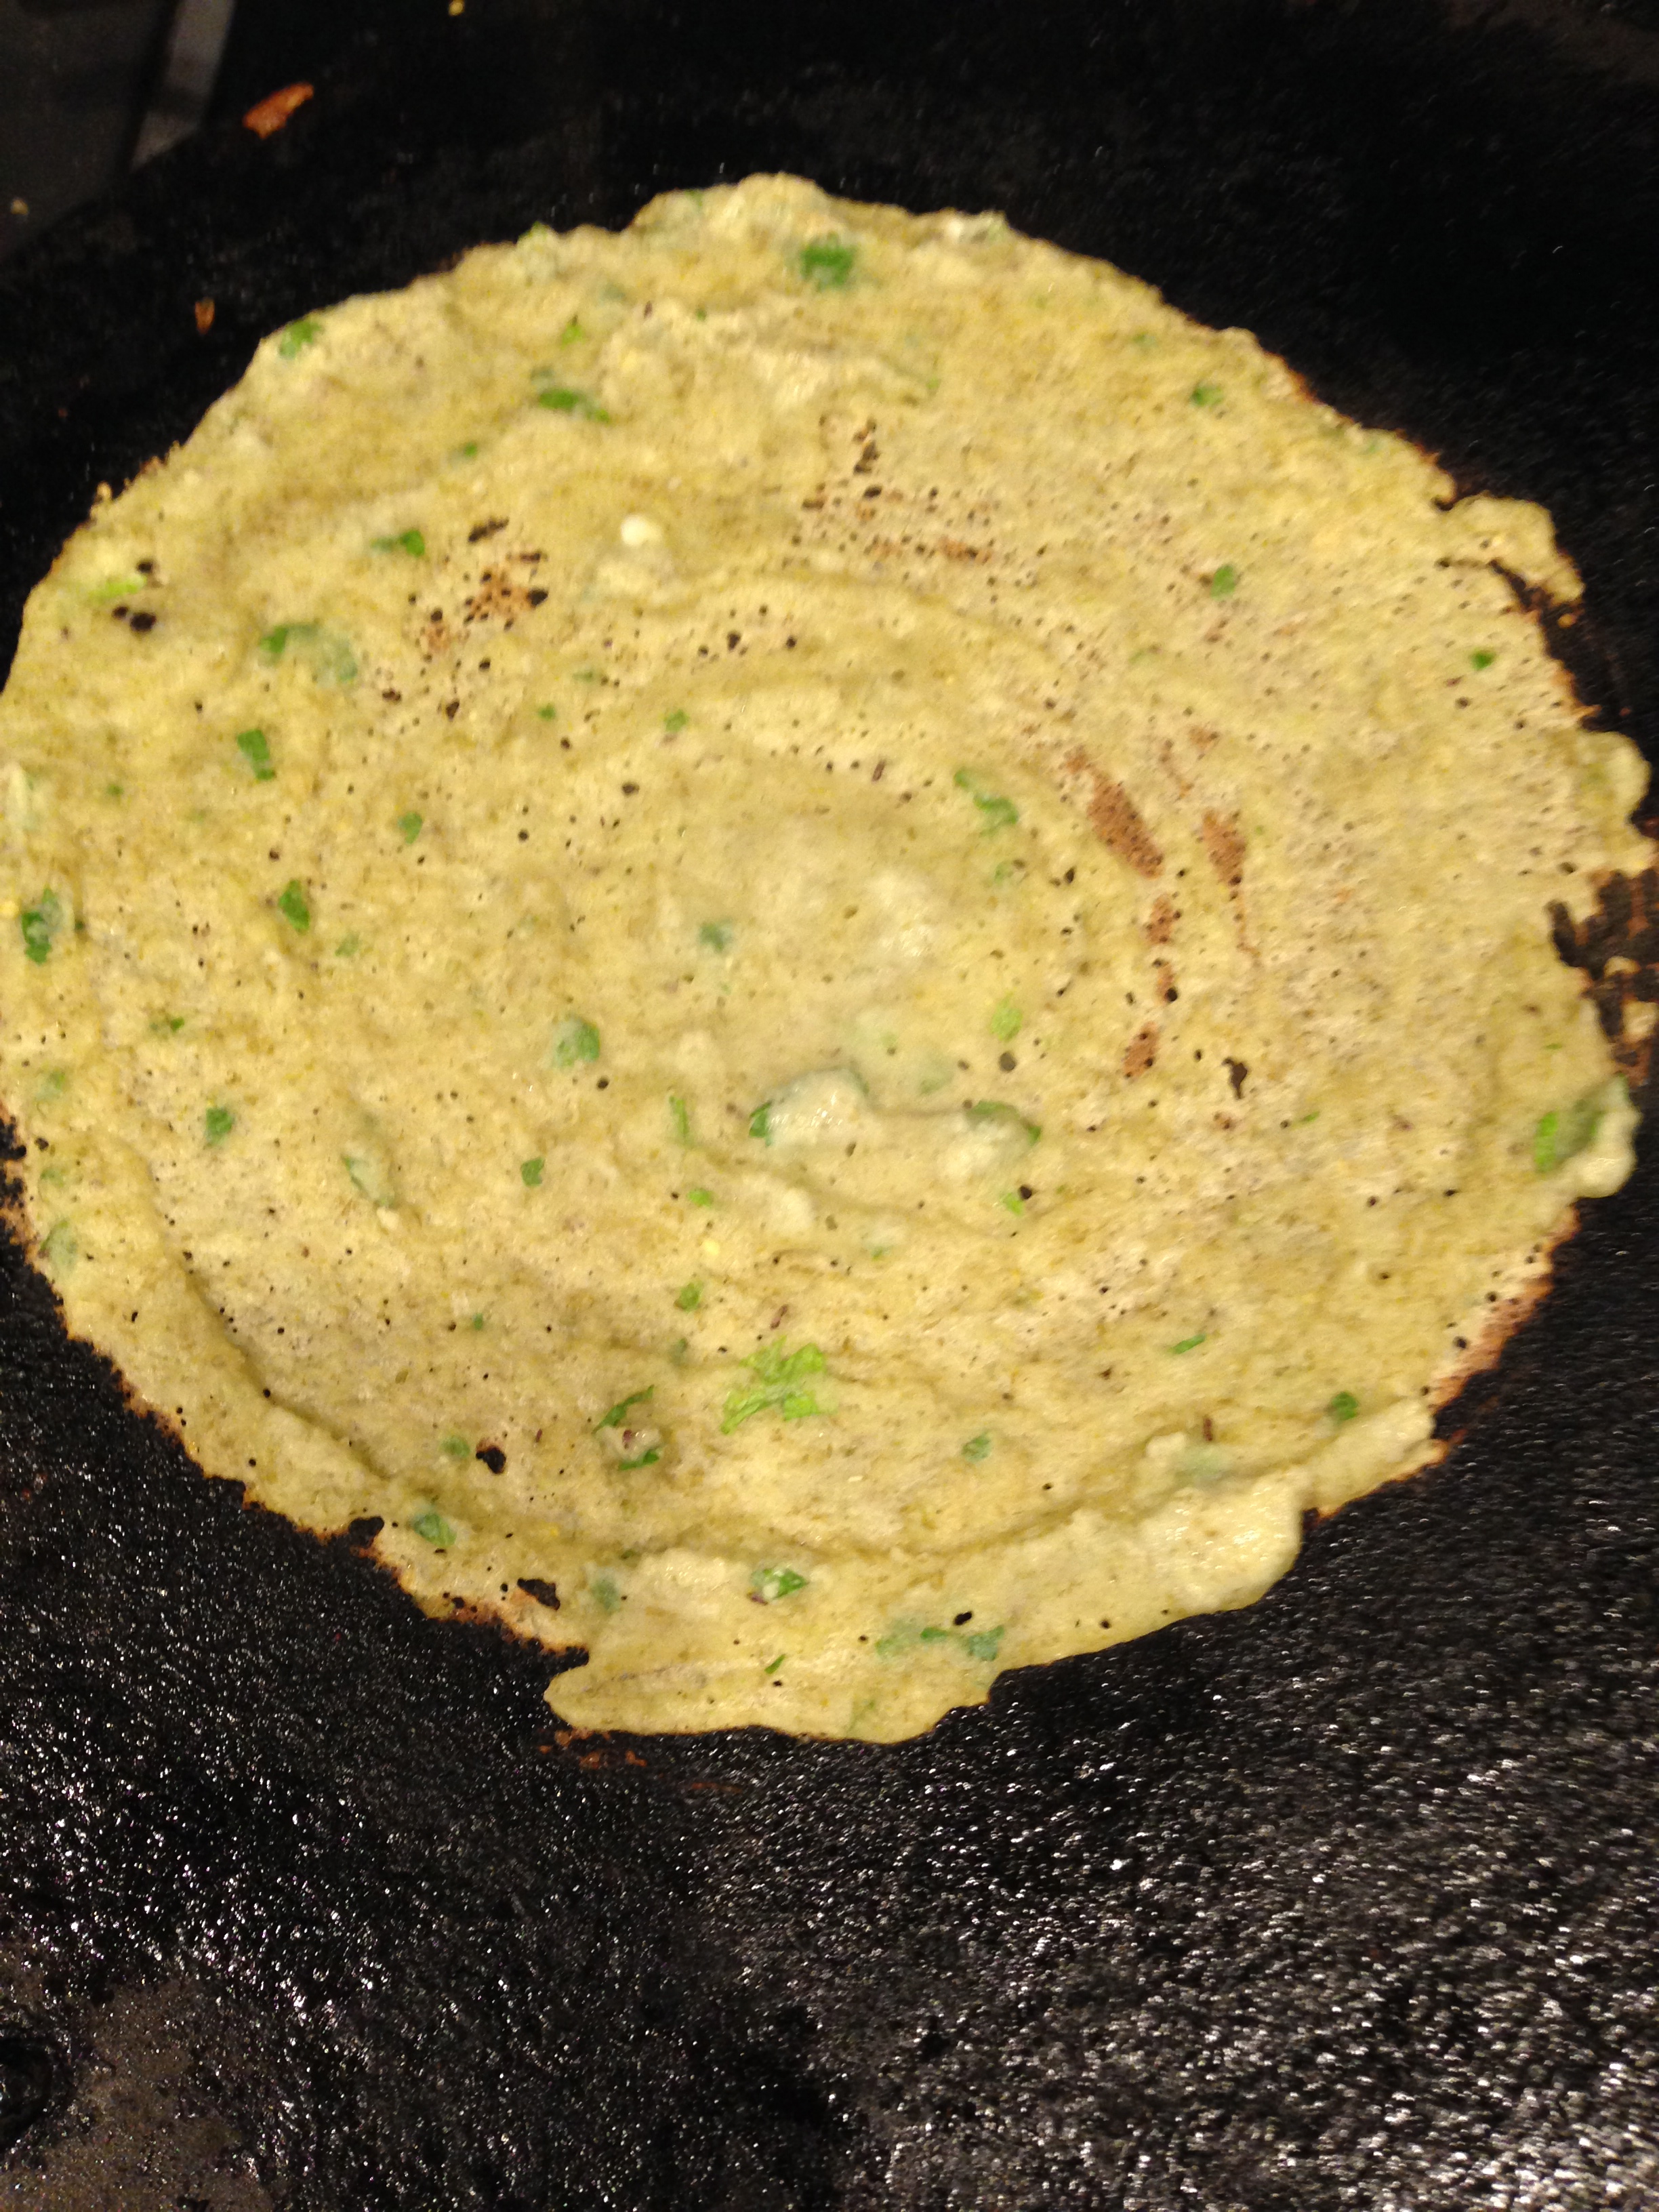
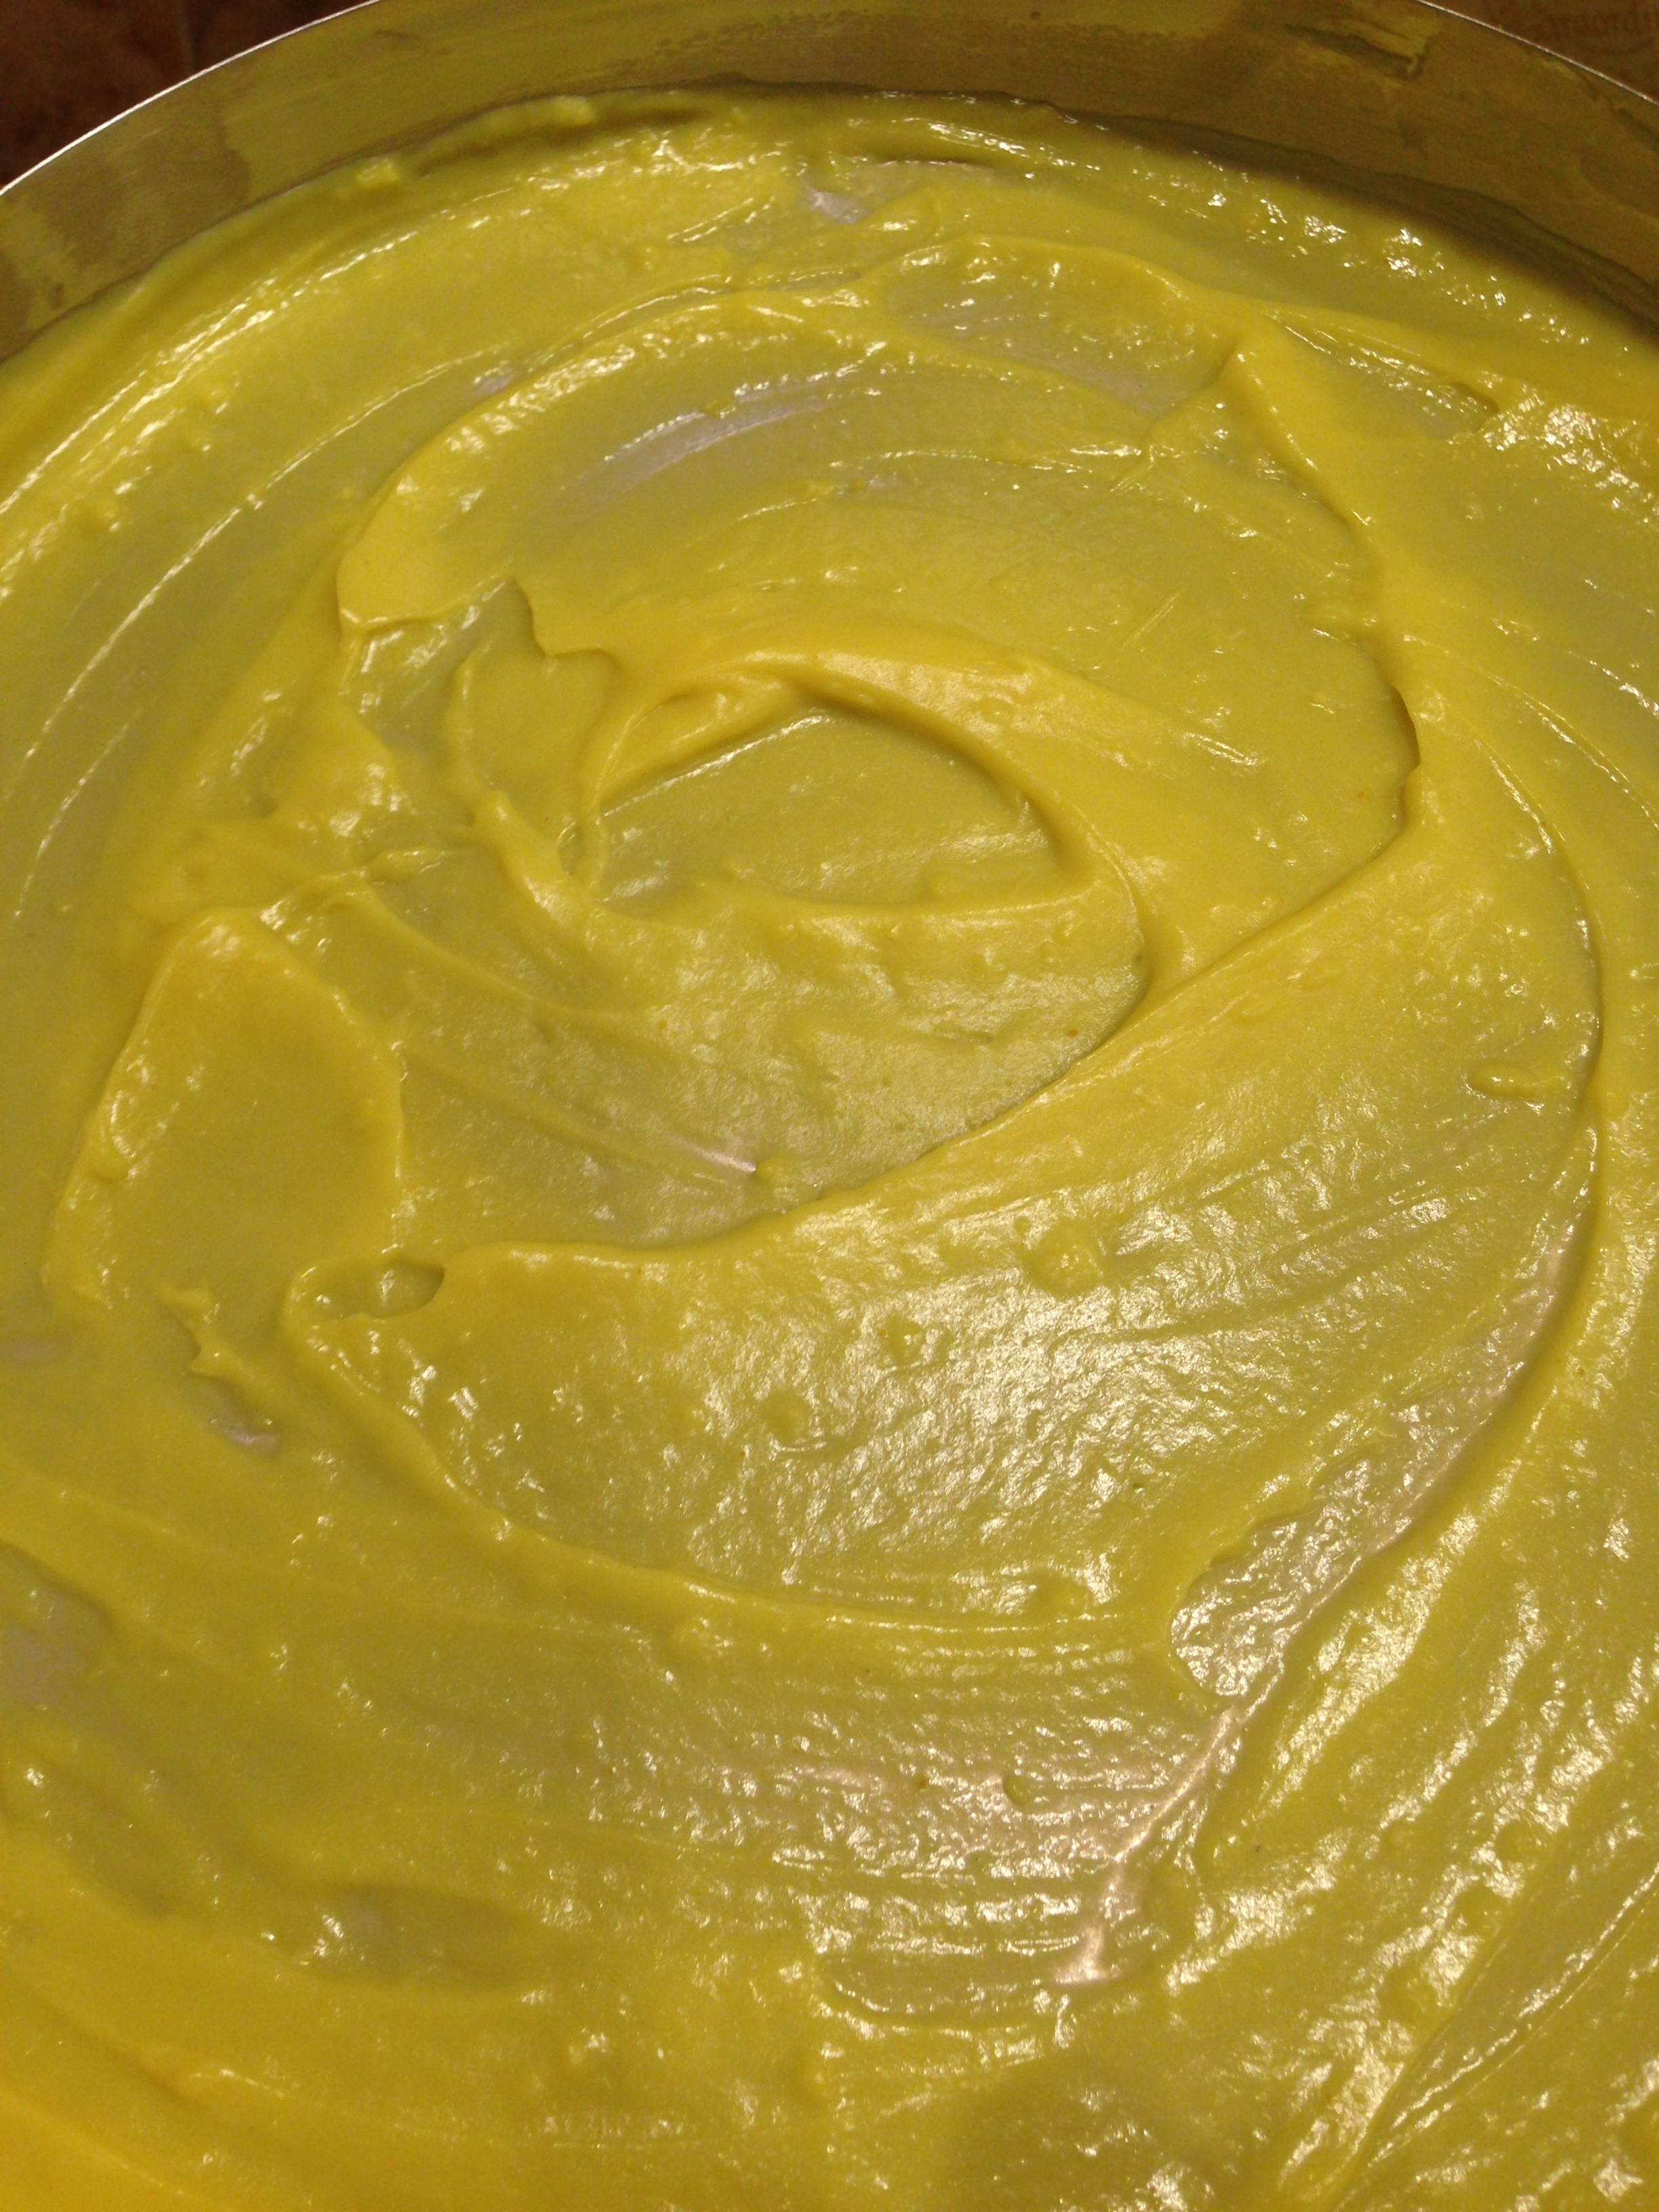
  • Remove from flame, and quickly spread the mixture evenly, using as much as is needed to evenly cover the diameter of the plate. 
  • The paste cools quickly, so you need to spread this fast and quick.
  • IMG_2258
  • Do this till all the paste is used up.
  • Cool for 15-20 min.
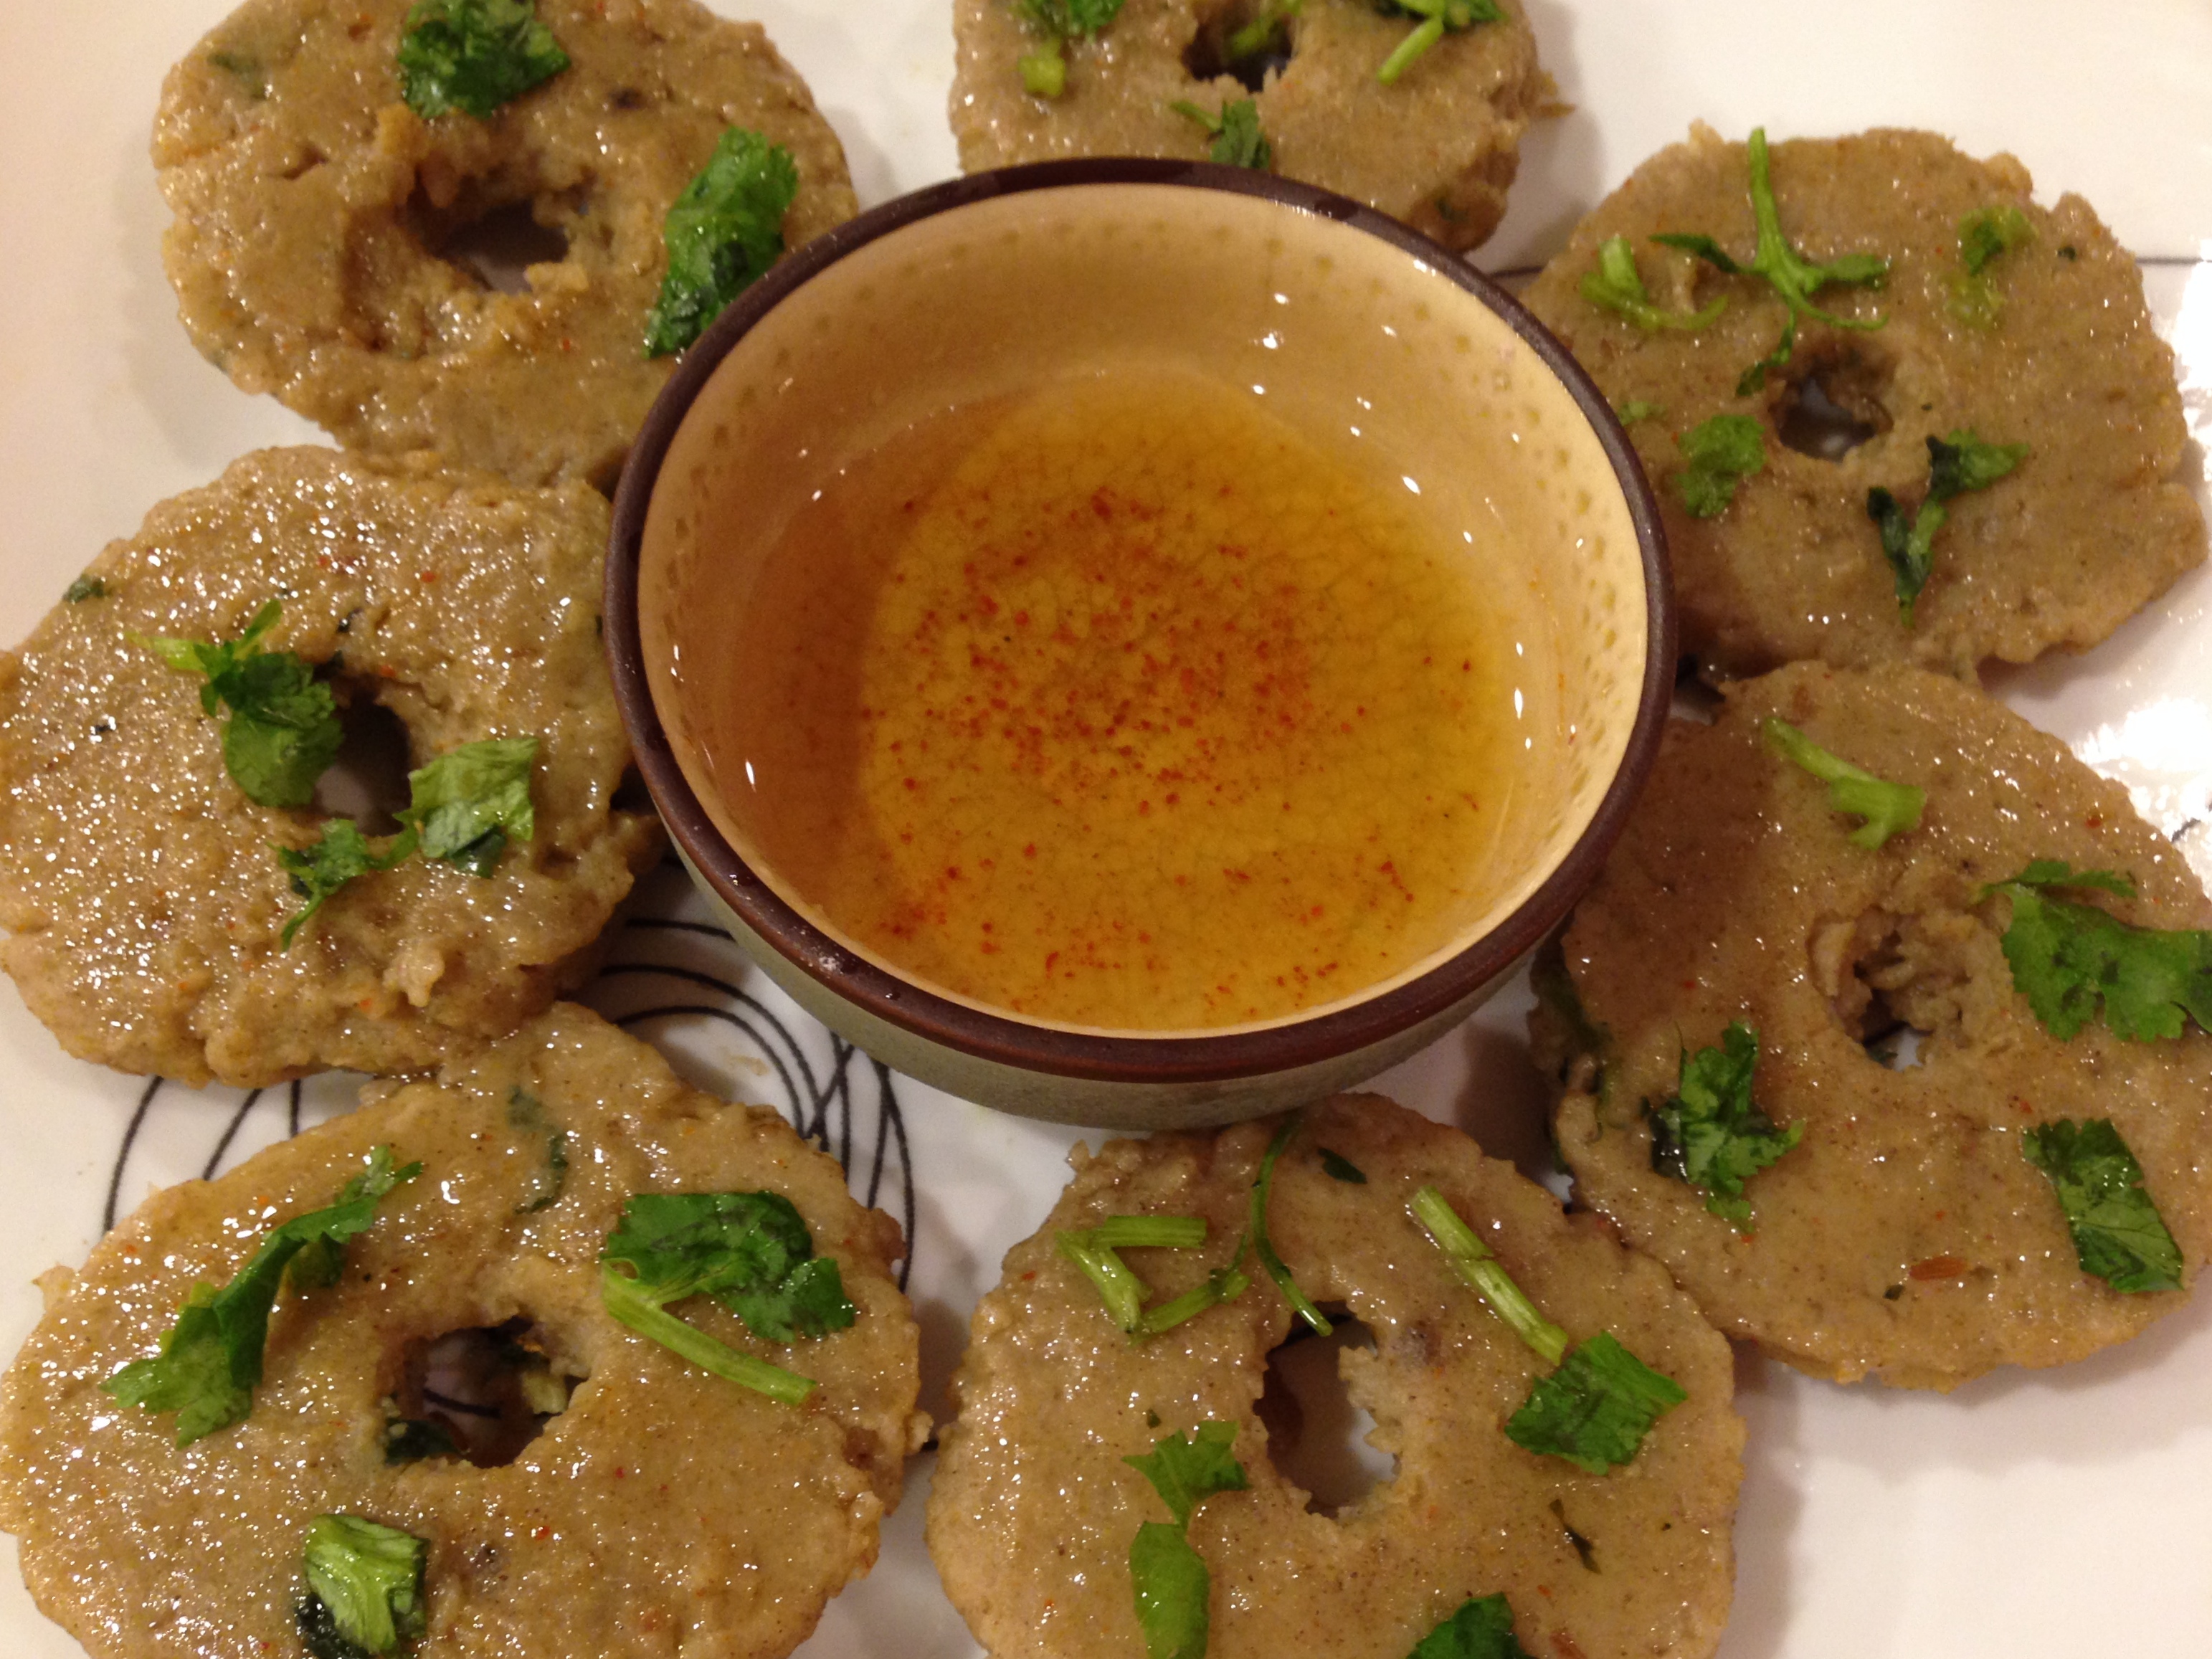
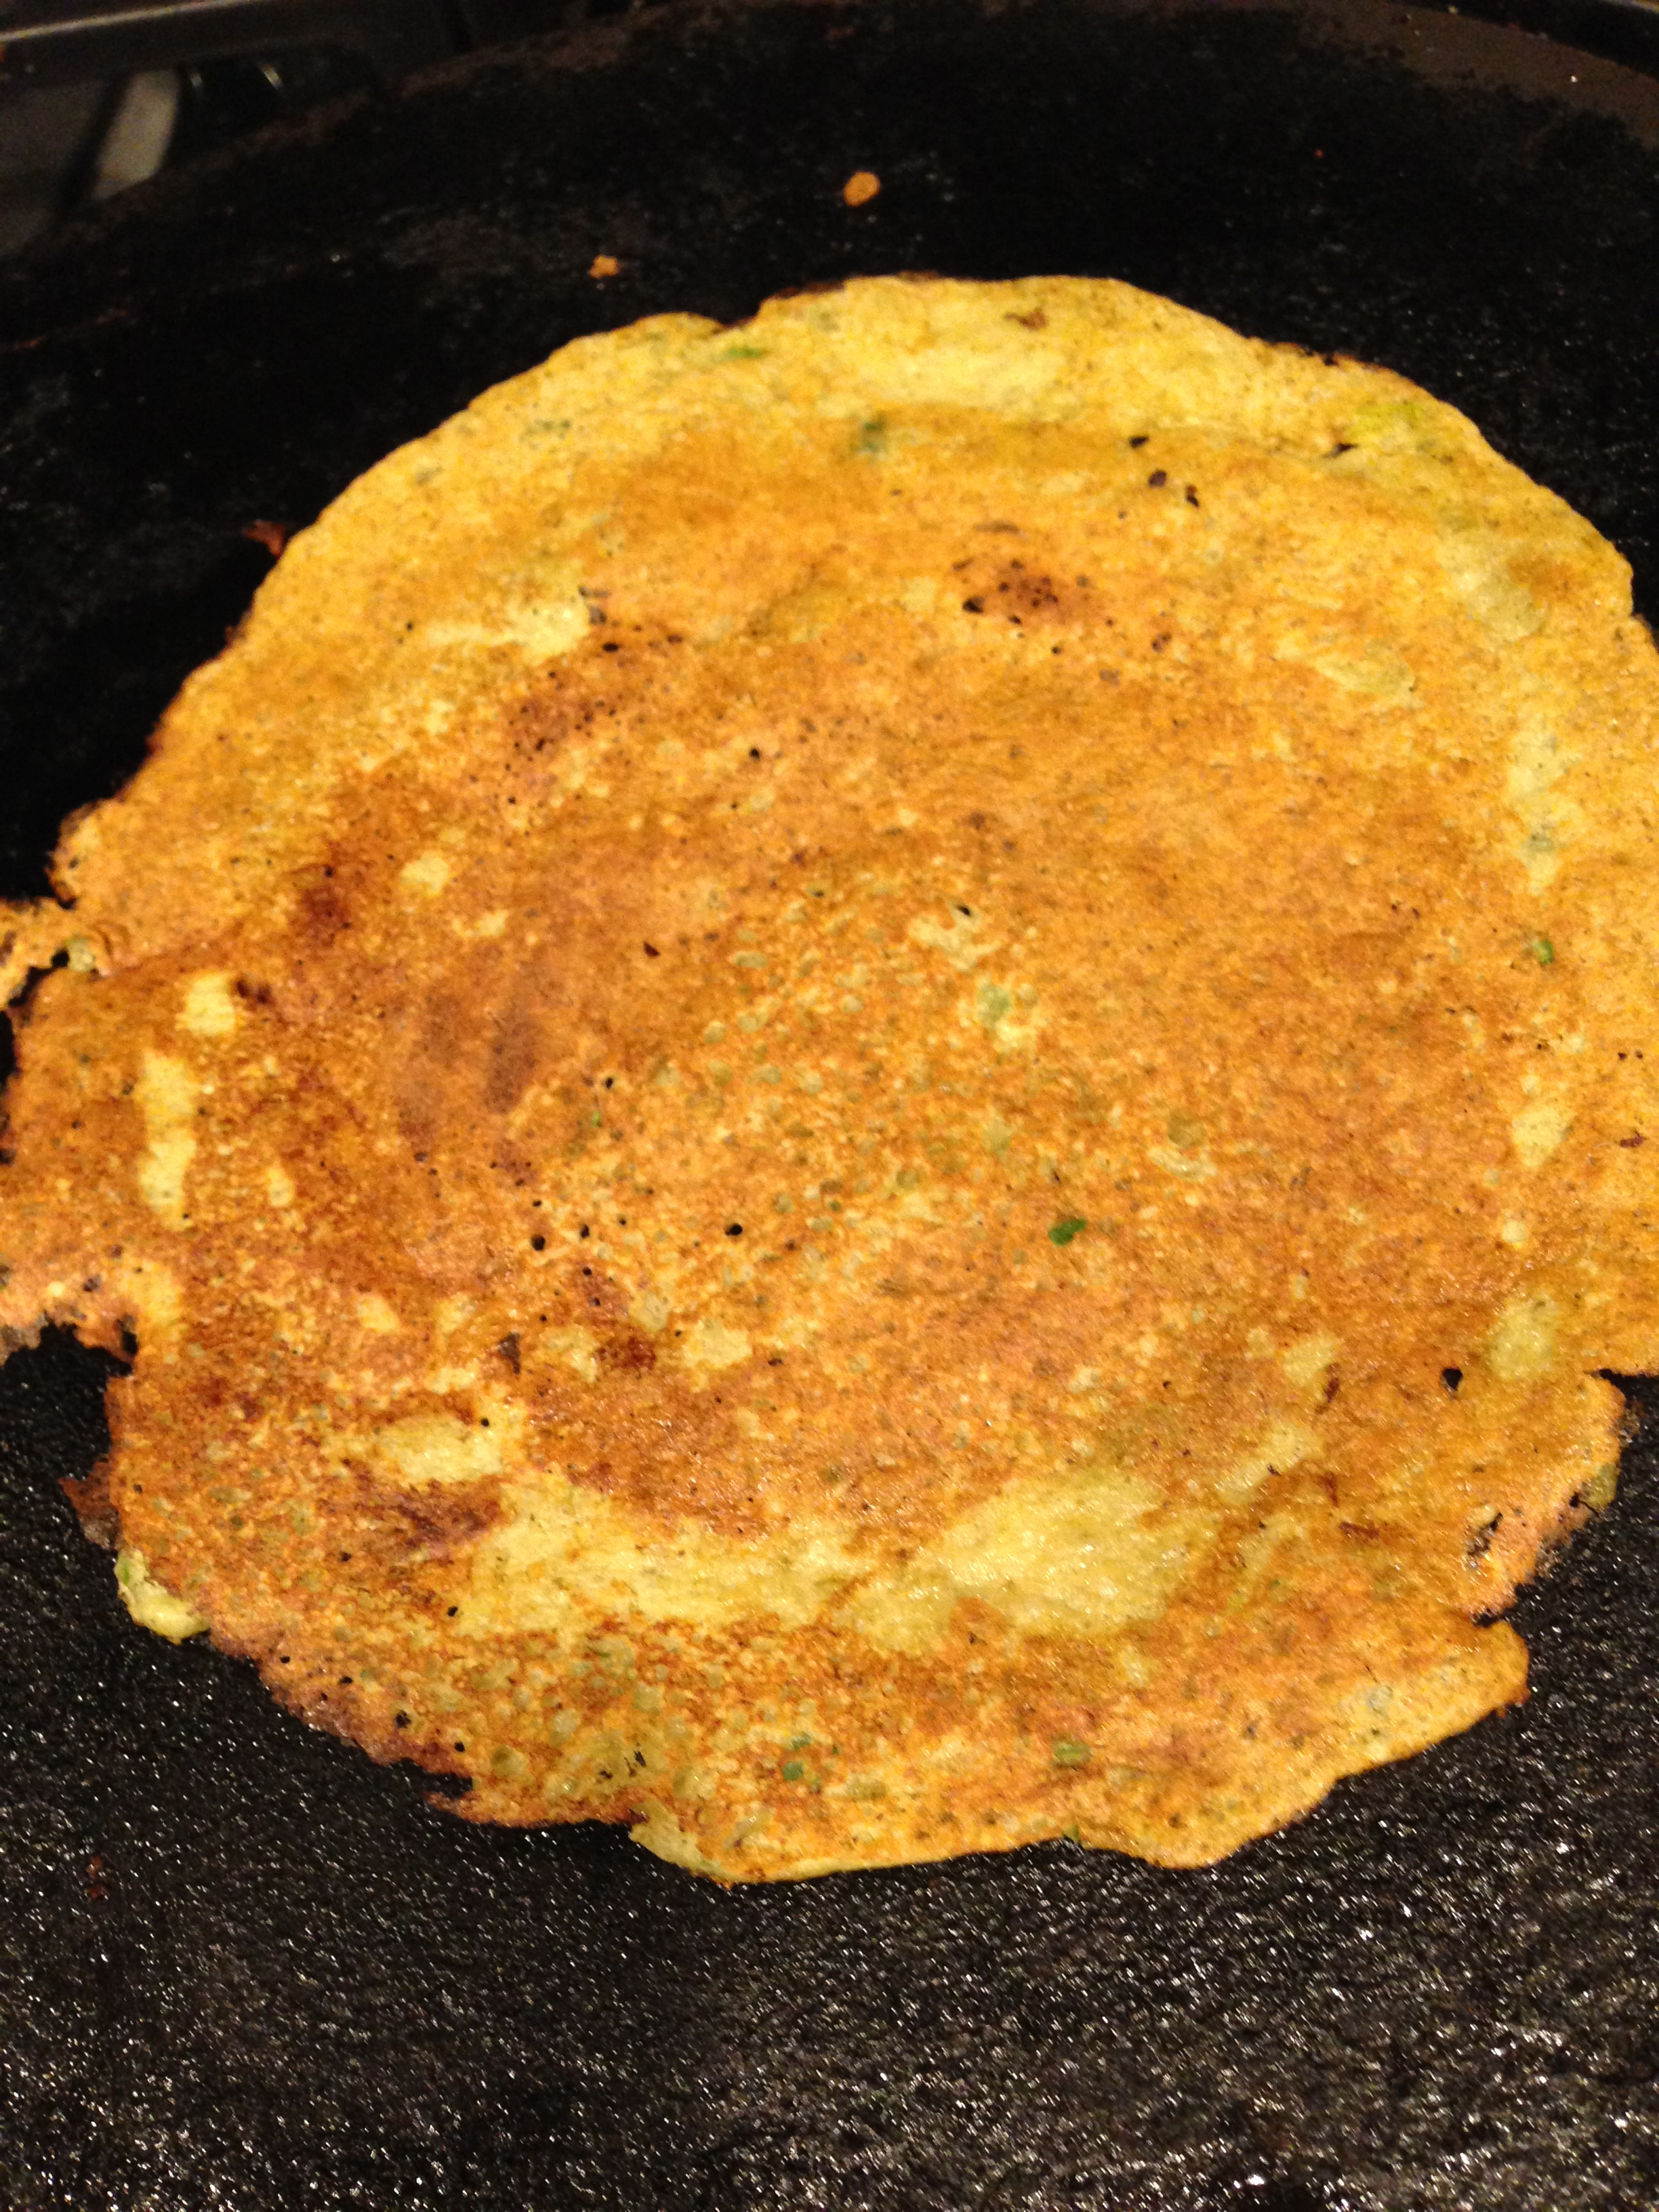
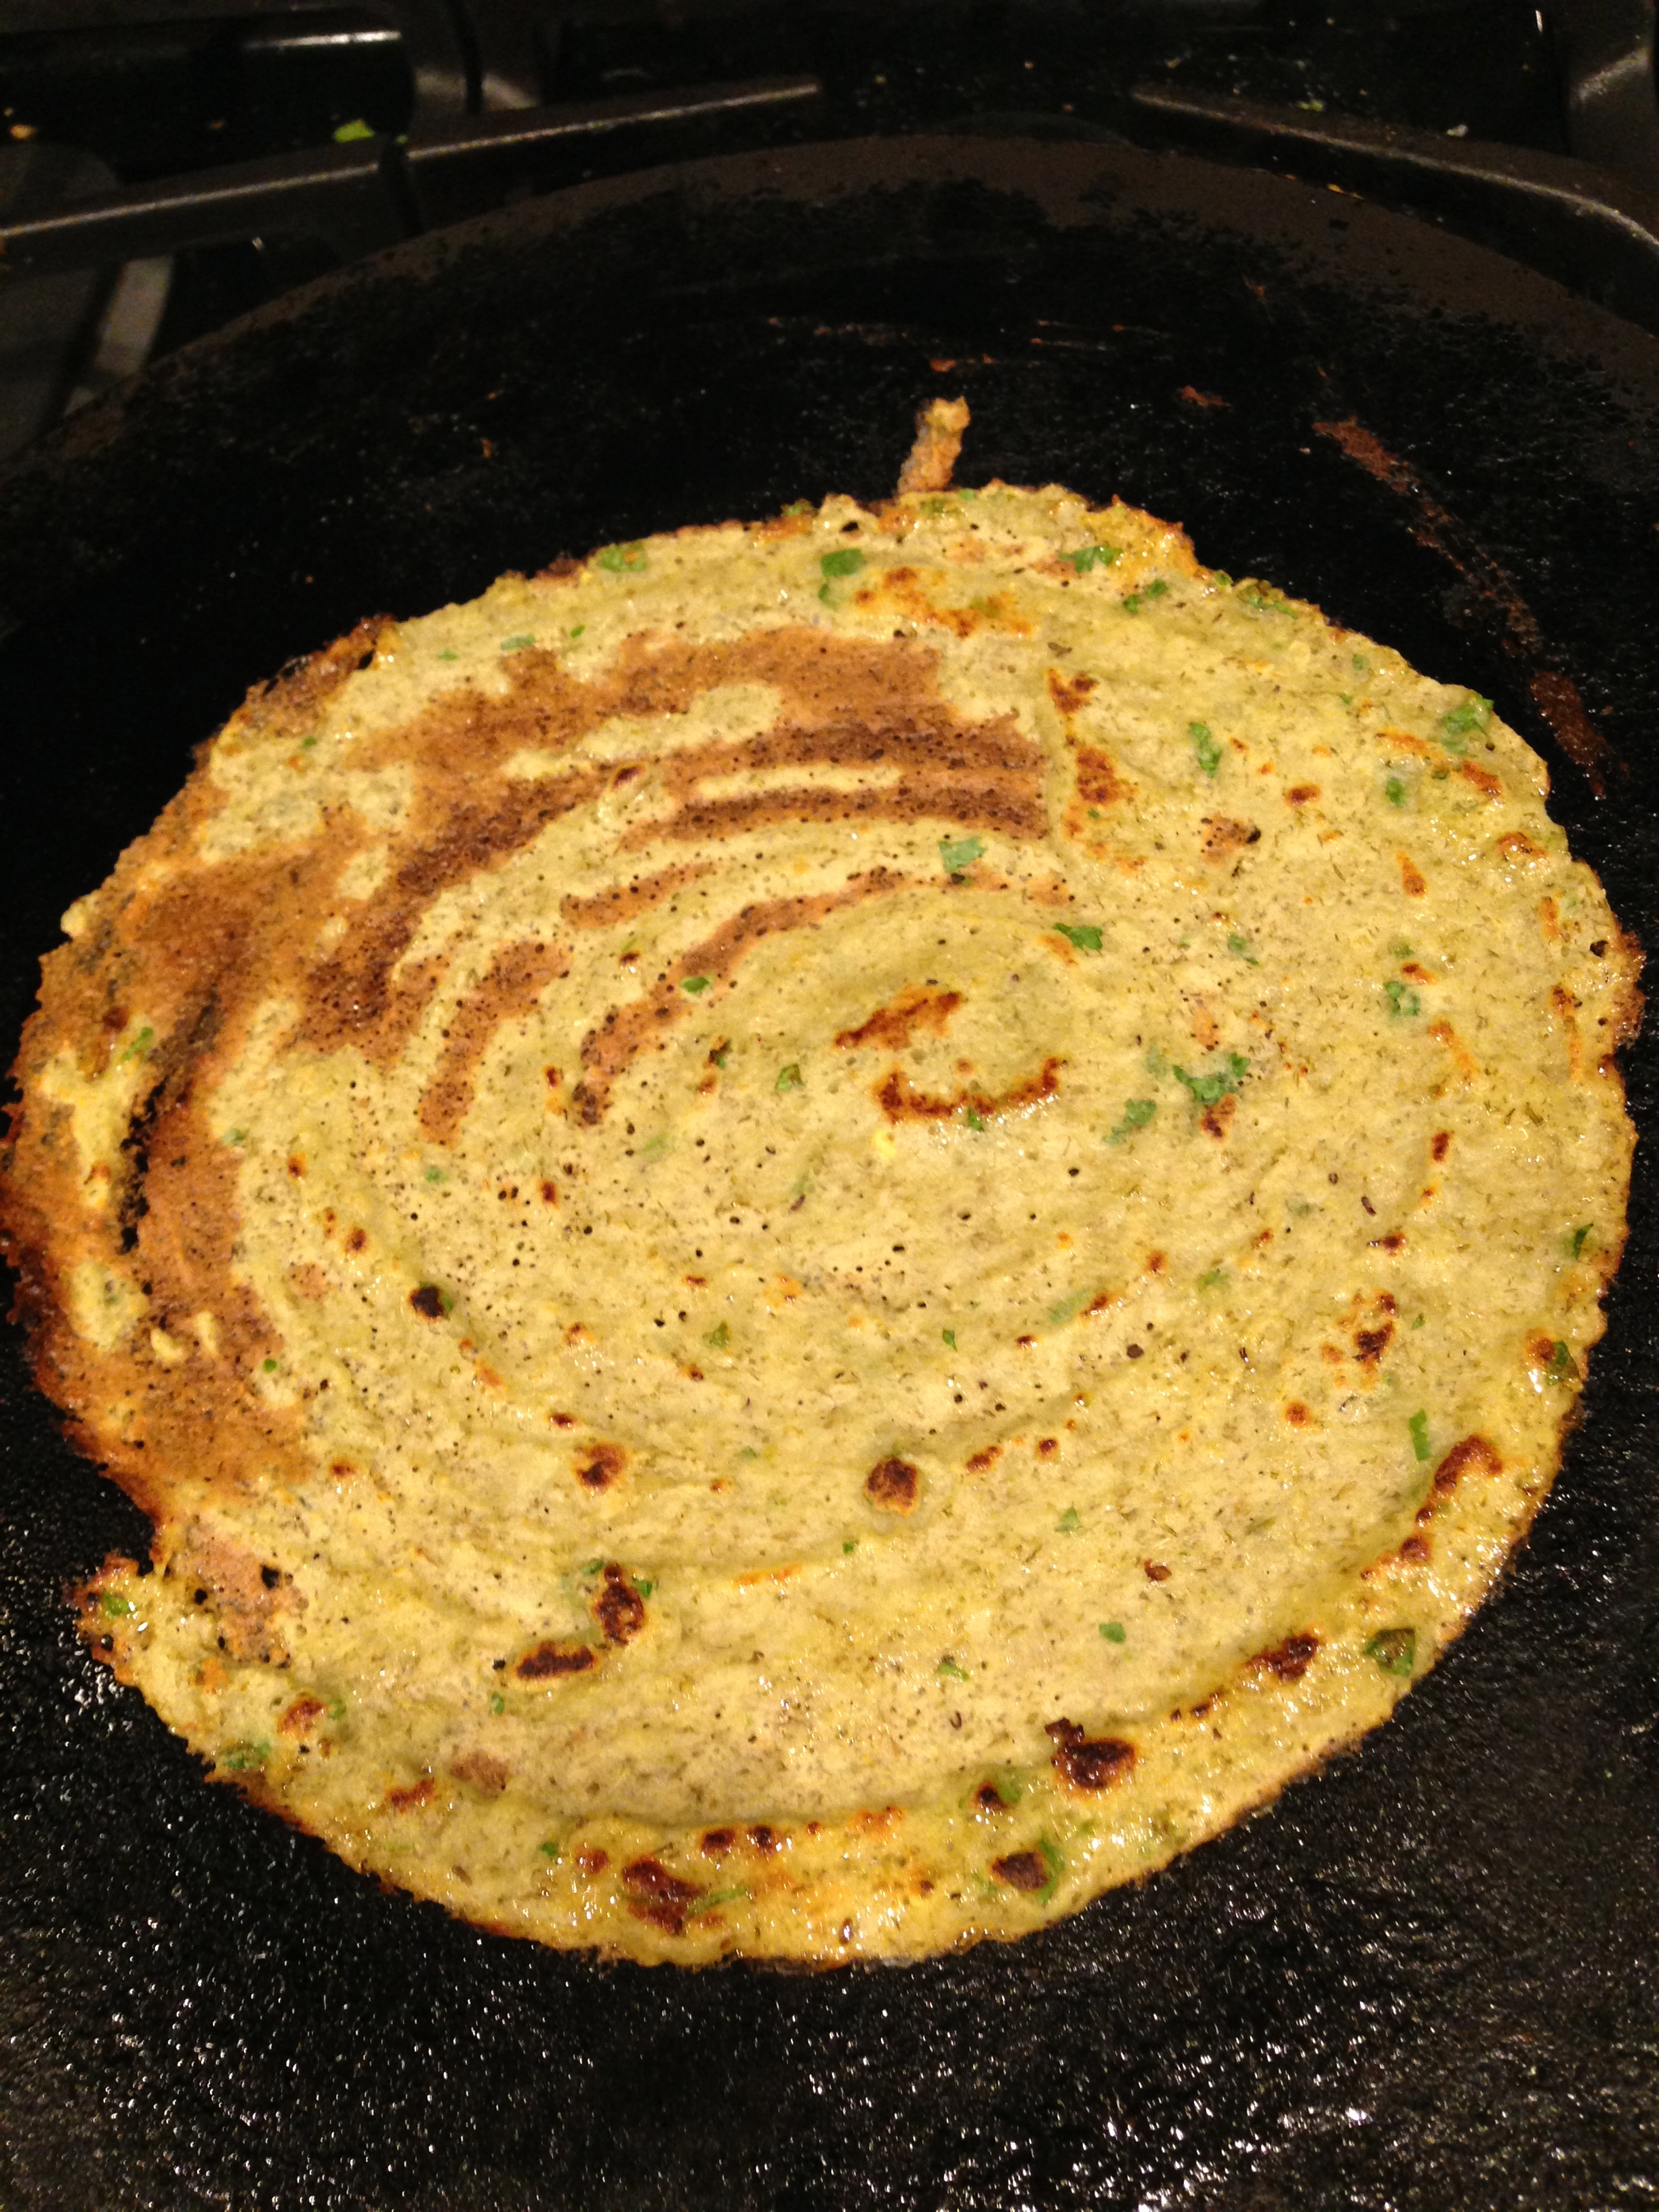
  • Spread some oil on the paste.
  • Sprinkle some red chilli powder
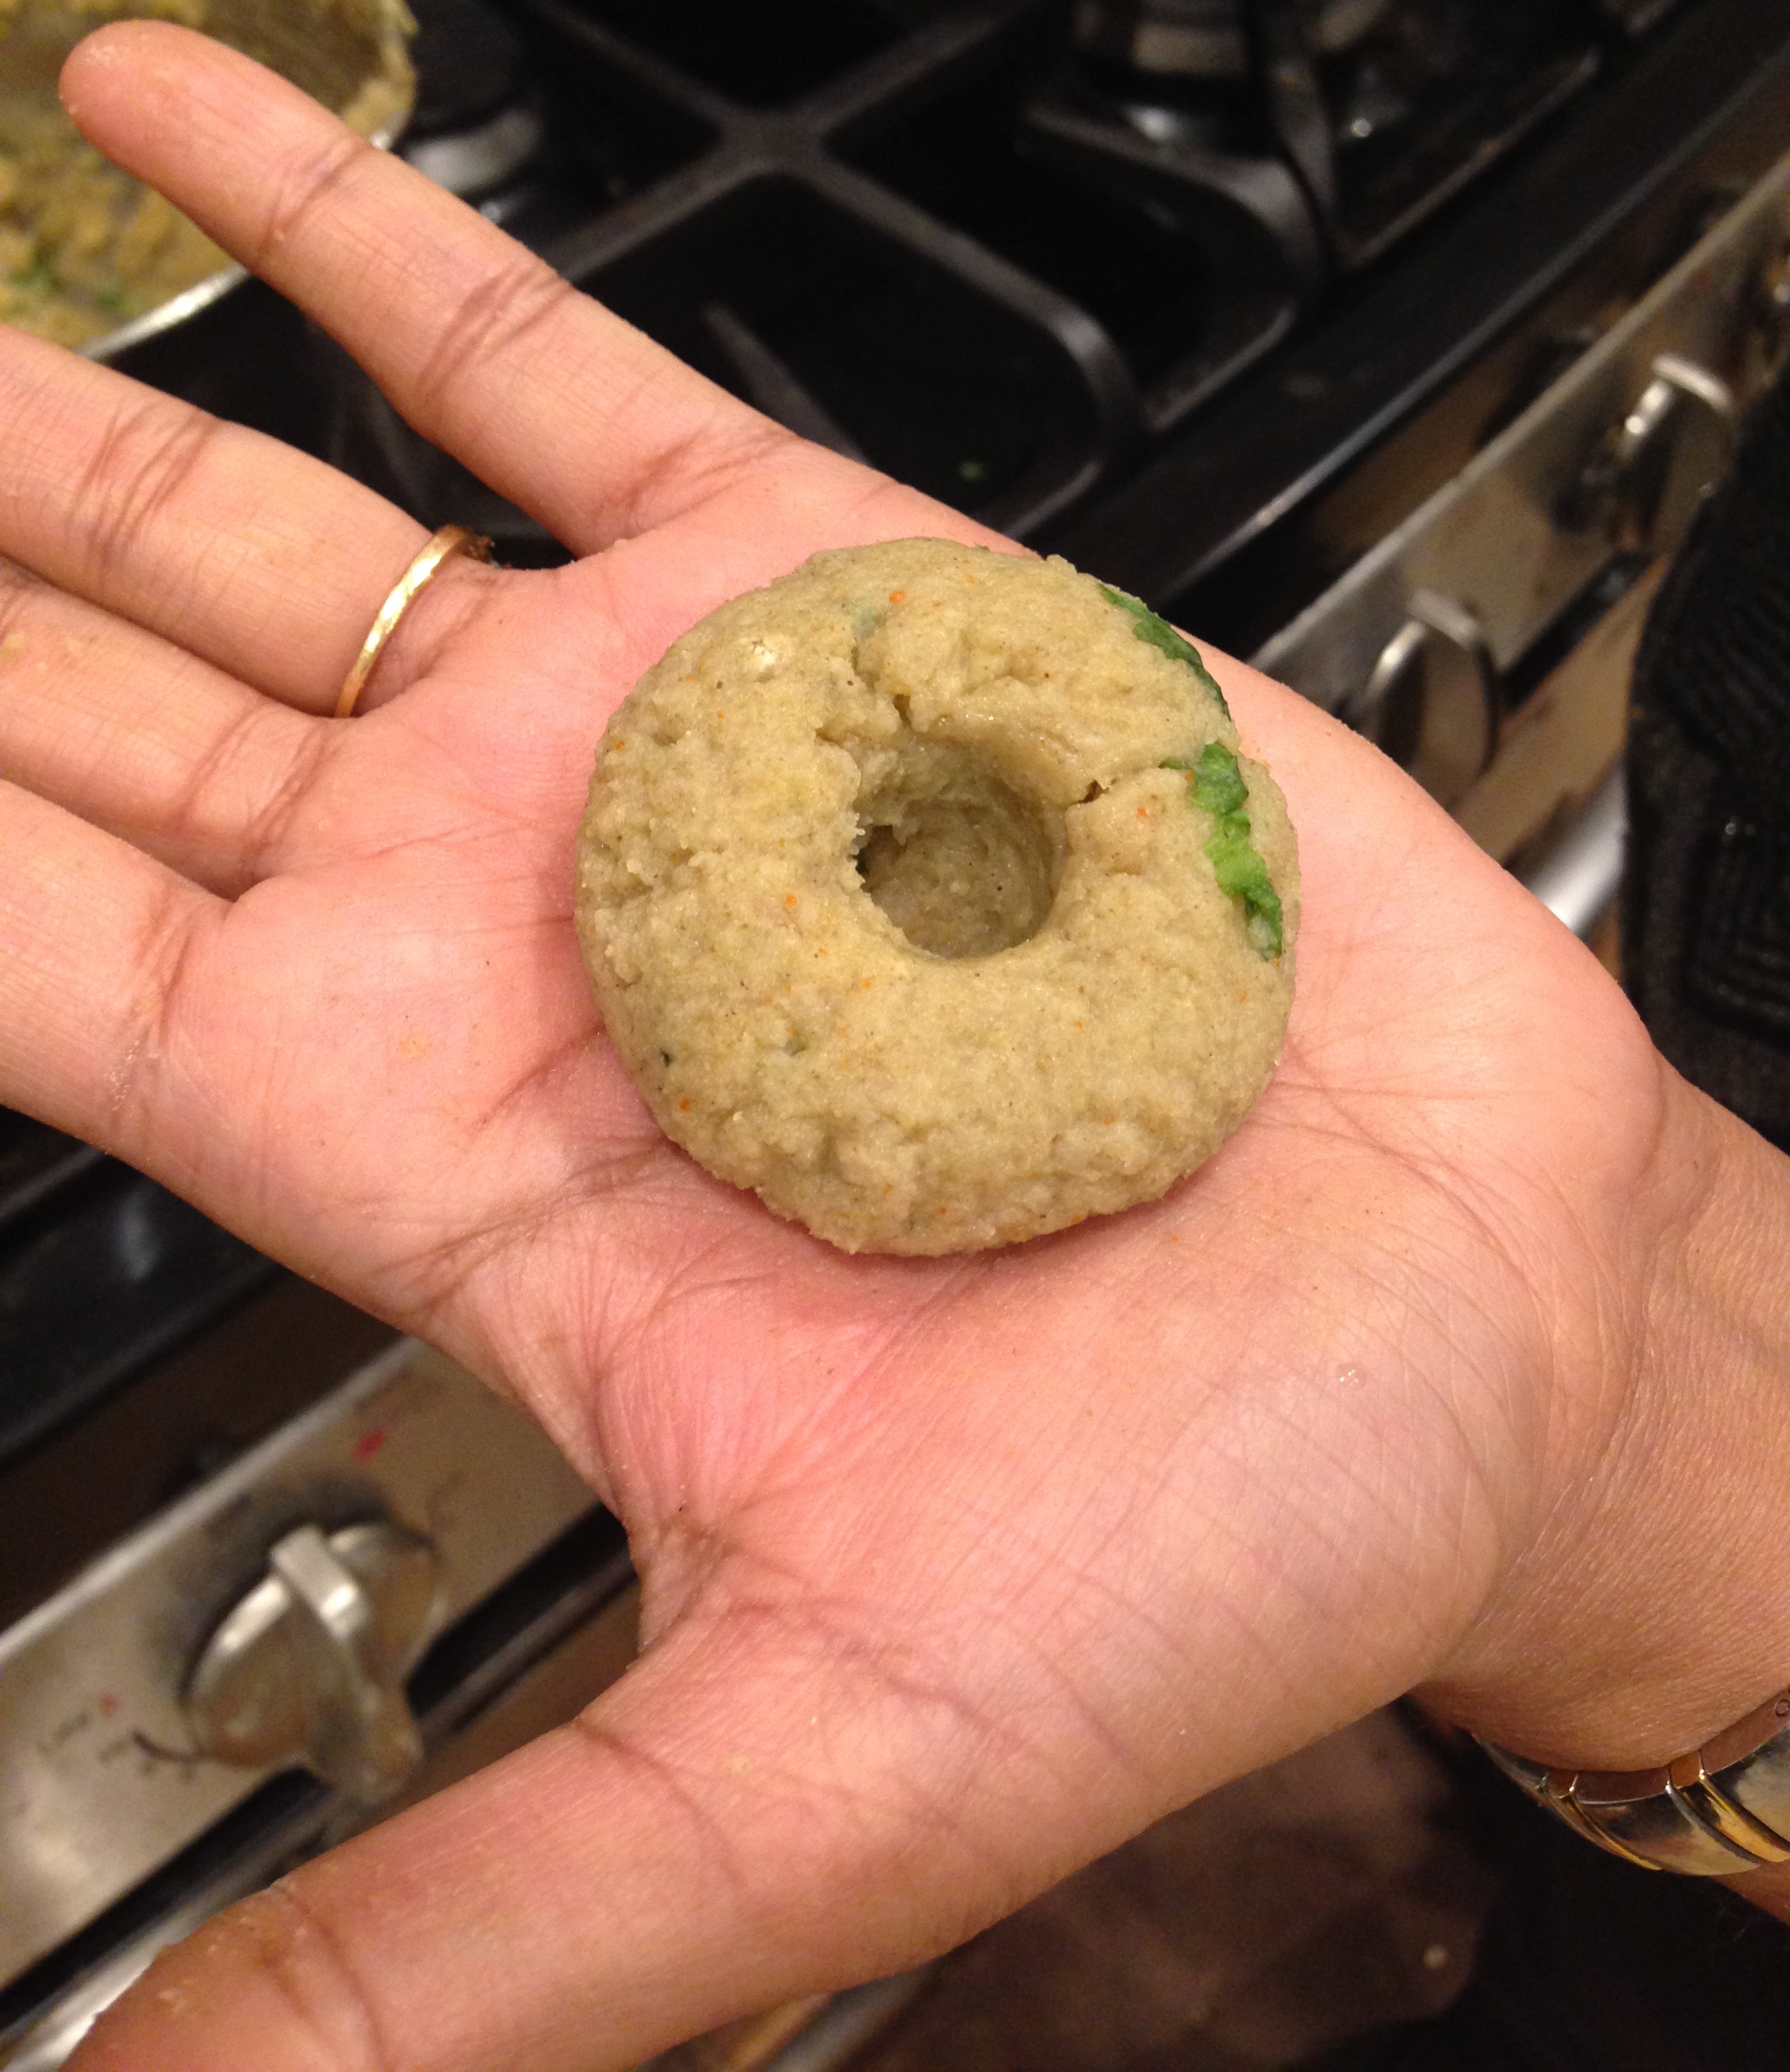
  • Using a knife, cut the circle into half.
  • Slightly release the edges of the paste from the plate, using your fingers, by pushing the paste inwards.
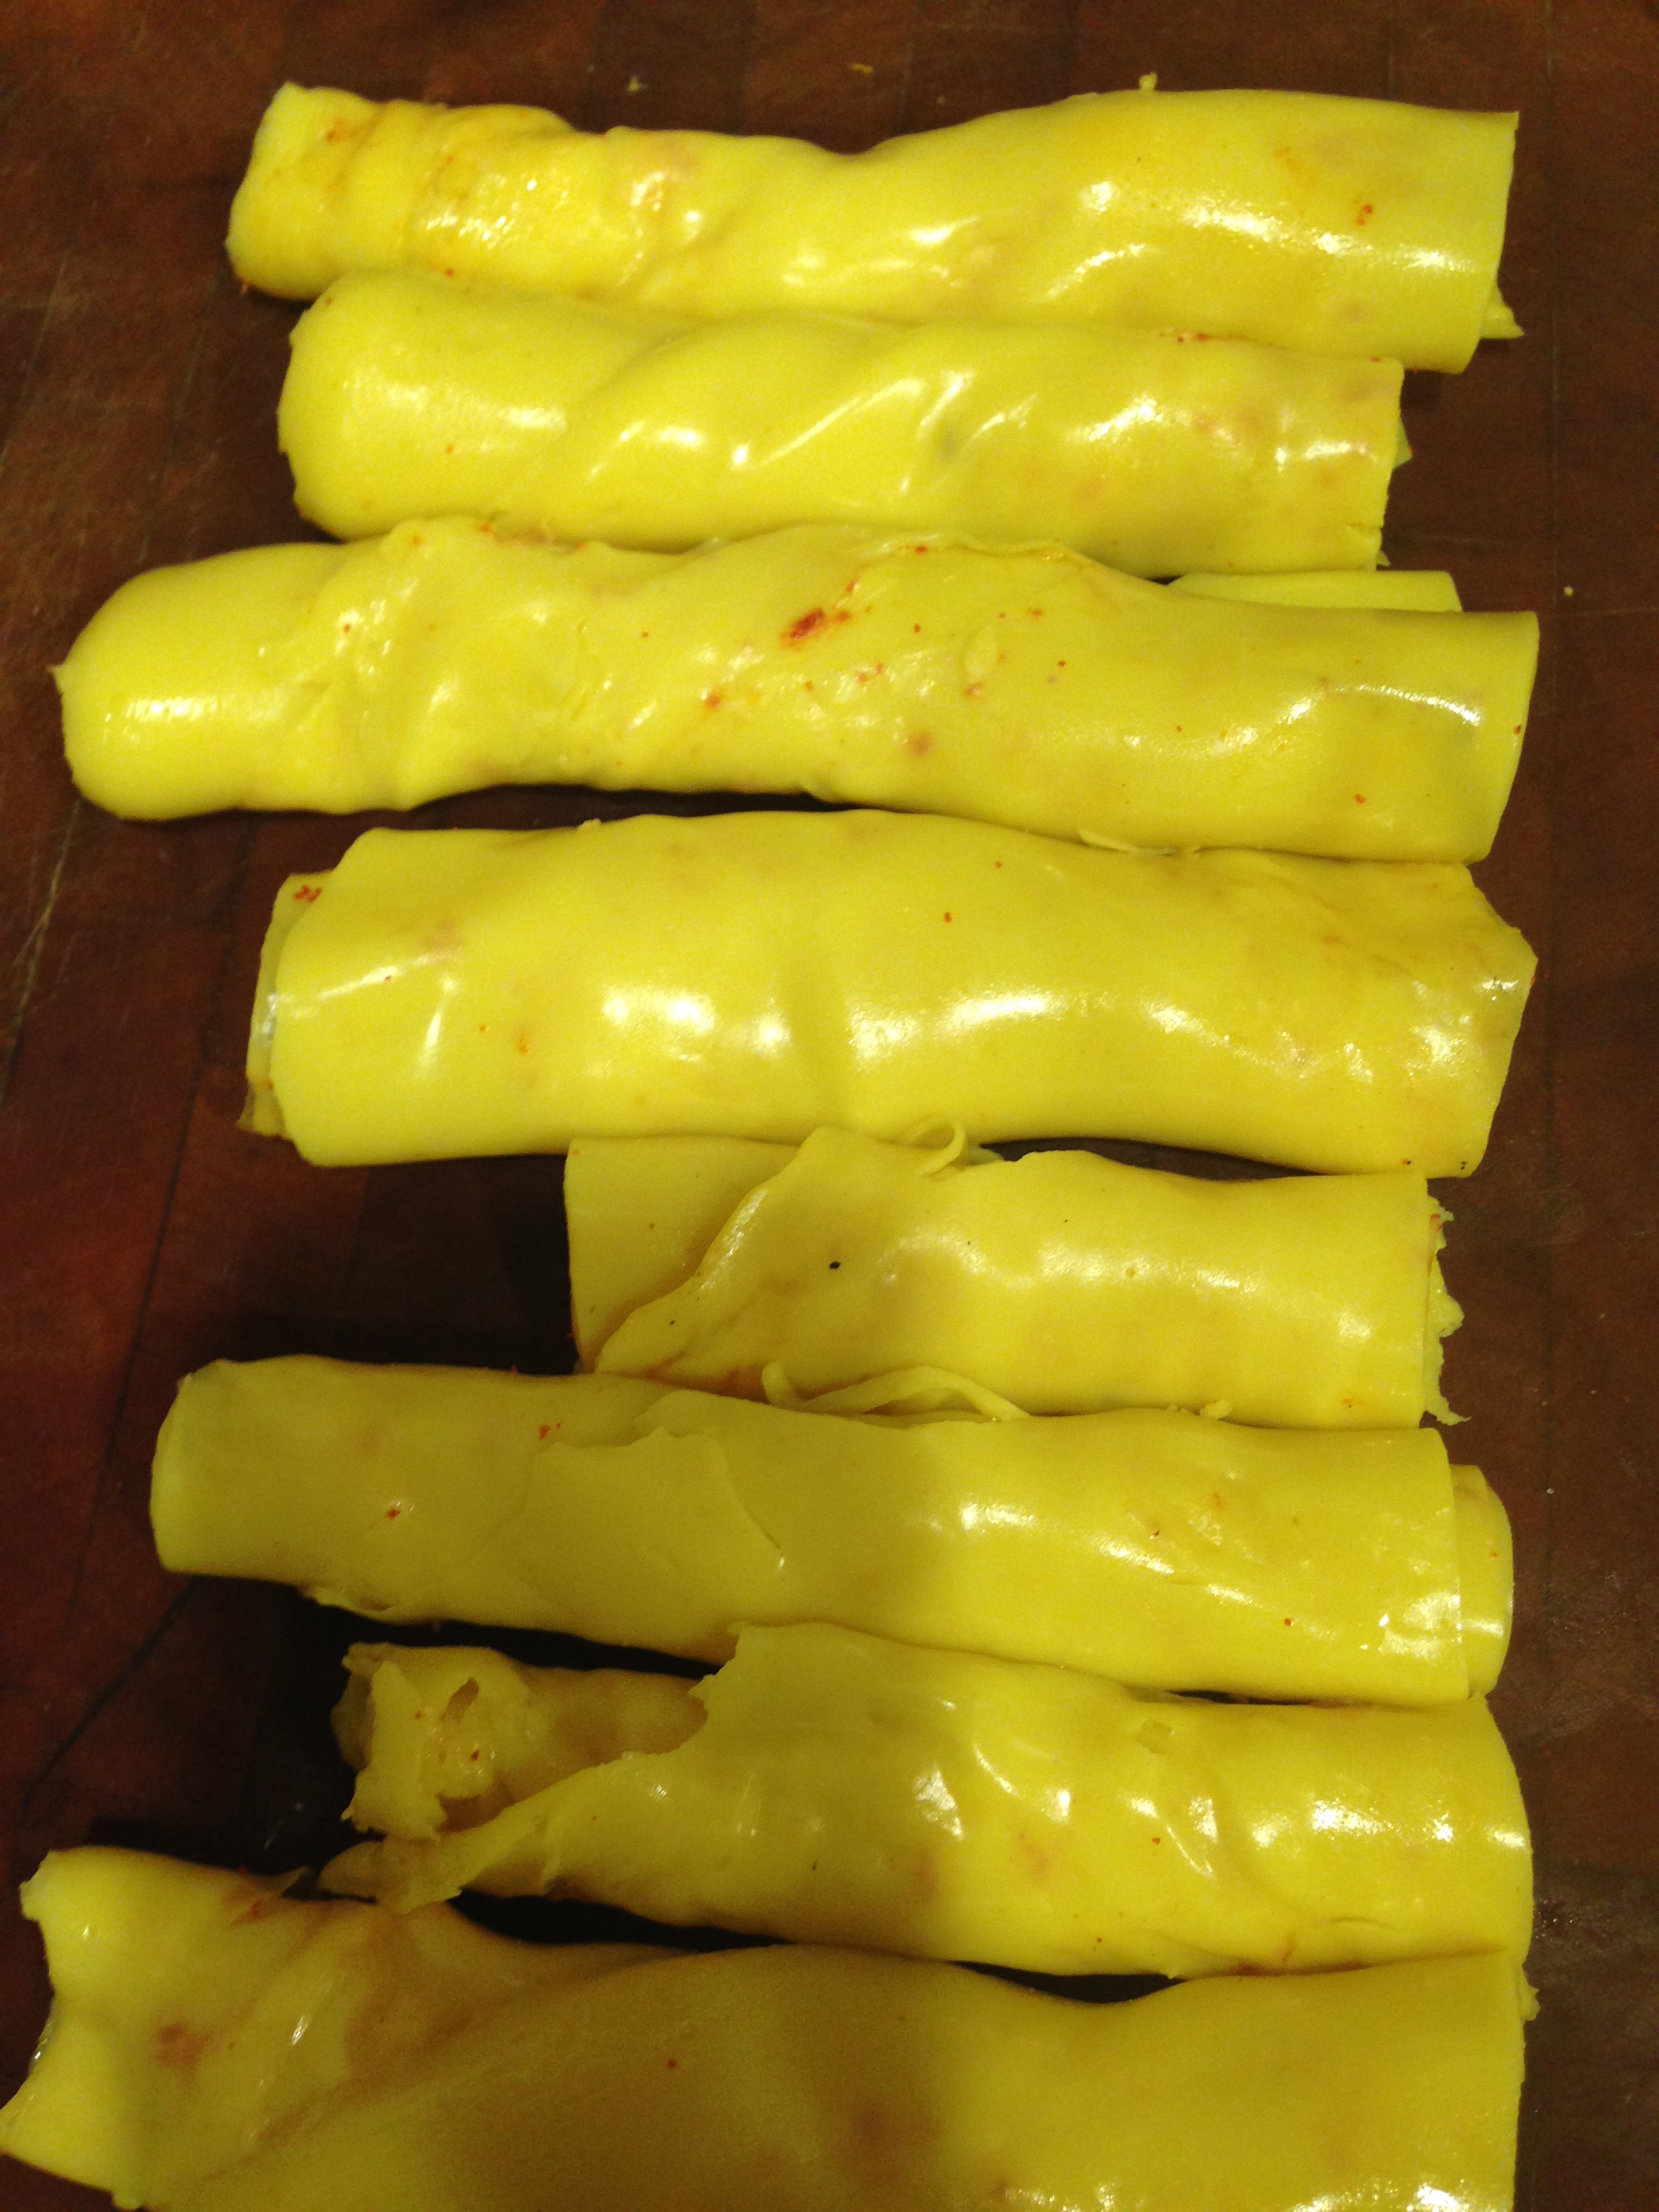
  • Start rolling into rolls, using one half of the circle, rolling it tight.
  • So every flat dish will give you two rolled circles.
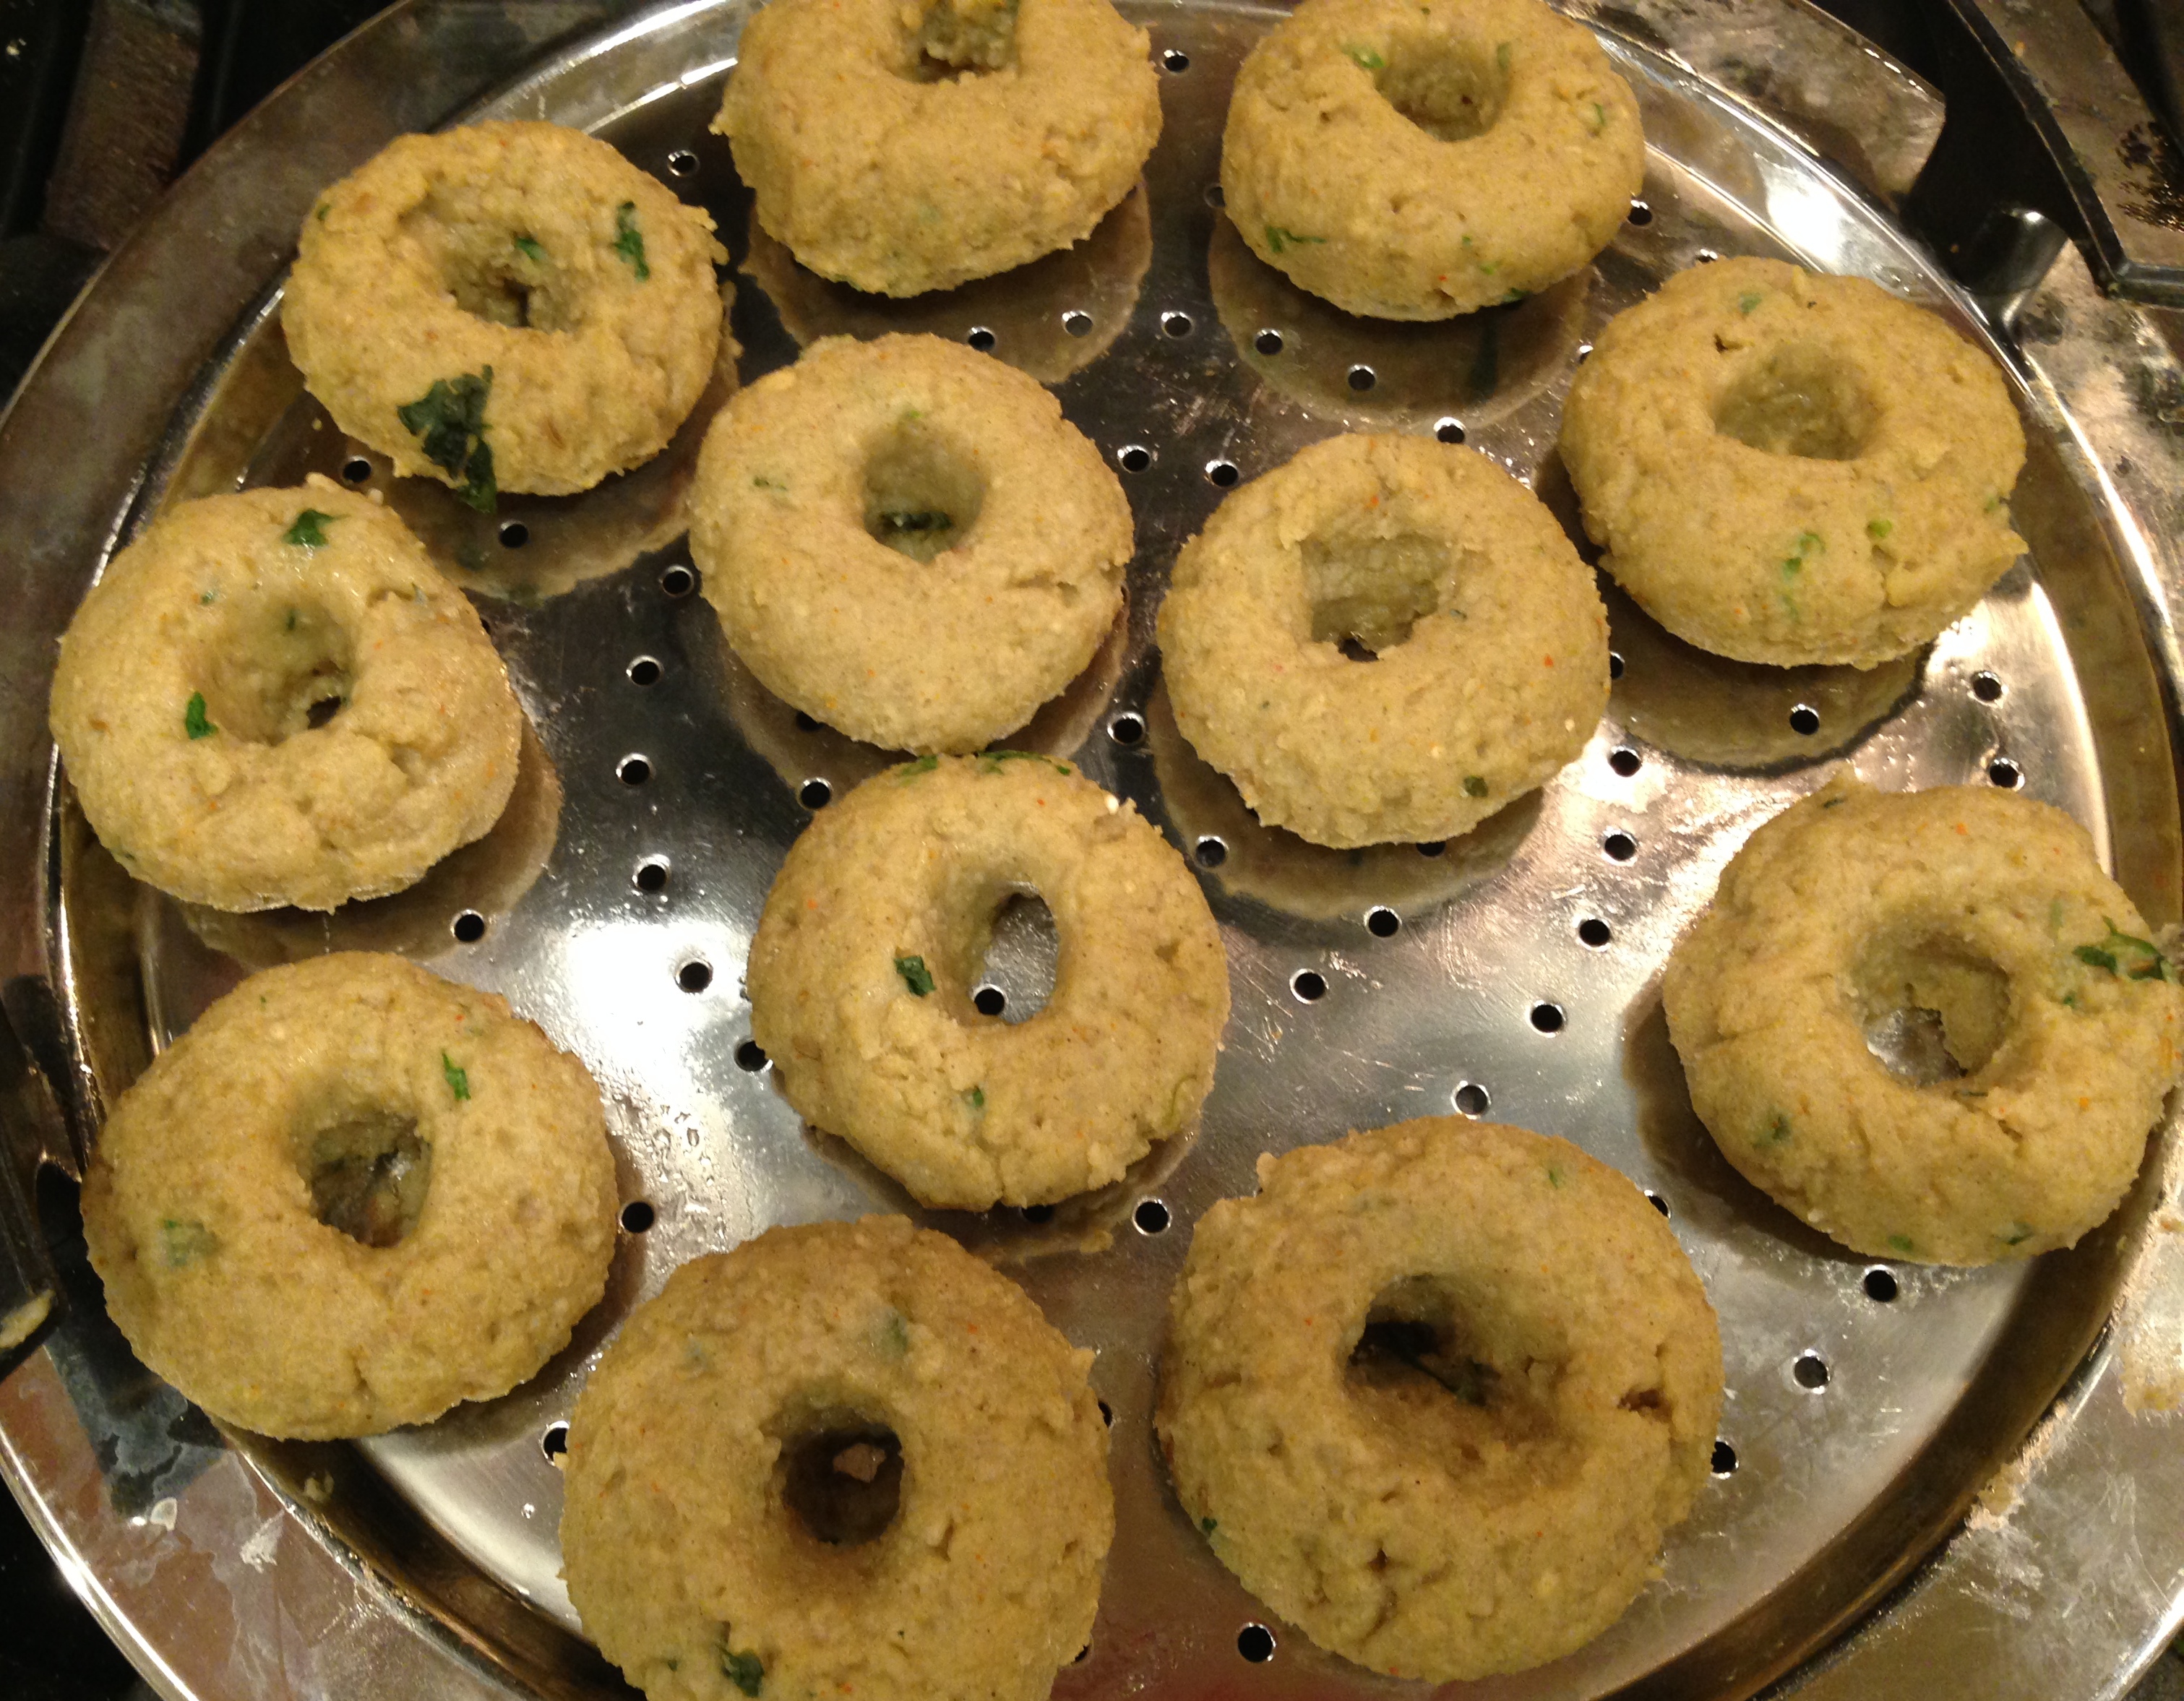
  • Gently lift the rolls and put it on a cutting board or flat surface.
  • IMG_2259
  • Cut the long rolls into 1/2 inch horizontal cuts.
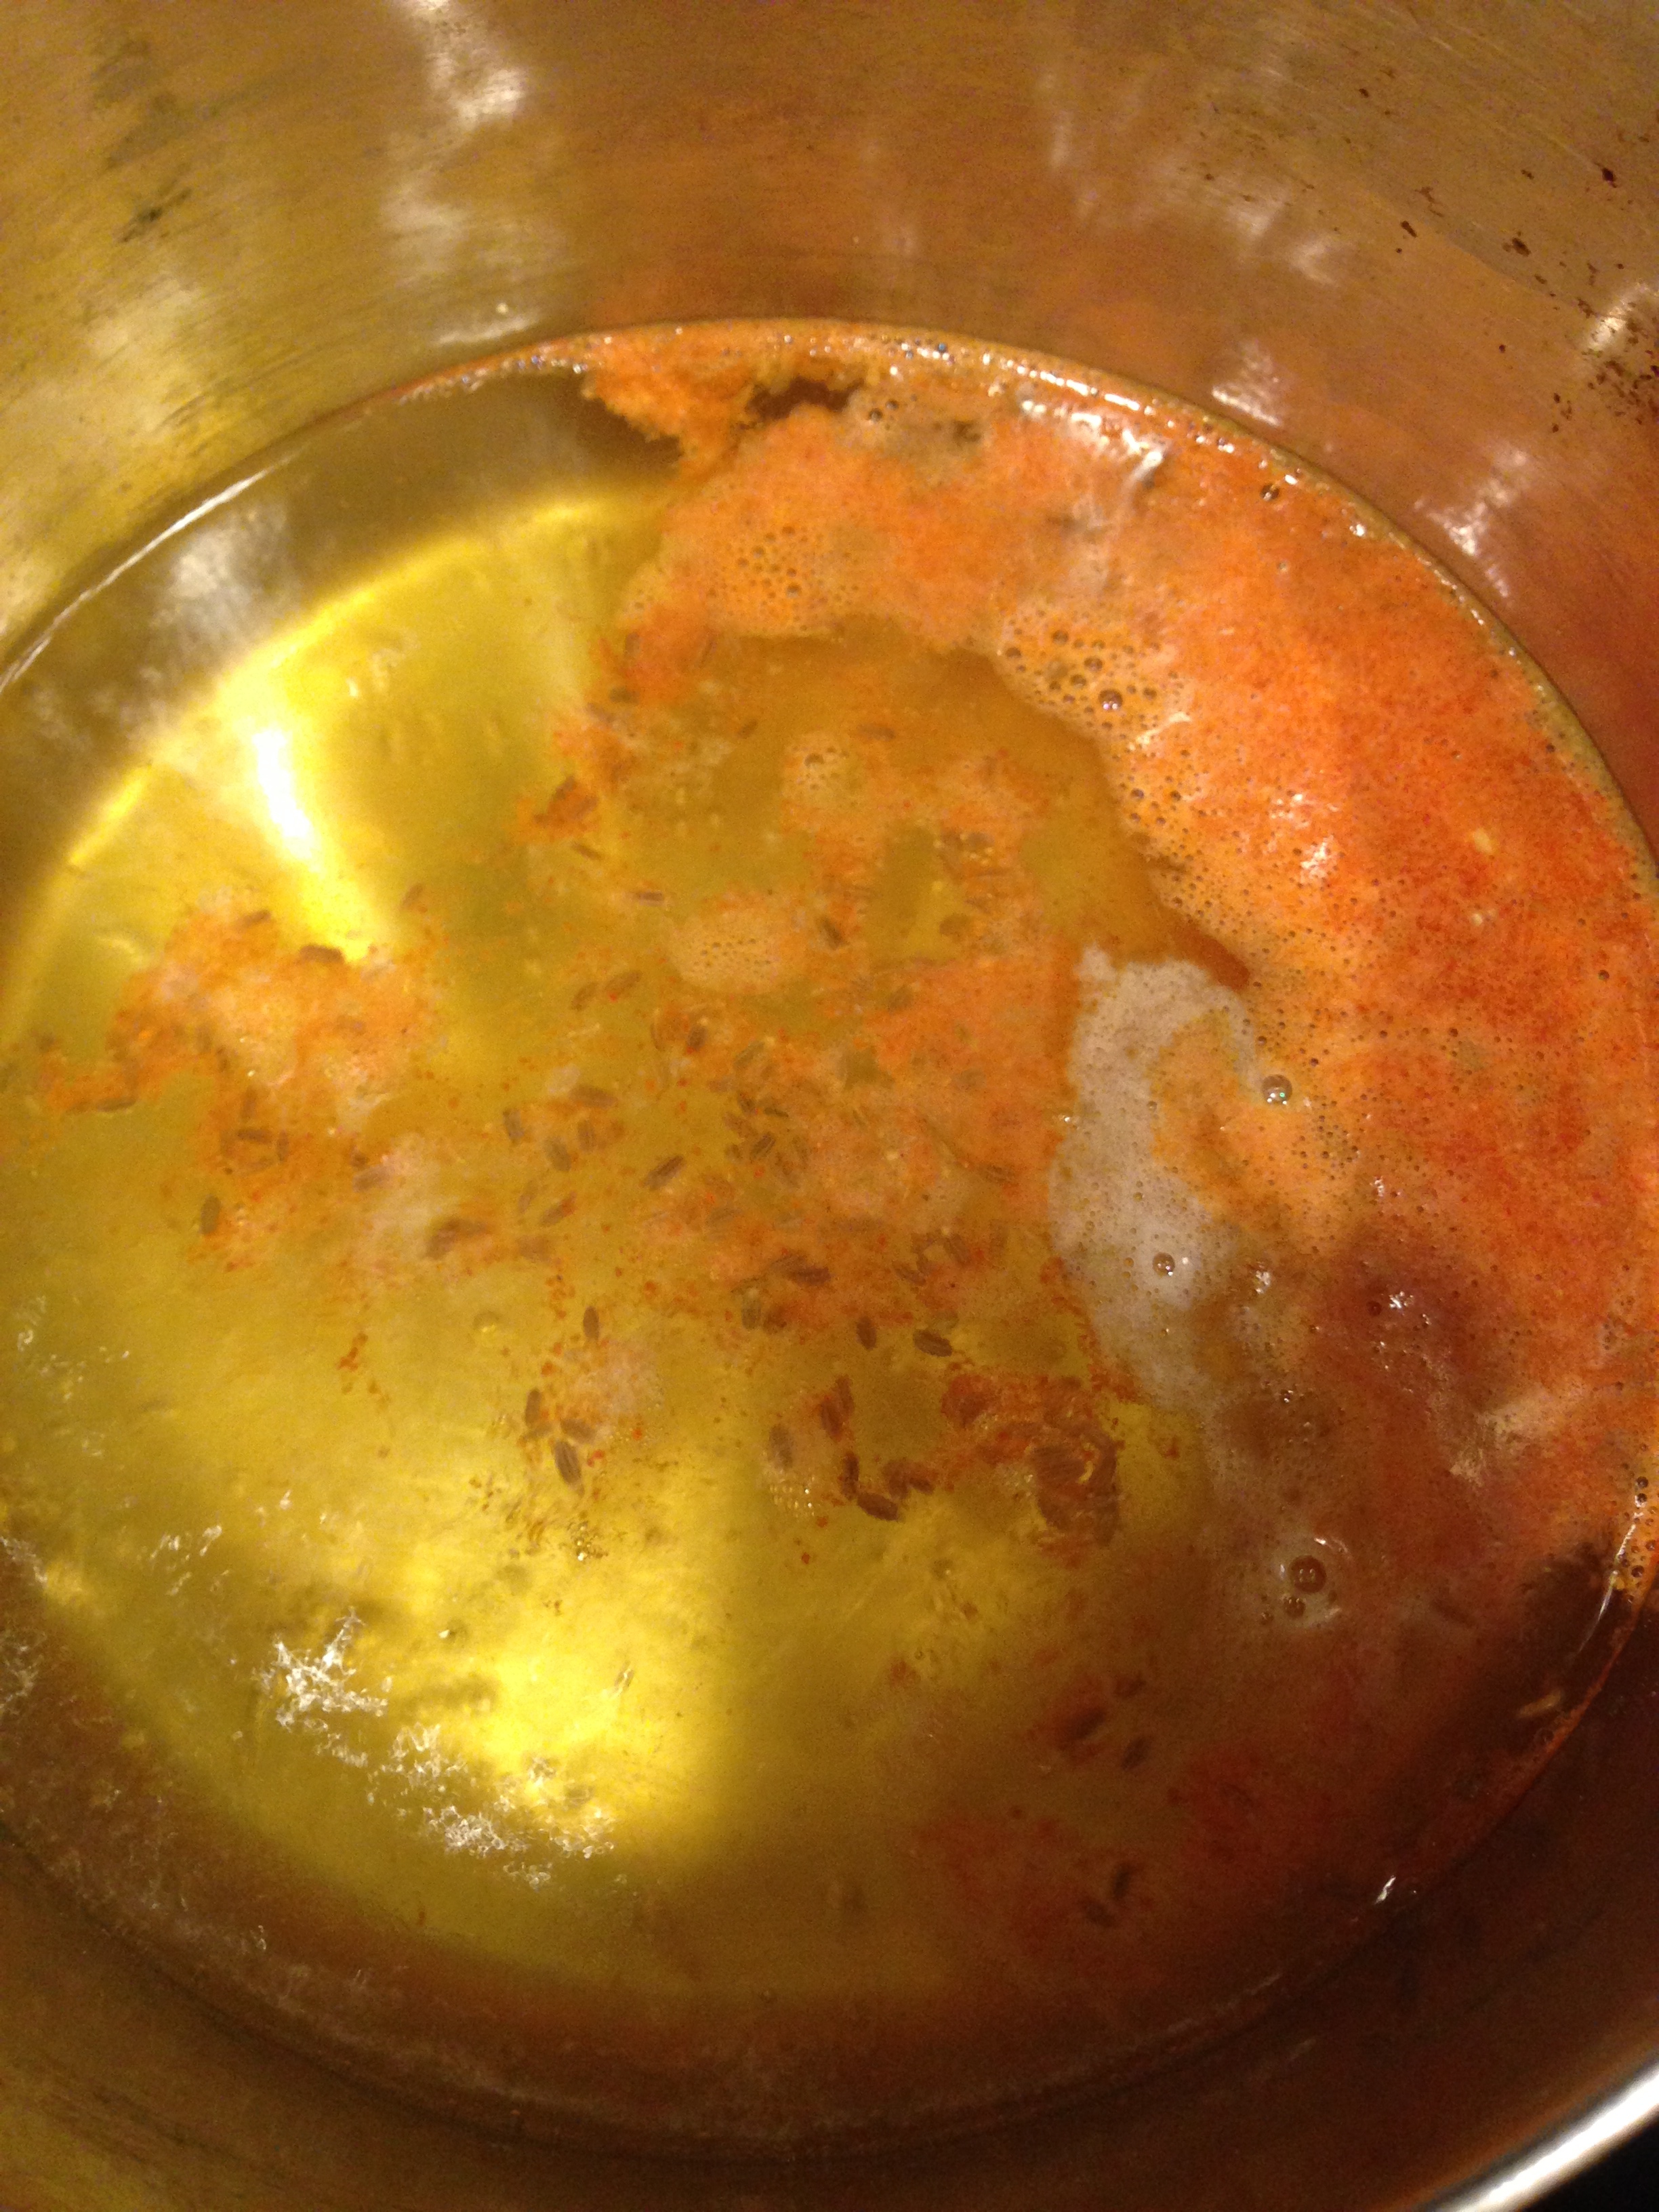
  • Heat the oil in a pan on a medium flame.
  • Add asofoetida, mustard seeds.
  • When mustard seeds crackle, add cumin seeds.
  • When cumin seeds turn golden brown, remove from flame.
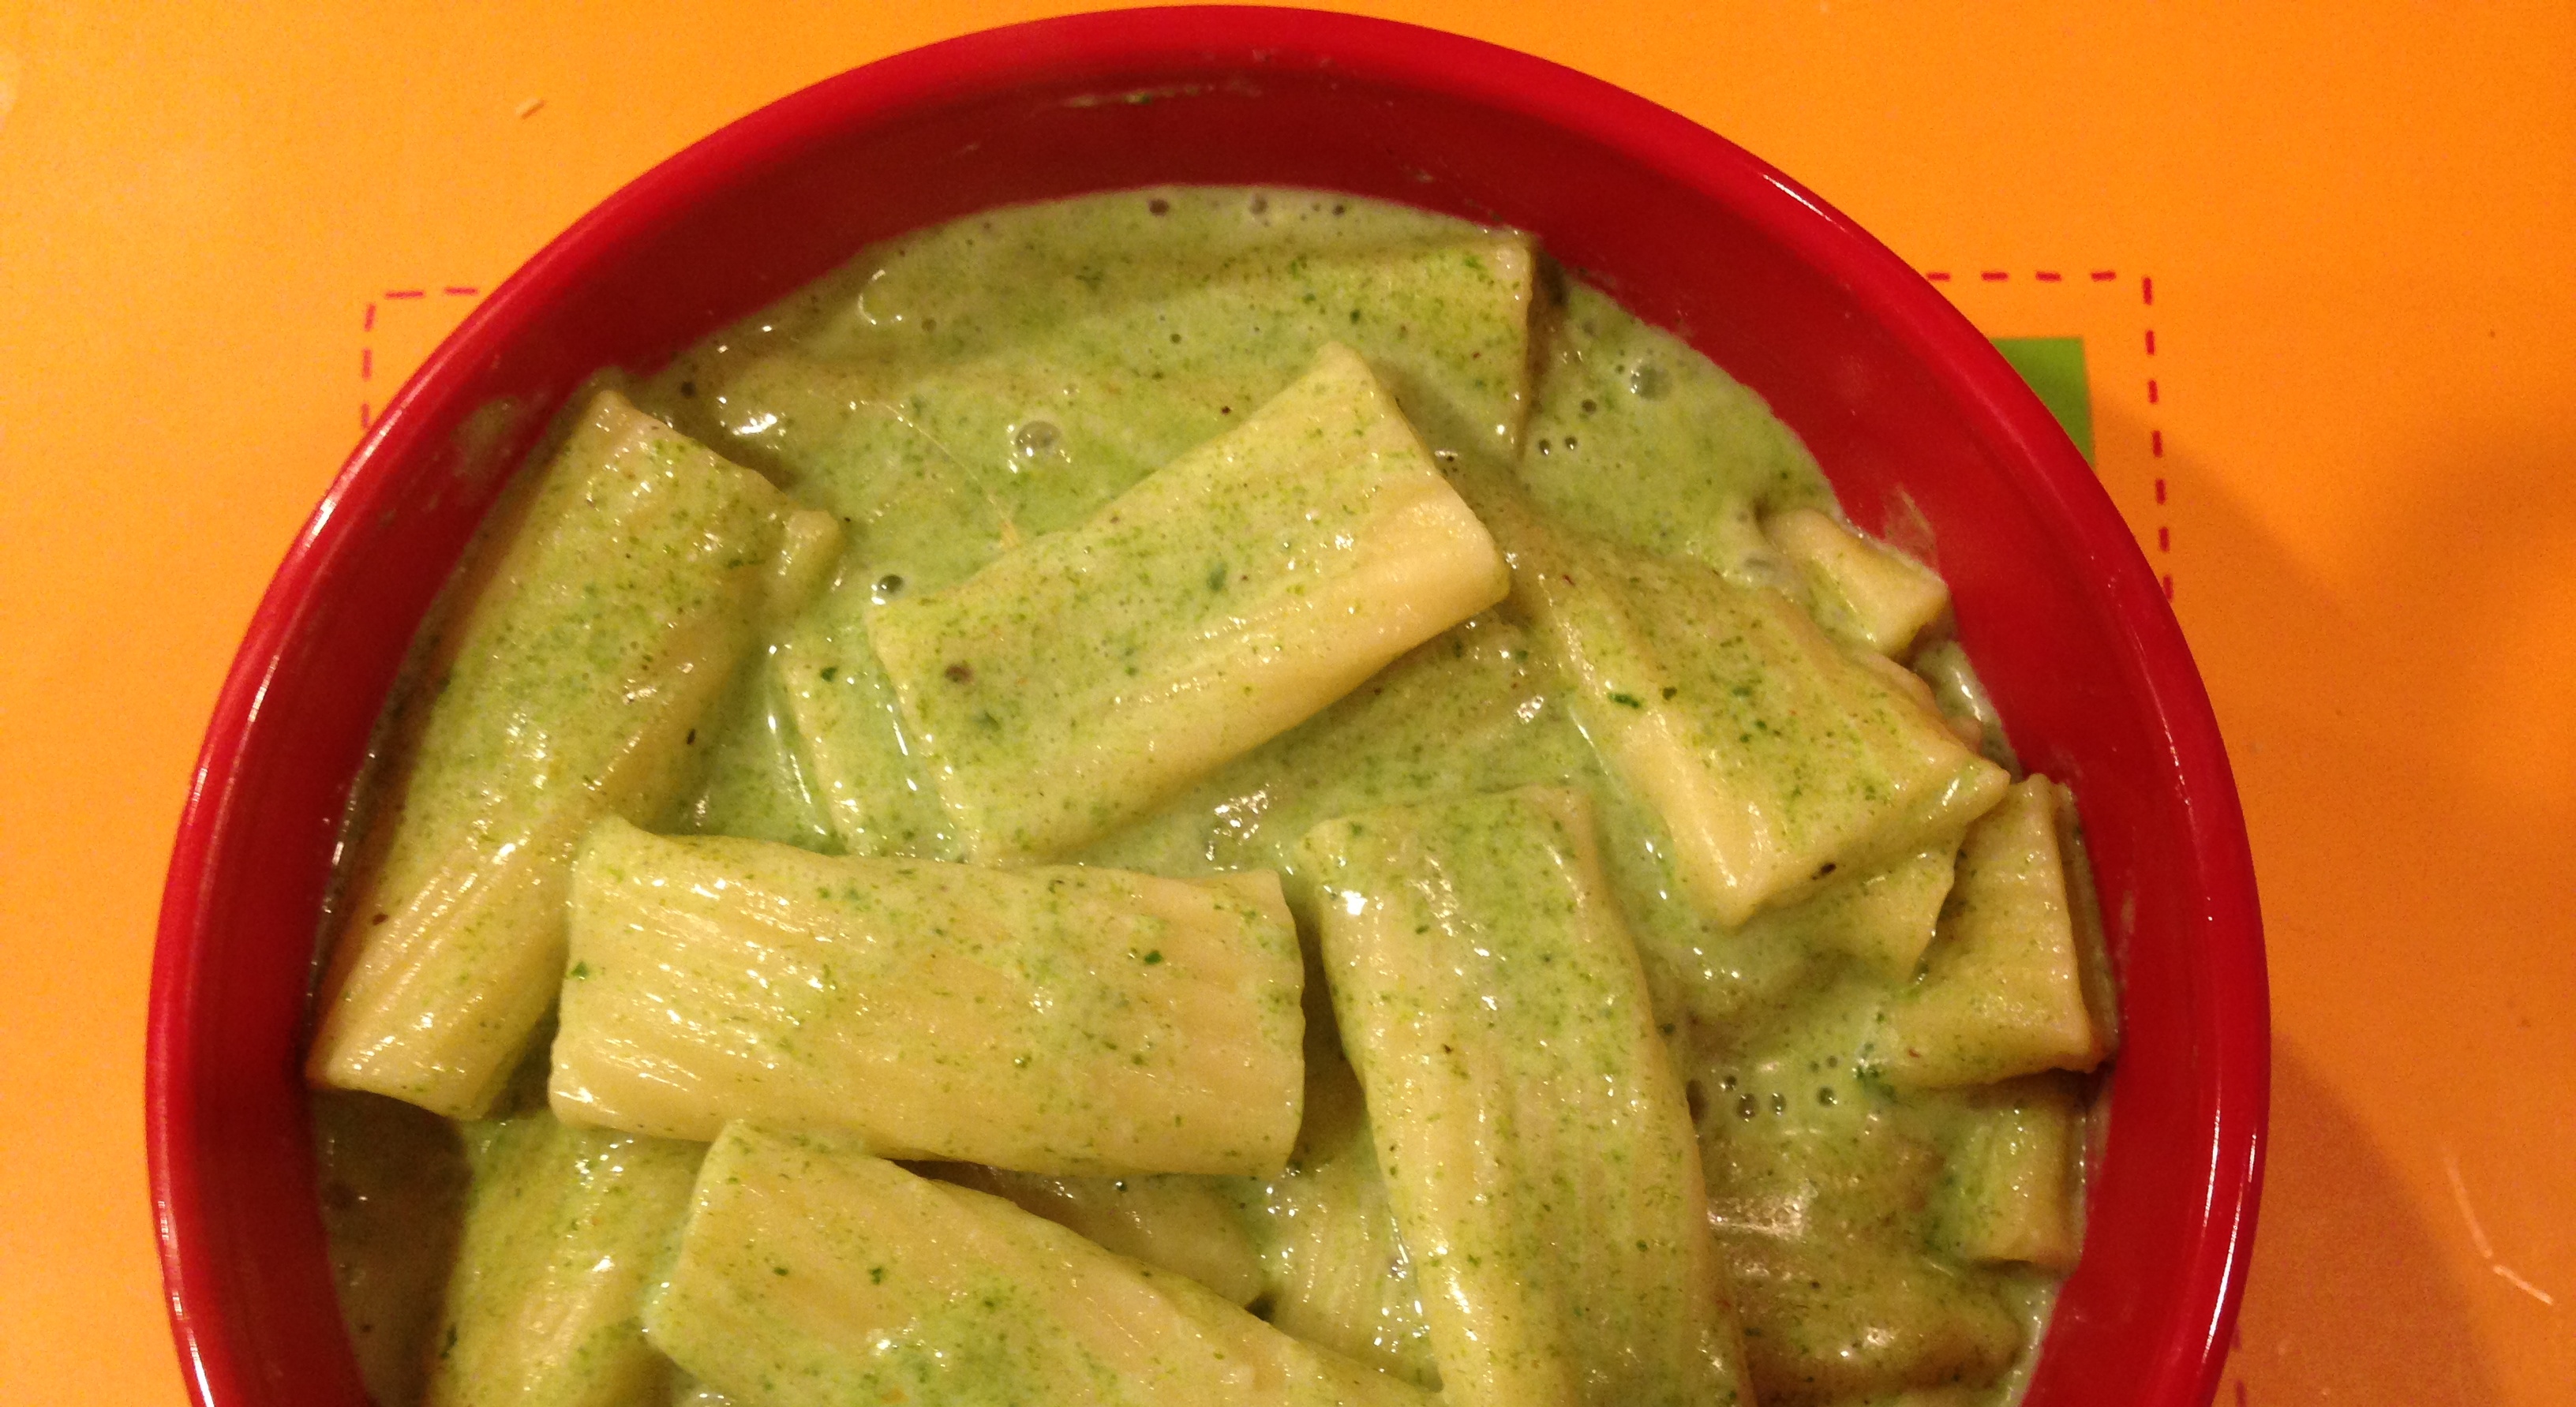
  • Using a spoon, spread this garnish over the cut khandvi bengal gram rolls.

IMG_2262

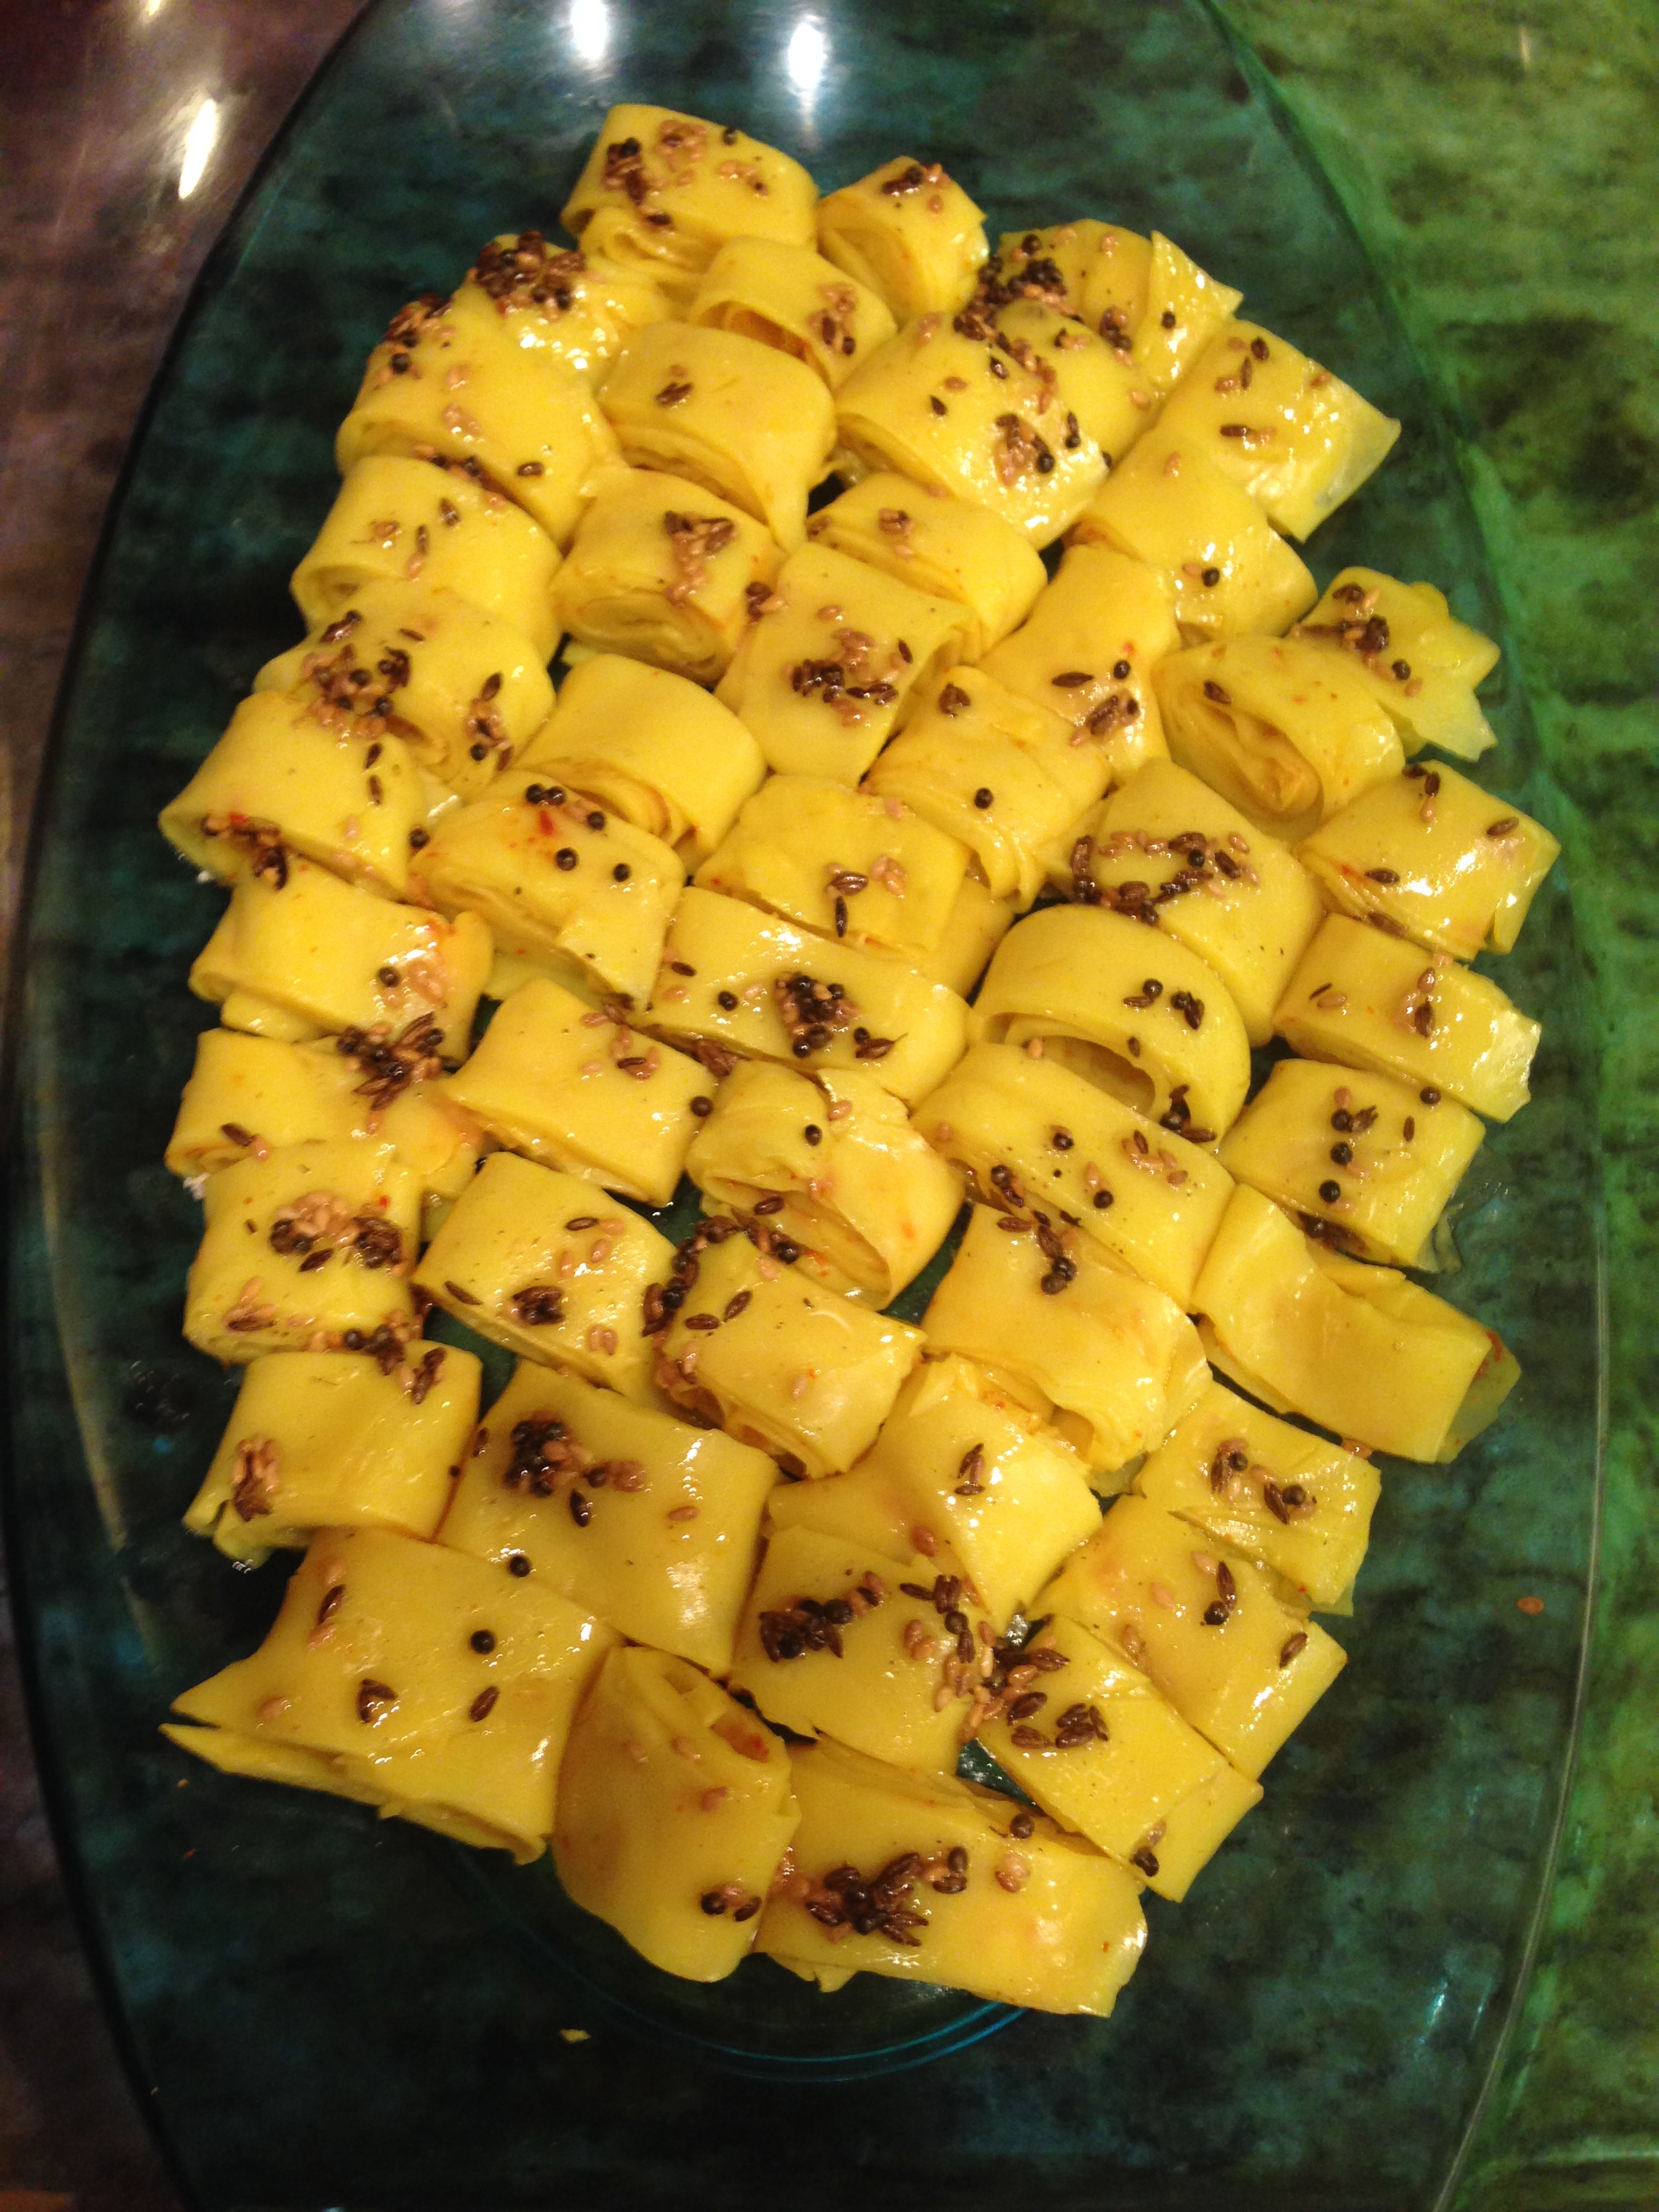
  • Garnish it further with fresh/frozen coconut and coriander.


Tips

Remove the seeds from lemon juice. I use a tea strainer to strain the lemon juice,

Mixing the bengal gram flour properly is needed, so that no lumps are left.

Keep stirring so that no lumps are formed while cooking.

To cut the long rolls, into small pieces, I prefer to line them one below other, and then slice it vertically in 1/2 inch gaps across all rolls.

You can add green chillies to the oil garnish on the top if you prefer. I often make this on days where we avoid green vegetables, hence often dont use green chillies and coriander too on this recipe. But these toppings no doubt add more flavour to the recipe. 

Instinct Factor

Spreading the bengal gram paste on the dish, comes with practice, but make sure you cover all the aspects of the plate.

If you see lumps on the top, that is fine, as this is going to be on the inside.

Feel Factor

A smooth, soft delicacy that just melts in your mouth. This is highly attractive, very quick to make appetizer that is simply YUM! The fresh coconut and coriander garnish atop the lemon flavored bengal gram rolls is a delicacy which will get a lot of WOW factor from your guests! And not to mention the feel good feeling you will  have once you make this complicated looking easy appetizer.

[contact-form-7 404 "Not Found"]


[shopeat_button]

Posted on

Cracked Wheat with Vegetables(Daliya Khichdi)

Cracked Wheat also known as Daliya or Lapsi in Hindi/Gujarati is a healthy form of eating daily nutritious food.Cracked wheat has many advantages for weight loss,  hypertension amongst other things as elaborated in this article http://healthyeating.sfgate.com/cracked-wheat-benefits-5717.html  Traditionally Indians are used to eating cracked wheat as a form of sweet item, but here it is presented with vegetables. This is a power breakfast with wheat, fibre and vegetables. The vegetables on the top have a nice tangy and refreshing taste due to lots of lemon and black pepper, which is the most delicious part for me.  This can also be an alternative to daily routine of eating oats to assist metabolism and weight loss. It is a quick meal under half an hour and it is a complete breakfast/lunch meal. You can variate the toppings of vegetables to your liking.

This is also a very comfortable baby food, and  the very first meal I gave to my daughter was this recipe without the vegetables. It is soft and nutritious and  with lots of fibre, easy to eat, after just garnishing with some black pepper and salt. An Indian way of eating  everyday oatmeal!

I like vegetables to have some crispiness when used as a topping on this, as it goes well with the softness of the pressure cooked cracked wheat, and adds a crunchy flavor through the crisp cabbage. It gives a fulfilling feeling when you have this complete meal and it is  warm,colorful and tangy! The first time I was exposed to this, I had it as a breakfast, so I continue to enjoy this as a breakfast item, and truly so,  as oats are normally considered as the best breakfast option by many. More commonly this recipe is also known as Daliya Khichdi.

Recipe makes for 3 people

Prep time : 10 min

Cooking time: 15 min

Ingredients
  • 1 cup cracked wheat
  • 1 1/2 tbsp ghee(clarified butter)
  • 4 cups of cauliflower cut into small florets
  • 3 cups of  shredded cabbage
  • 1/2 cup of peas
  • 1/3rd cup oil
  • 1/4 tsp cumin seeds
  • pinch of asofoetida
  • 1/2 lemon
  • freshly crushed black pepper
  • salt to taste
  •  2 tbsp coriander to garnish
  • 1/4  tsp turmeric powder
Method
  • In a pressure cook heat the ghee.
  • Add the cracked wheat and stir for 4-5 min on medium flame, until it changes color to pinkish brown.
  • IMG_2585
  • Add a pinch of salt and water.
  • Pressure cook that for 4 whistles on medium flame.
  • In a broad pan, put oil to heat.
  • When it heats, add asofoetida and cumin seeds(crushed in your palm)
  • Wait for it to become golden brown, and add turmeric.
  • Add the cauliflower and cook for 5 min. stirring in between.
  • Add cabbage and salt and cook for further 7 min . stirring in between.
  • Add peas and cook for 4 min.
  • IMG_2584
  • Remove from flame.
  • Remove the cooked cracked wheat from the cooker.
  • In a plate, put the warm cracked wheat at the bottom, top it with vegetables.
  • Garnish with nice dose of lemon, black pepper and coriander.
  • Serve hot.
  • IMG_2588


Tips

A lot of variation of vegetables is possible, such as carrots, spinach, but I prefer to have the above combination.

Cracked wheat can be alternated with bulgur wheat too, which will require less cooking time, as bulgur wheat is precooked. You may want to cook it to 2 whistles for bulgur wheat.

When you cook the cracked wheat and vegetables separately, you have the right texture for both of them, without overcooking either of them. And for this recipe, this is a crucial aspect.

Vegan Variation: Replace the ghee with oil and roast the cracked wheat.

Instinct Factor

Roasting of the cracked wheat to your desire, and enjoying the aroma of cracked wheat in ghee.

Feel Factor

When properly cooked, it has the perfect fluffy texture of cracked wheat, topped with the lemon yellow color of vegetables and green peas, with lots of lemon and black pepper. Inviting and fulfilling as well as extremely nutritious recipe for sure!

[contact-form-7 404 "Not Found"]
[shopeat_button]

Posted on

Eggplant Dip with Tortilla Chips

Super Bowl fever in the air, the biggest sport of USA. Tradition for Americans to huddle in front of the TV with friends and family, and enjoy a round of good game, heated conversations, watch some truly memorable ads and look forward to the famous half time entertainment performances. This year’s match is being played in Rutherford, NJ, my home state for a long period of time. The biggest ad spending happens here, and the conversations of which ad was the best continues to be office and social conversation for sometime. I have slowly warmed up to this game,  from my earlier interest of watching only half time performance. I have fond memories of watching this with friends, over various years, attending super bowl parties, to watching it on giant projector screen in my neighbourhood clubhouse. Super bowl generates a lot of interest in the community via the game,  attention capturing TV ads which also gives you the glimpse of the  new products being introduced.  I often enjoy the car ads that are being shown, and top of my recall so far is the Maserati Ghibli ad and am looking forward to Bruno Mars halftime performance.

One food that is a traditional part of this game watching is Tortilla Chips with various assortment of dip including Salsa, Hummus and  Guacomole. And so I made this Eggplant Dip, that has been a standard dip in my mother’s house , and I also wanted to relish the Tortilla chips with the Eggplant dip, and create a new combination to eating Tortilla chips, this Super Bowl. At my mother’s place, we use to mash this in the stone based mojavo pestle and bowl, as commonly used to make the Guacomole in western world. It must be something in the volcanic rocks that gives the flavor some edge.

Hope you enjoy this Eggplant Dip with your favorite Tortilla chips at a future sport watching event, as we enjoyed this at home and as far as the Super Bowl goes, looks like Seattle is in the winning seat!

Recipe Makes for 3 people

Cooking time `10 min

Preparation time 5 min

Ingredients
  • 8 inch (medium sized) eggplant
  • 3/4 cup yogurt
  • 1/8 tsp asofoetida
  • 1/2 tsp coriander powder
  • 1 1/2 tbsp chopped coriander
  • salt to taste
Method
  • Slice the eggplant into 8 or 4 long slices.
  • Add 2 cups of water and pressure cook them upto to 4 whistles on medium flame.
  • Let the pressure cooker cool down. 
  • Remove the cooked eggplant and 1/2 cup of water from the pressure cooker into a prep bowl.
  • IMG_2606
  • Add yogurt, salt, asofoetida, coriander powder, coriander  and mix well.
  • You can use a mojavo mortar pestle, or whisk it, to blend well.
  • Chill the dip for about 15 min.

IMG_2608

  • Garnish it with a sprig of coriander
  • Serve cold with chips of your choice.
Tips

If you like sea salt, replace ordinary salt with sea salt as it tastes well.

Yogurt should not be too sour, otherwise it will mar the taste.

Instinct Factor

The color of the eggplant dip to your liking. If you like a more darker shade, feel free to add some more of the water from the cooked eggplant.

Feel Factor

Mediterranean dip with a new flavor, quick and easy,  with a taste that is refreshing due to the yogurt and chilling. Eggplant and yogurt is an interesting combination when flavoured with asofoetida, sea salt and cilantro!


[shopeat_button]

Posted on

Khichu(Spicy Indian Doughnuts)

Khichu is a village food, in Gujarat, that is healthy, extremely quick and now is a widely appreciated rural delicacy in Gujarat. There are many variations in this, but traditionally it is made of rice flour or bajri millet flour. Some people also make it with grated corn or rice flakes. Though it is quick , it is a bit tricky and calls for getting the proportion right.  The rice flour khichu is the base from which rice papads are made. Rice  Papads or Pappadums as popularly known in restaurants, are made from this khichu dough. One rolls  the khichu dough into flat circles and dry them in the sun for a few hours.

During my childhood days, we use to make fresh rice papads every fortnight or so. As a child, I would look forward to eating khichu. This was my incentive for helping my mother roll out the rice papads from this.  The best way to enjoy this is to have it warm, and soaked in the accompanying oil. The texture of Khichu is smooth, flavored with spices, and extremely soft to eat. The garnish of oil and coriander gives it spicy and oily look and since it is steamed, it is healthy. The recipe here is made using the Khichi flour of Jalpar Brand. The traditional farming community of Gujarat often make the khichu with Bajri or Millet as it has a very high iron content and extremely nutritious.

My exposure to eating this in USA was only in  Edison, New Jersey, as it has a high concentration of families from Gujarat,India. I was excited to see this being commercially available in USA, that I made it a point to have a friend of mine try it, and now whenever I get a chance to eat this , I would not want to miss out.

The doughnut shape is what attracted me as a young kid, and it is definitely worth giving it a try for a spicy flavored healthy doughnut made of rice/grains/lentins.  Its attractive shape is ideal for a nice appetizers and  the advantage of this recipe is, it is quick, easy to make, can be made in advanced and then re steamed or re heated for large group of parties. And because of  its shape and texture it is highly appealing to children too!

I explored using the Khichi flour of Jalpar brand, thinking that this would be  the Khichu flour, but to my surprise, it came out to be a mix of Green Bean, Rice, Sago Seeds & Cumin and the taste turned out to be quite  delicious. The color difference from the original  rice flour based  khichu, is due to the use of different flour. I read the ingredients of Khichi flour only when I had to write this post!!

Recipe makes 12 pieces of khichu doughnuts about 3 inches in size

Preparation Time 5 min

Cooking time 15 min

Ingredients
  • 1 cup khicchi flour ( Jalpar Brand) or plain rice flour or plain bajri flour
  • 1/2 tsp cumin seeds
  • 1/2 tsp red chilli powder
  • 1/4 tsp asofoetida
  • 1/2 tsp chopped green chillies
  • 1/8 tsp bicarbonate soda
  • 1 tbsp chopped coriander for garnish
  • 2 1/3 cup water
  • salt to taste
  • For Flavoured oil accompaniment
  • 1/4 cup oil to serve and grease(preferably peanut oil)
  • Black salt powder
  • Red chilli powder
  • salt to taste
Method
  • In a deep pan, heat the water to boil on medium flame
  • When the water boils, add, cumin seeds, salt, red pepper powder and bicarbonate soda, green chillies.

IMG_2544

  • When the water reduces to about 2/3rd of its original volume, add slowly the khicchi flour, mixing it thoroughly so no lumps are left

IMG_2551

  • Stir for a couple of minutes, till water is absorbed, and flour forms a lump.
  • Cover and steam and slow flame for a couple of min.
  • Remove from flame and let it cool for 3-4 min.
  • In a broad pan, add, a litre of water to boil.
  • Grease a steaming dish with oil.
  • Grease your palms with a bit of oil.
  • Take about 1/4 cup size dough and roll it on to a ball shape.
  • Flatten the ball a bit, and pinch it in the middle with the thumb or index finger.

IMG_2553

  • Put it on the greased steaming dish.
  • When all dough is used up, put the greased dish on to the boiling water, cover and steam on high for 5 min.

IMG_2558

  • Remove from flame and open.
  • Using flat spatula, lift the cooked doughnut shape khicchu.
  • If the texture is not extremely smooth on the top, you can flip it and serve.
  • Make the flavoured oil by mixing red chilli powder, black salt and salt to your desire.( at least 1/4 tsp of each of chilli and black salt powder)
  • Garnish it with the flavored oil and coriander
  • Serve hot.


Tips

If the khichu doughnuts spread out to flat shape, that means you have overcooked it, or the soda bi-carbonate is too much.Excess of bicarbonate soda also will give it a bitter taste.

If the water is less, khichu doughnuts will turn out to be stiff and not soft.

Special bicarbonate soda knowns as Papad Kharo available in Indian Grocery store, is used. This is specially used when you are making Papad, as it gives it the appropriate crispiness needed. I have used normal sodium bicarbonate only.

If you do not want to make doughnut shapes, cook it further, and  after few minutes, you can mould it in a cup and serve it

Instinct Factor

Steaming the doughnuts,to the texture consistency of your choice as well as the shape of your choice.

Some people also add seasoning of sesame seeds , mustard seeds and green chillies, if that appeals to your taste!

Feel Factor

Comfort food, for me and  one just relishes this  soft, appetizing, warm and spicy doughnut that just melts in your mouth, when coated in the cayenne pepper and black salt flavored oil! And the new flour that I accidently used, seemed to appeal more to my daughter and I think that this mix was healthier too as it has green lentil and rice in this mix! This is any time quick meal, as an appetizer, snack or dinner!

[contact-form-7 404 "Not Found"]


[shopeat_button]

Posted on

Spicy Rajma Soup with Salad (Red Kidney Beans Soup Salad)

Waiting for snow, enjoying the cold, walking with my friend, feeling first round of snowflakes falling on me, is a pretty good description of my day! Weather and heart often influence the choice of food that is being cooked at  my home. With such a cold, wintry or rainy day, I wanted to make something that is hot and piping, colorful and easy, something between a soup and salad and something that gives a happy and warm feeling to one and all.

A dish like this is the Spicy Rajma Soup Salad. Many of you having ties with Sudan will  know this dish as ” Sudan na Phool”. This dish originated in Sudan.  The Gujaratis living there have created this vegetarian entree of a Sudanese delicacy, and spread it amongst the community. There are special Sudanese kidney beans that are used to make this. But, due to lack of its availability on a regular basis, I often make this with Red Kidney Beans, and hence I would like to rename this as Spicy Rajma Soup Salad . The red kidney beans resemble in shape and color to the original Sudan Phool. Some Indian shops do keep the original Sudan Phool, according  to a friend of mine. 

This is easily a complete meal by itself and it is highly colorful, extremely easy, very nutritious and fulfilling too. It is delicious to taste and enjoyed by non- Indians too. As it is accompanied with bread, this can be a weekend menu or a great entree even if you have a party of ten at home. All it requires is some preparation work by chopping vegetables that can be prepared in advance. Personally, chopping vegetables is a highly therapeutic activity to me, as it brings my wandering mind to focus only on the activity I am doing, and forget about everything else. I enjoy the experience of chopping to the  right size and shape, and when I see saw many different colors and varieties in front of me, the artistic mind of mine is highly satisfied via the vegetables color palette in front of me. Readers familiar with this dish are encouraged to add any variations, if I missed out!

What I like about this dish is that as a host,  you can just present the various vegetables on the table, and the guests can choose the toppings that they want , giving the guests the choice of personalizing this dish to their taste, and reducing the work of the host. And not to mention the joy of seeing the spread of  so many colorful items on the dinner table!  

Recipe : For 4 people

Cooking time: 30 min

Preparation time: 15 min

Soaking time: 4-5 hours

 Ingredients
  • 1 1/3 cup diced tomatoes
  • 2 cup shredded cabbage or thinly sliced
  • 1/2 cup diced green peppers
  • 1 cucumber diced
  • 6 green hot or kashmiri chillies
  • 1/2 cup finely chopped coriander leaves
  • 1/3 cup lemon juice or one lemon juice
  • IMG_2326
  • 1/16  tsp baking soda
  • 1 1/2 tsp red chilli powder
  • 1/2 tsp turmeric powder
  • 1 tbsp coriander powder
  • 1/4 tsp asofoetida
  • salt to taste 
  • 2/3rd cup oil
  • 6 cups of water to cook rajma
  • 4 whistles to cook rajma
  • 2 more cups of water to be added later on
  • 12 buns
  • Fine gram floursev for garnish ( optional)
  • Butter to grease the buns(optional)

Method:

  • Soak the rajma or red kidney beans,  after washing thrice for 4-5 hours.
  • IMG_2323
  • Add 1/2 tbsp salt and baking soda, 6 cups of water and put to cook in a pressure cooker for 4 whistles on a medium flame.
  • Remove from flame and let it cool.
  • As soon as the pressure is released, open and transfer to a broader container and put to heat.
  • IMG_2331


  • Once it heats up, add asofoetida, turmeric, coriander powder, chilli powder, oil, salt and all the diced vegetables along with lemon juice.
  • Stir and cook for 3-4 minutes. 
  • IMG_2337
  • Garnish with sev.
  • Serve warm with buttered bread, plain bread or toasted buns.
  • IMG_2347


Tips

If there is excess water after the red kidney beans are cooked, you can mash a few red kidney beans in the soup so that it will thicken the consistency.

Tomatoes are best, if sliced just before garnishing, as they tend to release the juice and become soft.

I often use V shaped slicer for shredding cabbage, as it makes it quicker and gives me a uniform thickness to cabbage.

Instinct Factor

If you are feeling more colorful, feel free to add some more sweet red and yellow peppers to red kidney beans soup. Since I am used to the taste from India, Green Capsicums were the only choice of capsicum at that point of time.

Look out for the aroma of boiled kidney beans in the whistles to indicate that is done!

Even if the kidney beans are overcooked, they will still taste great in this dish.

Feel Factor

Chases away the chill on a wet rainy or cold day, with the piping hot rajma kidney beans soup with colorful salad and spices. Its a complete meal for an evening with a buttered bread. Has a lot of wow factor when guests see so many colors together and experience the spicy and tangy taste of red kidney beans soup topped with almost raw salad vegetables. Its a happy feeling to relish a highly nutritious and colorful meal.


[contact-form-7 404 "Not Found"]
[shopeat_button]

Posted on

Triranga Idlis (Tricolor Idlis Rice & Lentil Steamed Cakes)

Inspired by the Independence spirit in air, due to the upcoming 65th republic day of India on January 26, I explored bringing this spirit to cooking. There are various events happening around the town, organized by local Indian Community via IAVA and am looking to forward to celebrating this with total patriotic spirit on 26th January via the Republic day celebrations of IAVA. Something that is simple, colorful, healthy and with a good deal of wow factor as well, is the Triranga Idlis. Triranga name is inspired from the  Indian Flag, which is also fondly called as  ” Triranga”, as it is in tricolor, The colors are in the order of orange, white and green. The white portion in the middle also has a blue circle with spokes, known as Ashoka Chakra. The idli colors are based on the flag. The natural color of idlis is white as it is primarily rice based.  To this I have added carrots for orange and spinach for green. Special quarter coin size idli moulds have been used for the coin size idlis, as these are very appealing to kids and also serve as a good finger bite appetizers in a party. And it also represents the size of the Ashoka Chakra in the middle!

Normally the use of carrots and peas is done as a topping on a rava idli( a variation of idli made from semolina) and I always  found this topping very attractive. To make the entire idli colorful, I have mixed the carrots and spinach with the idli dough, so that  it is visually more appealing, and also it disguises the taste of carrots and spinach, in case someone does not find them appealing. And needless to say, I do have members who dislike carrots. so I am hoping this is one way I can get them to eat carrots!

Idlis are very healthy and nutritious item and considered as an important breakfast item, in southern part of India, from where it originated. Its made of rice and black lentil . It texture is soft and fluffy and can be savored with sambhar( lentil soup) or chutney, which is often coconut based. Coriander based green chutney or just melted butter are other good accompaniments with idli. When idlis are fresh and hot, they taste yummy even if they are not accompanied with anything, specially when they are the size of coin shapes, as they just melt like small coin chocolates into your mouth!! The flavour of carrots mixed into the idli dough, tastes very nice. I topped the spinach based idli with gunpowder or hot chilli dry powder to create a contrasting flavour while eating. This dry idli chutney powder is easily available in Indian grocery stores. My challenge here is to have the pure green color on the spinach after the idlis are steamed..This is an area that needs some more thought…If any of you have any suggestions on retaining the green color please share…

And the verdict from the family members- yes to carrots based idlis, so here’s wishing Indian readers, a great patriotic week and day on 26th January 2014!  

Recipe makes:  64 coin size idlis 

Cooking time : 20 min

Preparation time: 15 min

Passive time: 20 min

Ingredients
  • 1 Gits Instant Idli mix
  • 1 cup baby green spinach or chopped spinach
  • 1/2 cup diced carrots
  • Salt to taste
  • Oil to grease
  • Gunpowder or dry idli chutney powder for garnish (optional)
  • Special Equipment: Coin sized idli moulds, or alternatively regular sized idli mould trays and Idli cooker
Method   
  • Put 3 cups of water to boil.
  • Boil chopped spinach for 4 min.
  • Strain the spinach, using a tea strainer, which is easy to lift off.
  • Re use the same water and boil carrots in it for 7 min.
  • Strain the carrots.
  • Grease the idli mould with a few drop of oil. You can skip this step if you would like to cut the calories. The pic here shows idli steamed without the initial grease. Greasing helps to remove the idli smoothly from the mould.
  • Put to boil 1 litre of water inside the idli cooker, and cover the cooker with  a lid. Put this at near high flame, on your second highest burner.
  • Pour the content of the mix into a wide and deep bowl. I often use a Large Prep Bowl.
  • In a separate bowl, mix water and oil.
  • With one hand pour the water/oil mix, at a medium pace in to the large prep bowl, and with the other hand, circularly agitate or stir vigorously the idli mix, as the water is being poured. This step is crucial to idlis being fluffy.
  • Continue doing this for about couple of minutes, and you will see the idli mix rising.
  • Divide the idli dough equally into three bowls.
  • Add spinach to one portion and add carrot to other.
  • Using hand blender or normal blender, thoroughly mix spinach with its portion of idli dough.
  • Do the same for the carrot and idli dough. 
  • Pour this mixture into the idli moulds, almost up to the edge. For coin sized idlis you will need idli moulds of that size. The pic here shows the idli mix poured in a regular size idli mould, as I forgot to take pics of the coin sized idlis..
  • IMG_2377
  • Lower the gas flame, open the idli cooker with caution using a towel or oven glove.
  • Put the idlis moulds with dough, inside the idli cooker
  • Cover with the lid and raise the flame to high.
  • Cook for 20 minutes and then switch off the flame.
  • For further 20  minutes, keep the the cooker closed.
  • Then slowly open the cooker, remove the idli moulds
  • Wait for about 20 seconds, and then using a butter knife slowly release the idlis from its outer edge.
  • Serve with chutney. lentil soup or sambhar,  or eat it with a dash of melted butter/clarified butter(ghee) ,which is also equally delicious.

 IMG_2382


 Tips

Instead of carrots, you can even add tomato puree about 1 tbsp to get the orange color and different flavor. I prefer using the instant dough mix, but the same can be added in relative proportion to the fermented dough recipe too.

Instinct Factor

The amount of water needed in the idli mix depends on the water hardiness of your area. Increase the water content if idlis are hard and reduce if they are too wet  and slippery after cooking.

Feel Factor

Have fun by adding colors of your choice to an  otherwise regular dish in white. A visually appealing, healthy, kid friendly idlis and a new way of presenting the well known rice lentil idlis. The texture of idlis is soft and smooth. The spinach idli has a little dense flavour, while carrot is light and fun, and plain white idlis is the original light fluffy healthy meal in a lot of households.  

[contact-form-7 404 "Not Found"]
Posted on

Rigatoni Pasta in Spinach Sauce

We often think of Alfredo or Marinara sauce as base for pasta, but I decided to experiment with it by adding spinach and garlic to a basic white cheese sauce. As I recollect this, I realized that this is my first time flirting with creativity while cooking. The need stemmed from trying to figure out how to variate the everyday pasta in my daughter’s lunch box. Like every mother, I was focused on getting enough spinach in my “popeye”. So, I decided to implement this idea about six years back, and this combination was extremely successful with the kids. I had my daughter’s friends asking for several helpings of this, when this was a part of her lunch. In fond appreciation of one of my daughter’s friends, I shall rename this pasta as “Ankita’s Pasta”! Thanks for liking this and encouraging me to be innovative while cooking, Ankita. 

The spinach, cheese and garlic simmering on the gas stove is highly tempting, and the combination of green and white is an attractive and different combination on a pasta dish, that makes everyone give it a try and subsequently relish it.

Since this is often a lunch meal for my daughter, it is for sure a quick and easy dish to make in under half hour in the morning rush.

Recipe: Serving for 2-3 people

Cooking time  15 min.

Preparation time: 5 min.

Ingredients
  • 3 cups Rigatoni Pasta
  • 3 cups baby spinach leaves or chopped spinach
  • 3 cups whole milk
  • 2 tbsp olive oil
  • 2 slices of cheese
  • 2 tbsp corn starch
  • 1/4 tsp fresh ground black pepper
  • 2 pods of garlic crushed(optional)
  • Salt to taste
  • 6 cups of water for pasta
  • 2 cups of water spinach.


Method
  • Pressure cook pasta, water, salt and 1 tbsp oil to 4 whistles on medium high flame. 
  • In a pan  put 21/2 cups of  milk, cheese, black pepper, 1 tbsp oil to boil.
  • Cook spinach in a microwave, along with 2 cups of water for 3 min on high setting.
  • Remove excess water from spinach.
  • Using hand blender, blend the spinach to fine paste.
  • When milk boil overs, add garlic, spinach and salt to taste.
  • Add cornstarch to the remaining 1/2 cup of milk and mix thoroughly.
  • Add the cornstarch milk, to the boiling milk.
  • Simmer on low flame for 10-12 minutes.
  • Drain the pasta of excess liquid, once the pressure cooker has cooled down.
  • Add the pasta to spinach sauce and mix well and cook for 2-3 min.

IMG_2352

  • Serve hot.

IMG_2356

Tips

Spinach can be boiled separately in  water for 7 min. if microwave is not available.

The sauce needs to be slight liquidy, as pasta will soak it up, and when eaten after several hours.

Jain Variation: This spinach sauce tastes equally delicious without garlic too! A garnish of fresh/dried basil leaves gives this spinach sauce a nice fragrance.

Instinct Factor

Cooking Spinach Pasta to the level of your choice. Alternatively the pasta can be boiled in 6 cups of water for about 12 min. 

Feel Factor

Healthy spinach pasta sauce for everyday pasta, that is fast to cook and extremely appetizing! Rigatoni and Penne Pasta are my favorite choices of pasta with this spinach cheese sauce.


[contact-form-7 404 "Not Found"]
[shopeat_button]

Posted on

Sesame Chikki (Sesame Candy with Jaggery)

Lets welcome and celebrate Sankranti, also known as Uttarayan, Pongal, and Lohri to name a few. It marks the beginning of the new year for some folks in India. In the Julian Calendar, January 14th was also considered as new year, as the sun starts its northward journey from the southern most tip. The day of this festival is always fixed as January 14th. In North India, this is also the beginning of Harvest Festival, bringing wealth and good tidings to the community. Traditionally we believe that all auspicious actions be taken after January 14th, as that brings you good luck in your endeavors. I can vouch for this, as I have received good tidings through the day today, so I felt all the more compulsion to celebrate in its true spirit with the making of Sesame Candy in Jaggery. 

My hometown Rajkot, India, is famous for its jaggery based chikki(candy). There are other versions of this candy, as this is a festival that is widely celebrated all over India. At many places, jaggery is substituted by sugar. Variation of these candies consists of the jaggery mixed with peanuts and almonds or mixed nuts. But, my favorite combination is that of sesame seeds in jaggery as jaggery has more nutritional value than sugar.

In Gujarat, this celebration takes a whole new level, with kite flying festival and neighbors competing against each other to fly their kite to the highest point in the sky. Ahmedabad, India, hosts the International Kite festival, attended by many from world over, where kites of different shapes and sizes are seen flying in the sky. This day is a holiday at most places, specially in the state of Gujarat. I miss those days of being able to go up the terrace and fly kites, eat chikki, and compete with my friends and neighbors in kite flying. But the least I could do was to make an effort to make the sesame candy and celebrate the good tidings coming my way. Sesame seeds chikki candy has a smooth texture to look at, crunchy while biting, and soft on chewing. The jaggery gives a flavor of sweet and salty taste besides adding the color of warmth on a candy, to be enjoyed in the cold season. The color of the candy differs on the color of jaggery used. I had the dark brown jaggery, hence the shade is a little darker than normally seen, but the texture and softness was just right and if you get hooked on it like I do, its difficult to stop, so you are safely warned here!!


Recipe : 15 pieces of 2*2 inches

Cooking time: 15 min

Preparation time: 5 min

Ingredients by Volume
  • 3/4 cup filled with jaggery pieces
  • 3/4 cup white sesame seeds
  • 2 1/2 tsp unmelted ghee(clarified butter)
Method
  • In a broad pan, heat the sesame seeds on medium flame stirring constantly, until mildly brown in about 3/4 minutes.

IMG_2303


  • Remove from flame, and remove the sesame seeds into a plate or another vessel, so that it does not brown further.
  • Grease with ghee, a chopping board,  or aluminum foil of about 18*18 inches dimension..
  • In the same pan, heat the ghee. When melted, add the jaggery and stir on medium flame, until completely melted, as in the case of melted chocolate!

IMG_2304

  • As soon as it melts thoroughly, which should not take more than 4-5 min, reduce the flame, add the roasted sesame seeds to it, and mix thoroughly.
  • Soon you will be able to form a lump,while stirring. 
  • Transfer this lump very quickly on to the chopping board or aluminium foil and spread it wide.
  • Using a roller pin, spread it evenly into a rectangular shape if possible.

IMG_2306

  • Cool for 2 minutes.
  • Using a knife, make square pieces of 2*2 inches.
  • Store immediately in an airtight container.

IMG_2307


Sesame candy in another color and form, also known as Til Ladoo, round in shape and white/wheatish in color. Til, is the more commonly used name for Sesame seeds and Ladoo means a round ball. Here the color of jaggery used is more golden. To make this shape, after the lump is formed, remove from flame and very quickly make small rounds. Challenge over here, is to be able to make round balls in the palm of your hand, while it is hot. I would prefer the flat rectangle pieces to the round balls, due to the ease in making. 

IMG_2315


Tips

If the Jaggery is very firm,slice it into small pieces, or microwave it in a bowl for 45 seconds.

Sesame seeds should not be overcooked, otherwise they will have a slight bitterness to them.

While making pieces with knife, applying even pressure  by the palm of your hands on top of the knife, will work better to have clean cuts.

Instinct Factor

Trusting your instinct over here is very crucial, as jaggery if overcooked, will become too brown and burnt. Undercooking is better than overcooking over here.  You cannot go wrong with the taste, so even if the shape is not perfect, the taste will be!

Feel Factor

Never knew candies can have iron and calcium and also taste so yum! A crunchy warm looking candy that has a sweet and salty flavor at the same time, and once you start nibbling, you may just finish the whole box!


[contact-form-7 404 "Not Found"]
Posted on

Apple Sandesh Cottage Cheese Dessert

Today we complete one month from the starting of the blog, and I am really encouraged by the likes, comments and shares done by the readers over this period. So, let’s celebrate this baby milestone with an Apple Sandesh! This is a cottage cheese based dessert with grated apple stuffed inside. I have very fond memories of enjoying Sandesh in my younger days, as this was an easy dessert which could be made fresh and consumed fresh.  In those days, the stuffing would be a clementine segment or better known as oranges in India.  I would look forward to this delicious dessert that had a nice creamy texture which you could bite into. The chilled cottage cheese with the tangy fruit inside when mixed with some cardamom and sugar creates a very delicious and mouthwatering dessert.  I thought I would experiment with grated apple , and it turned out to be  an equally classy dessert, enjoyed by all at home including guests in town!

Recipe: 10 pieces of Sandesh

Cooking time: 30 min.

Chilling time: 2 hours.

Ingredients:

  • 1 large Apple ( I used Fuji Apple. Stamen also works well.)
  • Fresh Paneer or Cottage Cheese 1 cup or 100 gms in weight.
  • Sugar 3/4 cup sugar
  • Cardamom powder 1/2 tsp.
  • Lemon juice 1 tbsp ( I prefer Fresh Lemons to Limes, as they have sweeter taste)
  • Saffron 1/2 tsp.
  • Milk – 1/3rd cup.

For Making Fresh Paneer

  • 1 quart of 4% fat or whole milk
  • 3 tbsp lemon juice ( not lime)
Method:

For Making Fresh Paneer

  • In a deep pan(nonstick preferred), put the milk to boil on medium flame.
  • When in starts boiling, add 2 tbsp lemon juice and stir, keeping the flame high.
  • The milk should curdle in a minute or so, if it does not , add some more lemon juice.
  • As soon as the water separates, remove from flame and drain it in a strainer.
  • Let it cool for  about 15 minutes in the strainer.

For Making Sandesh

  •  Remove the skin of the apple and grate it fine.
  • Take a shallow pan and heat on a medium flame.
  • Add grated apple, lemon juice and 3 tbsp sugar and mix well and cook for 3 minutes, stirring continuosly.
  • When done, it should make the mixture dry of liquid and apples well cooked.
  • Let it cool for 15 minutes.
  • In a broad flat pan, take the cottage cheese and using your palm, knead it thoroughly for 4-5 minutes, till the texture is smooth and soft.
  • Add the remaining sugar, cardamom and mix well.
  • Take another broad pan and put it to heat on medium flame.
  • Add the cottage cheese mix on it and reduce the flame to slow- medium.
  • Stir and cook for  7-8 minutes on slow flame, ensuring it looses its liquid and starts to form like a lump. 
  • Remove from flame and let it cool for couple of minutes.
  • Knead again for a couple of times.
  • Make 8-10 round balls of equal size.
  • Take one round ball, flatten it in your palm.
  • Take approx. 1/2 tsp apple stuffing and put it in the center.
  • Enclose the stuffing from all sides.
  • Shape it into round ball using both palms.
  • Make a dent in the center with finger.
  • Repeat this for all 8-10 pieces of cottage cheese.
  • Drizzle some  saffron melted milk in the dents of the round of the balls.
  • Chill in the refrigerator for 2 hours.
  • Serve cold.
Tips

Remember to strain the seeds from the lemon juice.  If the cottage cheese feels very dry, you can add few drops of milk to smoothen.

You can control the fat intake, by opting to go for low fat milk or low fat cottage cheese, with slight impact on taste. 

Variation with oranges/clementines – Peel the thin skin off the clementine segments. Make a larger circle from the initial round segments, so that the orange segment can lay flat, with room to be folded over. Cover the segment from all sides so that the C shape of segment is outlined. Chill and serve.

Instinct Factor

Kneading with equal pressure of palm to have smooth texture.

Feel Factor

A dessert that has a smooth texture and filled with fruit of your choice!  The chilled fruit enclosed in the sweetened  cottage cheese is just irresistible. Cottage cheese is light and so why not consume more than one!! For the adventurous, the filling choices are unlimited including mangoes, strawberries and blueberries to name a few. Use of cottage cheese aids in weight loss and protein intake according to SF Gate http://healthyeating.sfgate.com/cottage-cheese-healthy-eat-1575.html  

 
[shopeat_button]

Posted on

Green Lentil Dosa Crepes

The texture of green lentil dosa, is similar to the salted crepes known in the western world. A combination of split skinned green and yellow lentils with green chillies, lucknowi mithi fennel seeds and coriander creates an inviting and refreshing flavor on a crispy crepe. Traditionally dosas are rice and black lentil based and requires fermentation time. This recipe comes from Rajasthan, where it is known as Dal Childa and is often considered as a healthy breakfast option. It does not need fermentation time, has a lot more fibre and is good protein booster. When served with a yogurt accompaniment, it aids the lentils to become protein. They are easy to make as they don’t stick to the pan and so can be easily lifted and cooked. The texture and taste of this dosa or childa may remind you of Adai, a southern indian delicacy.

This can be a great dinner option too, as it is  light, fulfilling to taste, easy to make  and fennel seeds and coriander add a refreshing taste that gives it a unique flavor.


Recipe Makes 12-15  Dosa Crepes 

Cooking Time: 20 min

Preparation Time: 5 min

Soaking TIme : 2 hours

Ingredients
  • 1 cup split green lentils(skinned and split moong dal)
  • 1 cup yellow split lentils(yellow moong dal)
  • 4-5 green chillies
  • 2 tbsp chopped coriander
  • 1/2 tsp fennel seeds (lucknowi mithi saunf)
  • Salt to taste
  • Pinch of asofoetida
  • Oil to grease.
Method
  • Mix both the lentils in  a pan, and wash them thrice in plenty of water, draining water everytime.
  • Add  4 cups of water and soak for 2-3 hours.
  • Remove half of the remaining water from the soaked lentils.
  • In a mixer/food processor, grind the lentil along with the balance water for about 4-5 min.
  • Add  chopped chillies and grind for further 2 min.
  • Remove the lentil mix from the food processor into a bowl.

IMG_2388


  • Add salt, asofoetida, chopped coriander and fennel seeds and mix thoroughly.
  • Put a thin round pan/griddle  to heat on medium high flame.
  • Grease the pan with dots of oil
  • Take 1/3 rd cup of lentil mix and pour it in the center.
  • Use a crepe tool or use a hollow spoon with round base and spread it evenly into 7-8 inch circle.
  • IMG_1742
  • Make sure that there are no lumps in the center.
  • Dot with oil on the edges of the crepe dosa and also a few dots on the top.
  • Cook on a medium flame and wait for the edges to turn golden brown.
  • Using a spatula, release the crepe from the sides first.

IMG_1743


  • Then flip it over and cook on the other side till golden brown spots appear.

IMG_1746

  • Roll the crepe and serve with green chutney or plain yogurt or pickle.


Tips

The pan should be well heated in order to have a nice uniform brown color.

The consistency of lentil mix paste, if found too thick, can be diluted with some extra water.

If you prefer crepes with a very soft texture,  add 1 tsp gram flour and 1 tbsp yogurt after the grinding of the lentils. 

Instinct Factor

Watch for the browning of the edges of the dosa to know that it  is done. And start releasing if from the edges and then go to the center to lift off. 

Feel Factor 

When combined with green chutney or pickle, it is possible to consume multiples of these at a time, as they are thin and light and somehow the guilt of calories is overshadowed by the fact that this is a good protein booster that you are consuming. Also it is closest to satisfying the craving for a Dosa, that can be made fresh easily and quickly, at your convenience.

[contact-form-7 404 "Not Found"]