Posted on

Smoked Eggplant Baingan Bharta

Fresh Eggplants ripe this summer can be enjoyed the best when its a fresh from the farm and straight to the table. At my previous home, we used to pluck eggplants in the neighborhood  farm and the task of cooking them would be an under ten minutes job. I have yet to replicate the  sweetness of these  eggplants at any other restaurant!  Presently,  I do miss the proximity of such farms as available at my previous home. My experience says that the sweetness of these vegetables is even higher than what one gets when buying organic.

With summer almost in full swing, the outdoor grills are out in my neighborhood and neighbors and friends are enjoying grilling various vegetables. Eggplant baingan bharta is also made by grilling the eggplant. Many do this over a gas flame or microwave, but I wanted to approach this a little differently, keeping some of my Jain philosophy in place. Grilling a vegetable as a whole, is a no-no in Jainism , as there are chances of some worms inside the   vegetables, which might get accidently grilled or burnt in the process.  Hence we normally slice and steam it. And Jains will not also grill it for you may accidently kill some insects. But I still wanted to have the smoke flavour in my Eggplant Baingan Bharta.

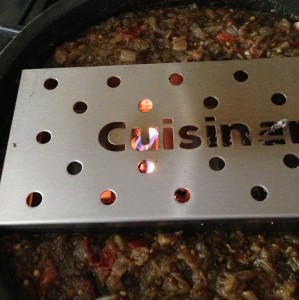
So I decided to use a smoking box and insert this with lighted wood chips/coal amongst the vegetables and cover the vegetable to get the smoky flavor and the result was truly delicious and mouth watering. I was reminded of my home state in India where this is also known as Ringana No Oro- and is considered  a rural village delicacy , expertly cooked by farming community and served with other rural food accompaniments as Khicchadi Rice Lentil Entree and Bajri Rotla Millet Bread.

In the Northern India, this is often made without the skin, but I make it with the skin , as I like the eggplant for its rich purple color too,  and I am of the firm believer that the skins of the vegetables hold the maximum nutrients and besides it gives the cooked  vegetable a nice rich color of a night shade. The eggplant skin holds a lot free antioxidants that are also helpful in better skin and I also found on research that eggplants help in reducing triglycerides.

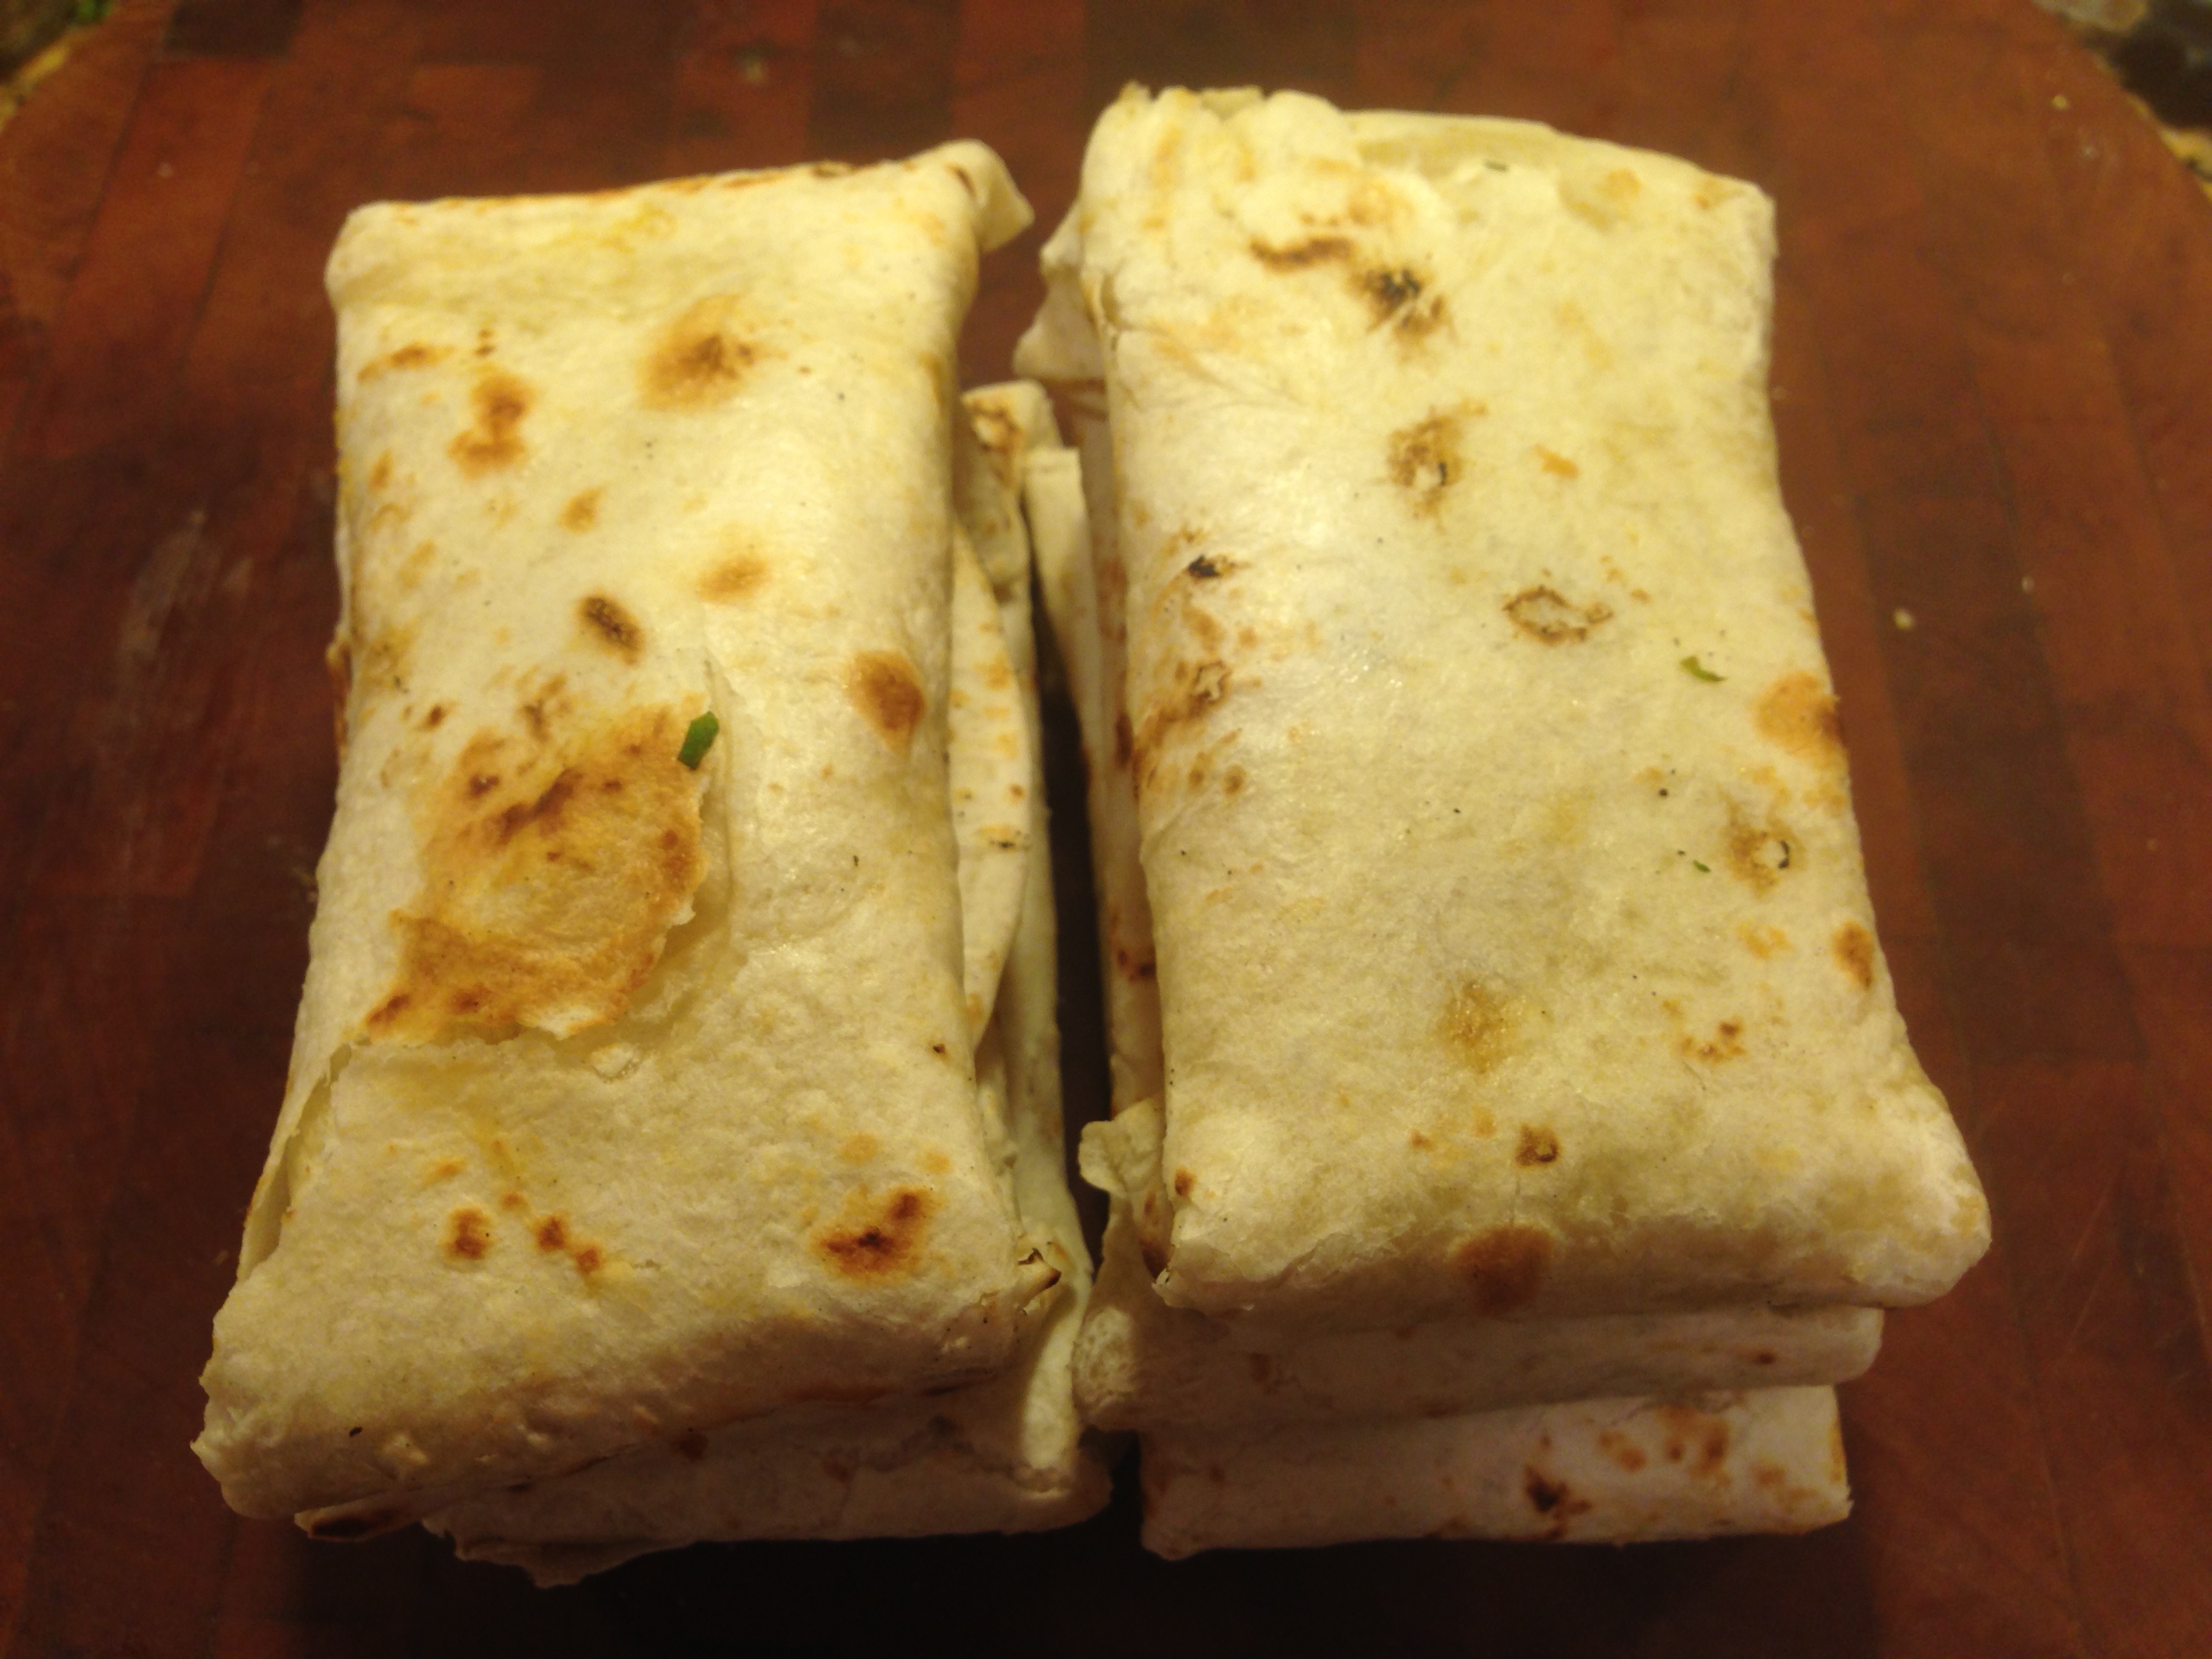
The smoked eggplant baingan bharta can be used a spicy dip and enjoyed with a pita bread or simple bread or you can relish this soft pulpy spicy textured entree with Roti, Paratha or Puri. Enjoy this also with any yogurt accompaniment in form of raita or lassi. If you have trouble finding a smoking box, you can experiment by putting the  chips/coal in an aluminum foil , light it and insert this in the vegetable and cover it with a lid.

If you are not an eggplant fan, I am pretty sure this smoked eggplant bharta will make you one!

Recipe Makes for 4 people

Cooking time 35 min

Prep time 10 min.

Smoking time : 60 min.

Ingredients:
  • 2 large eggplants
  • 4-5 vine tomatoes ( campari tomatoes preferred)
  • 2 1/2 cups medium diced yellow onions
  • 3 inches ginger with skin peeled off
  • 4 hot green chillies grounded into paste
  • 3/4 cup oil
  • salt to taste
  • 1 tbsp sugar(optional)
  • 1/8th tsp asofoetida
  •  coriander to garnish

For smoking the eggplant baingan bharta

  • 3-4 coals or wood chips ( hickory or sugar maple) I used sugar maple chips
  • Ghee Clarified butter for soaking coal/wood chips
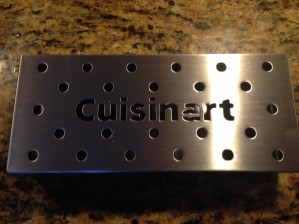
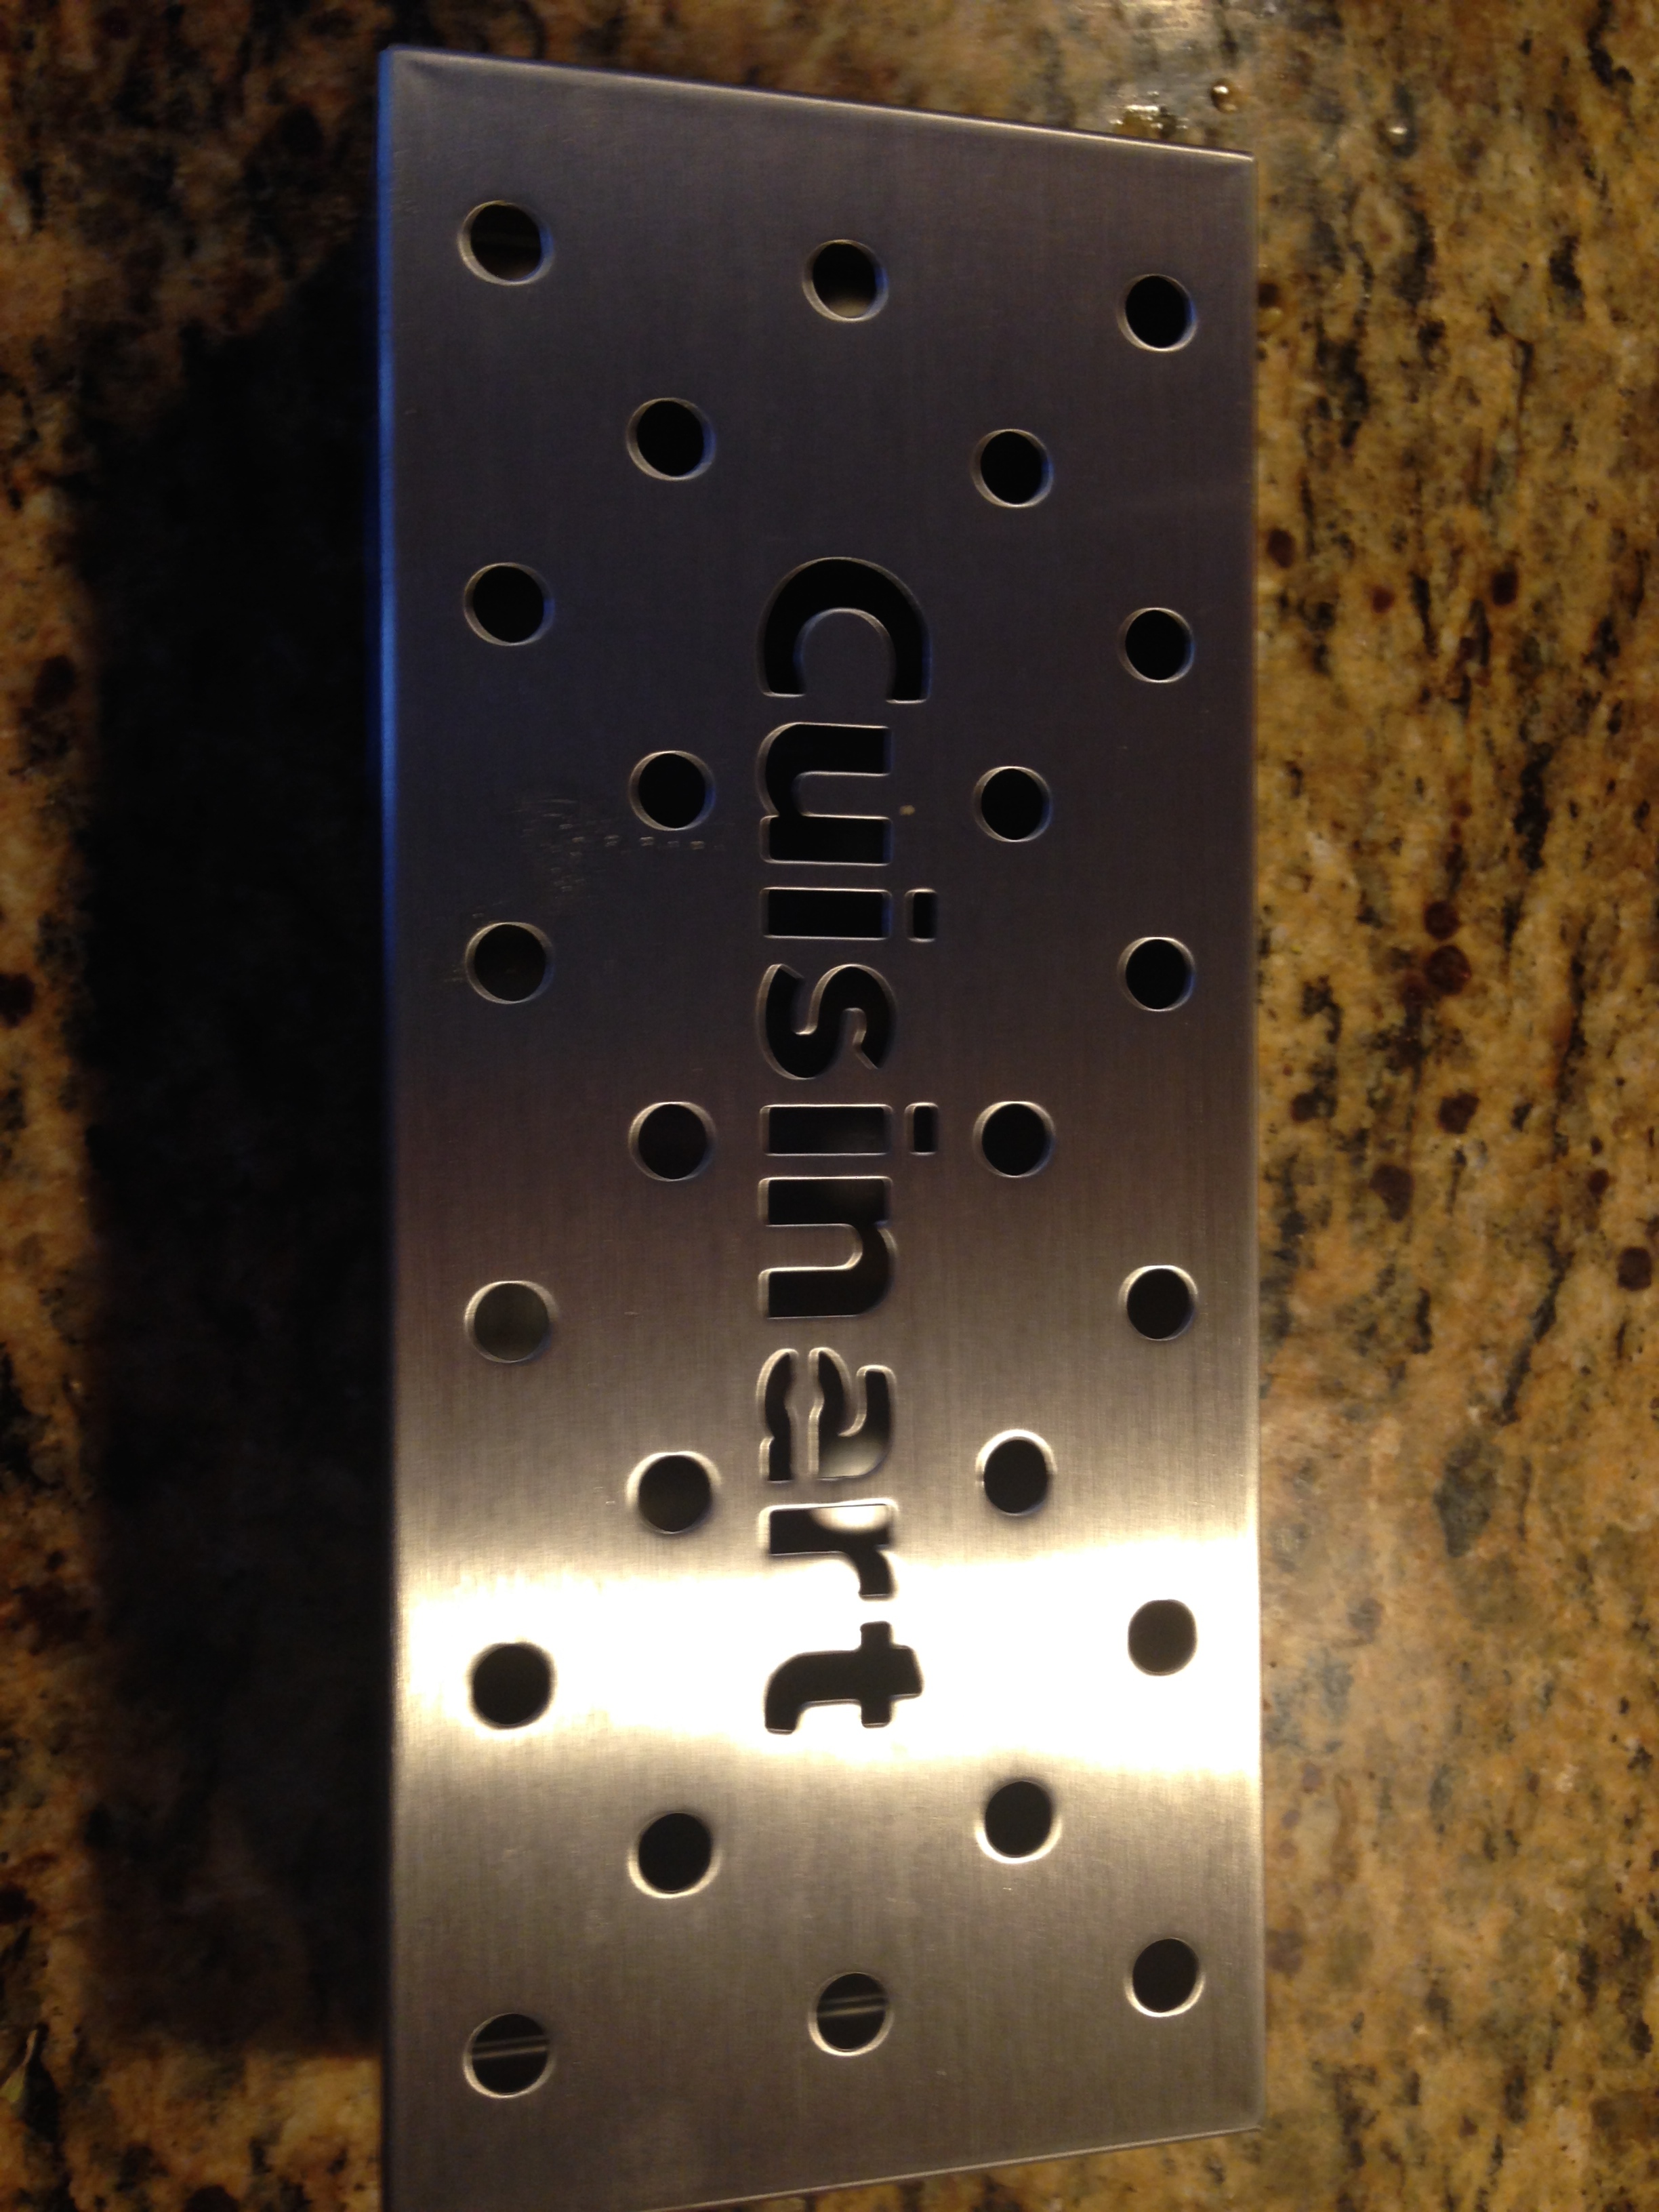
  • Smoking box or aluminium foil
  • IMG_3956
  • Match sticks to light
Method
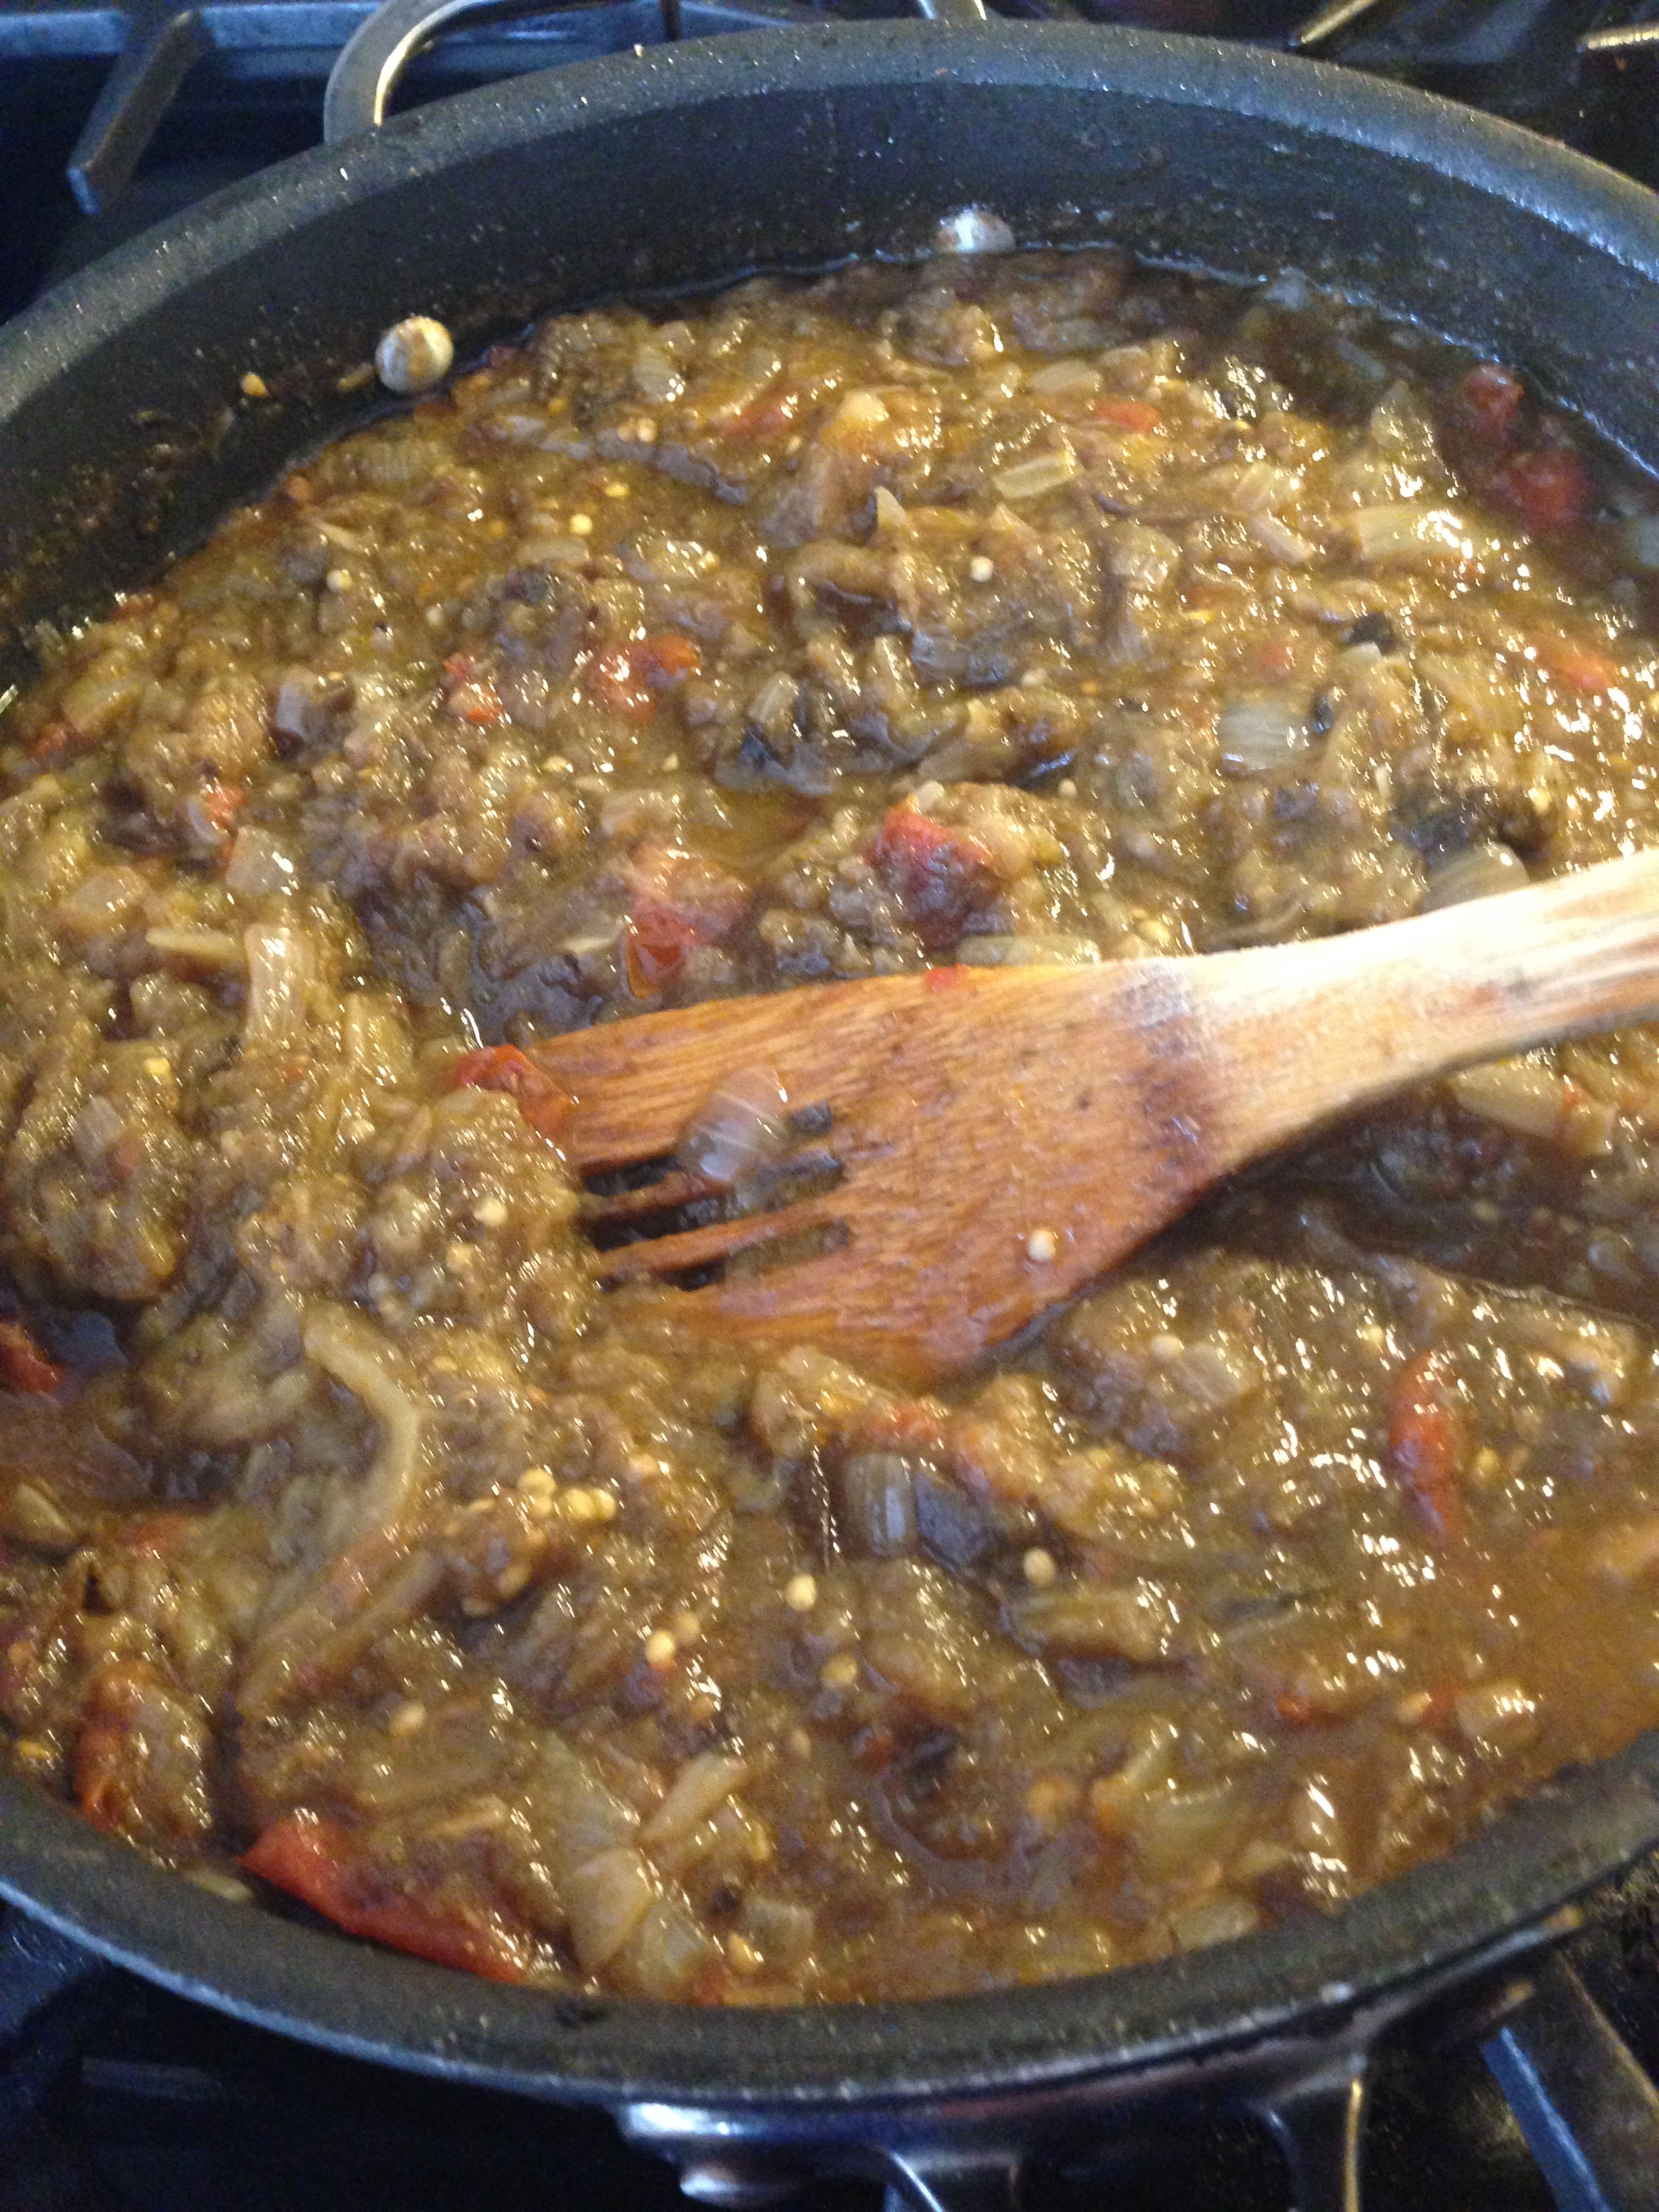
  • Slice the eggplants and  put to steam in a cooker adding 3 cups of water .
  • Remove from flame after 4 whistles.
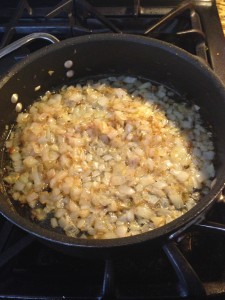
  • On another flame put oil to heat in the  broadest thick bottom  pan you have
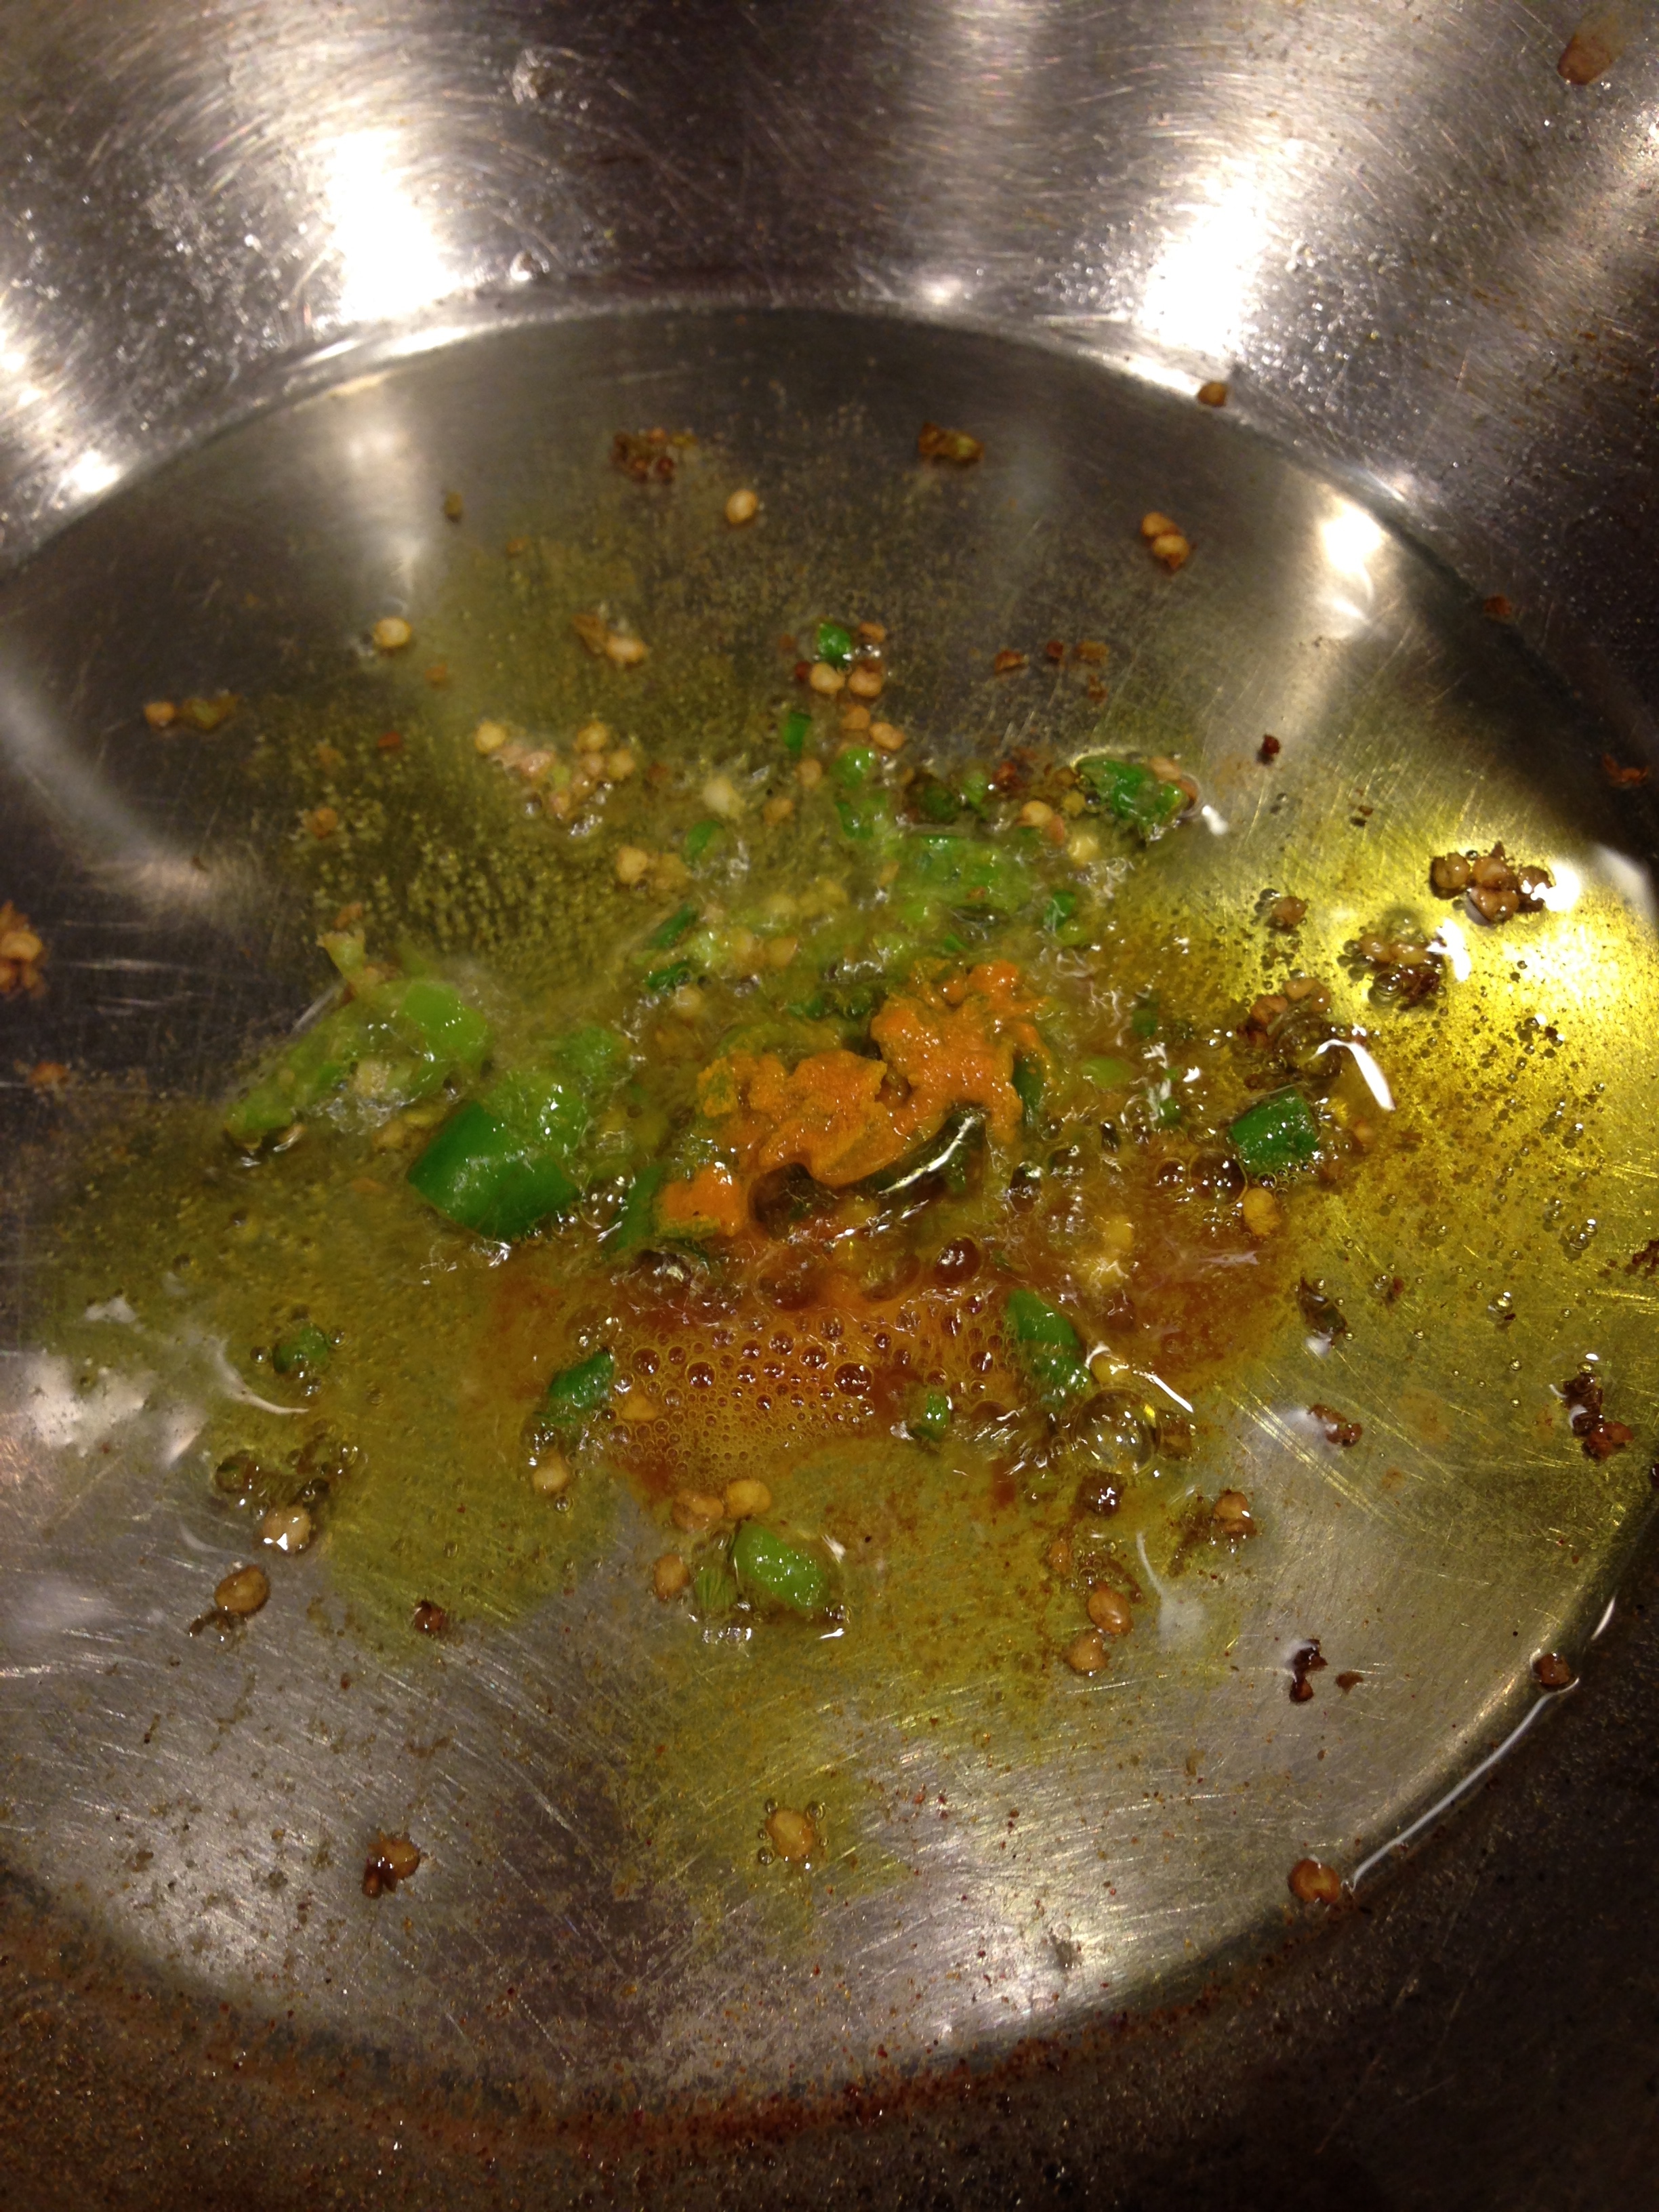
  • When the oil heats, add asofoetida  and chill ginger paste and saute for a couple of minutes.
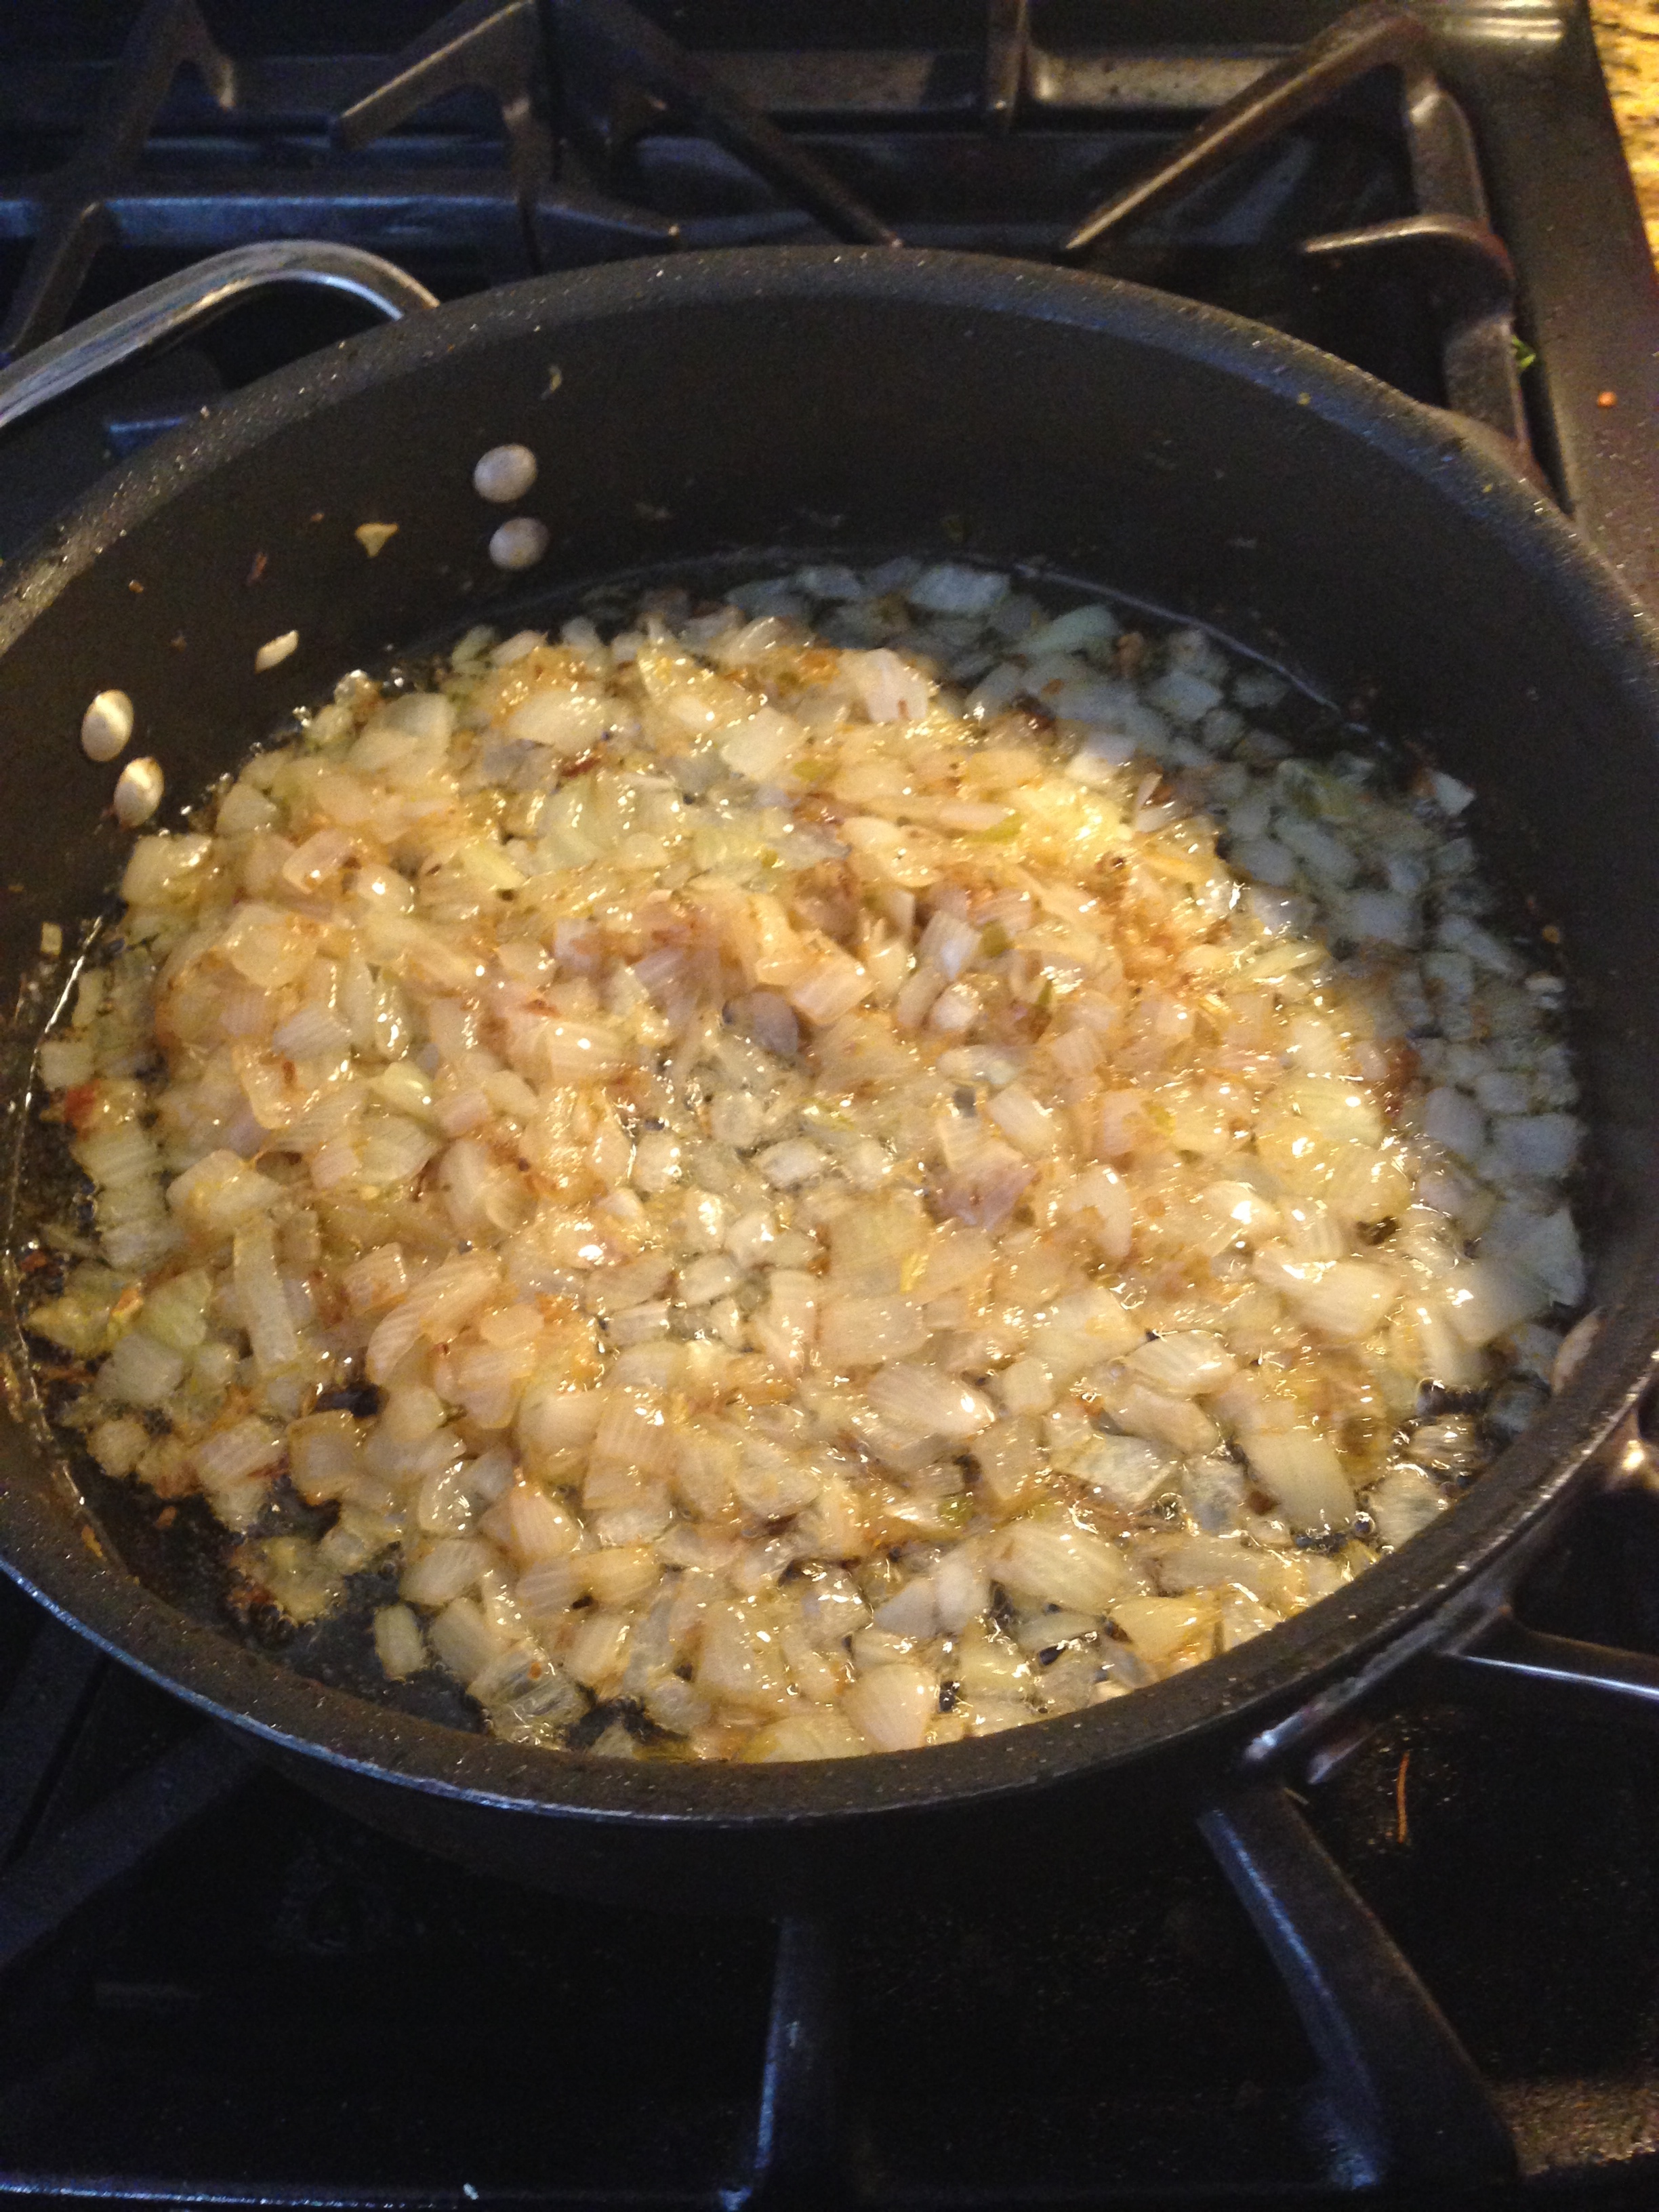
  • Add diced onions and saute  on medium flame to nice golden brown color.
  • IMG_3950
  • Once the cooker cools, remove the eggplant and drain and save the cooked water.
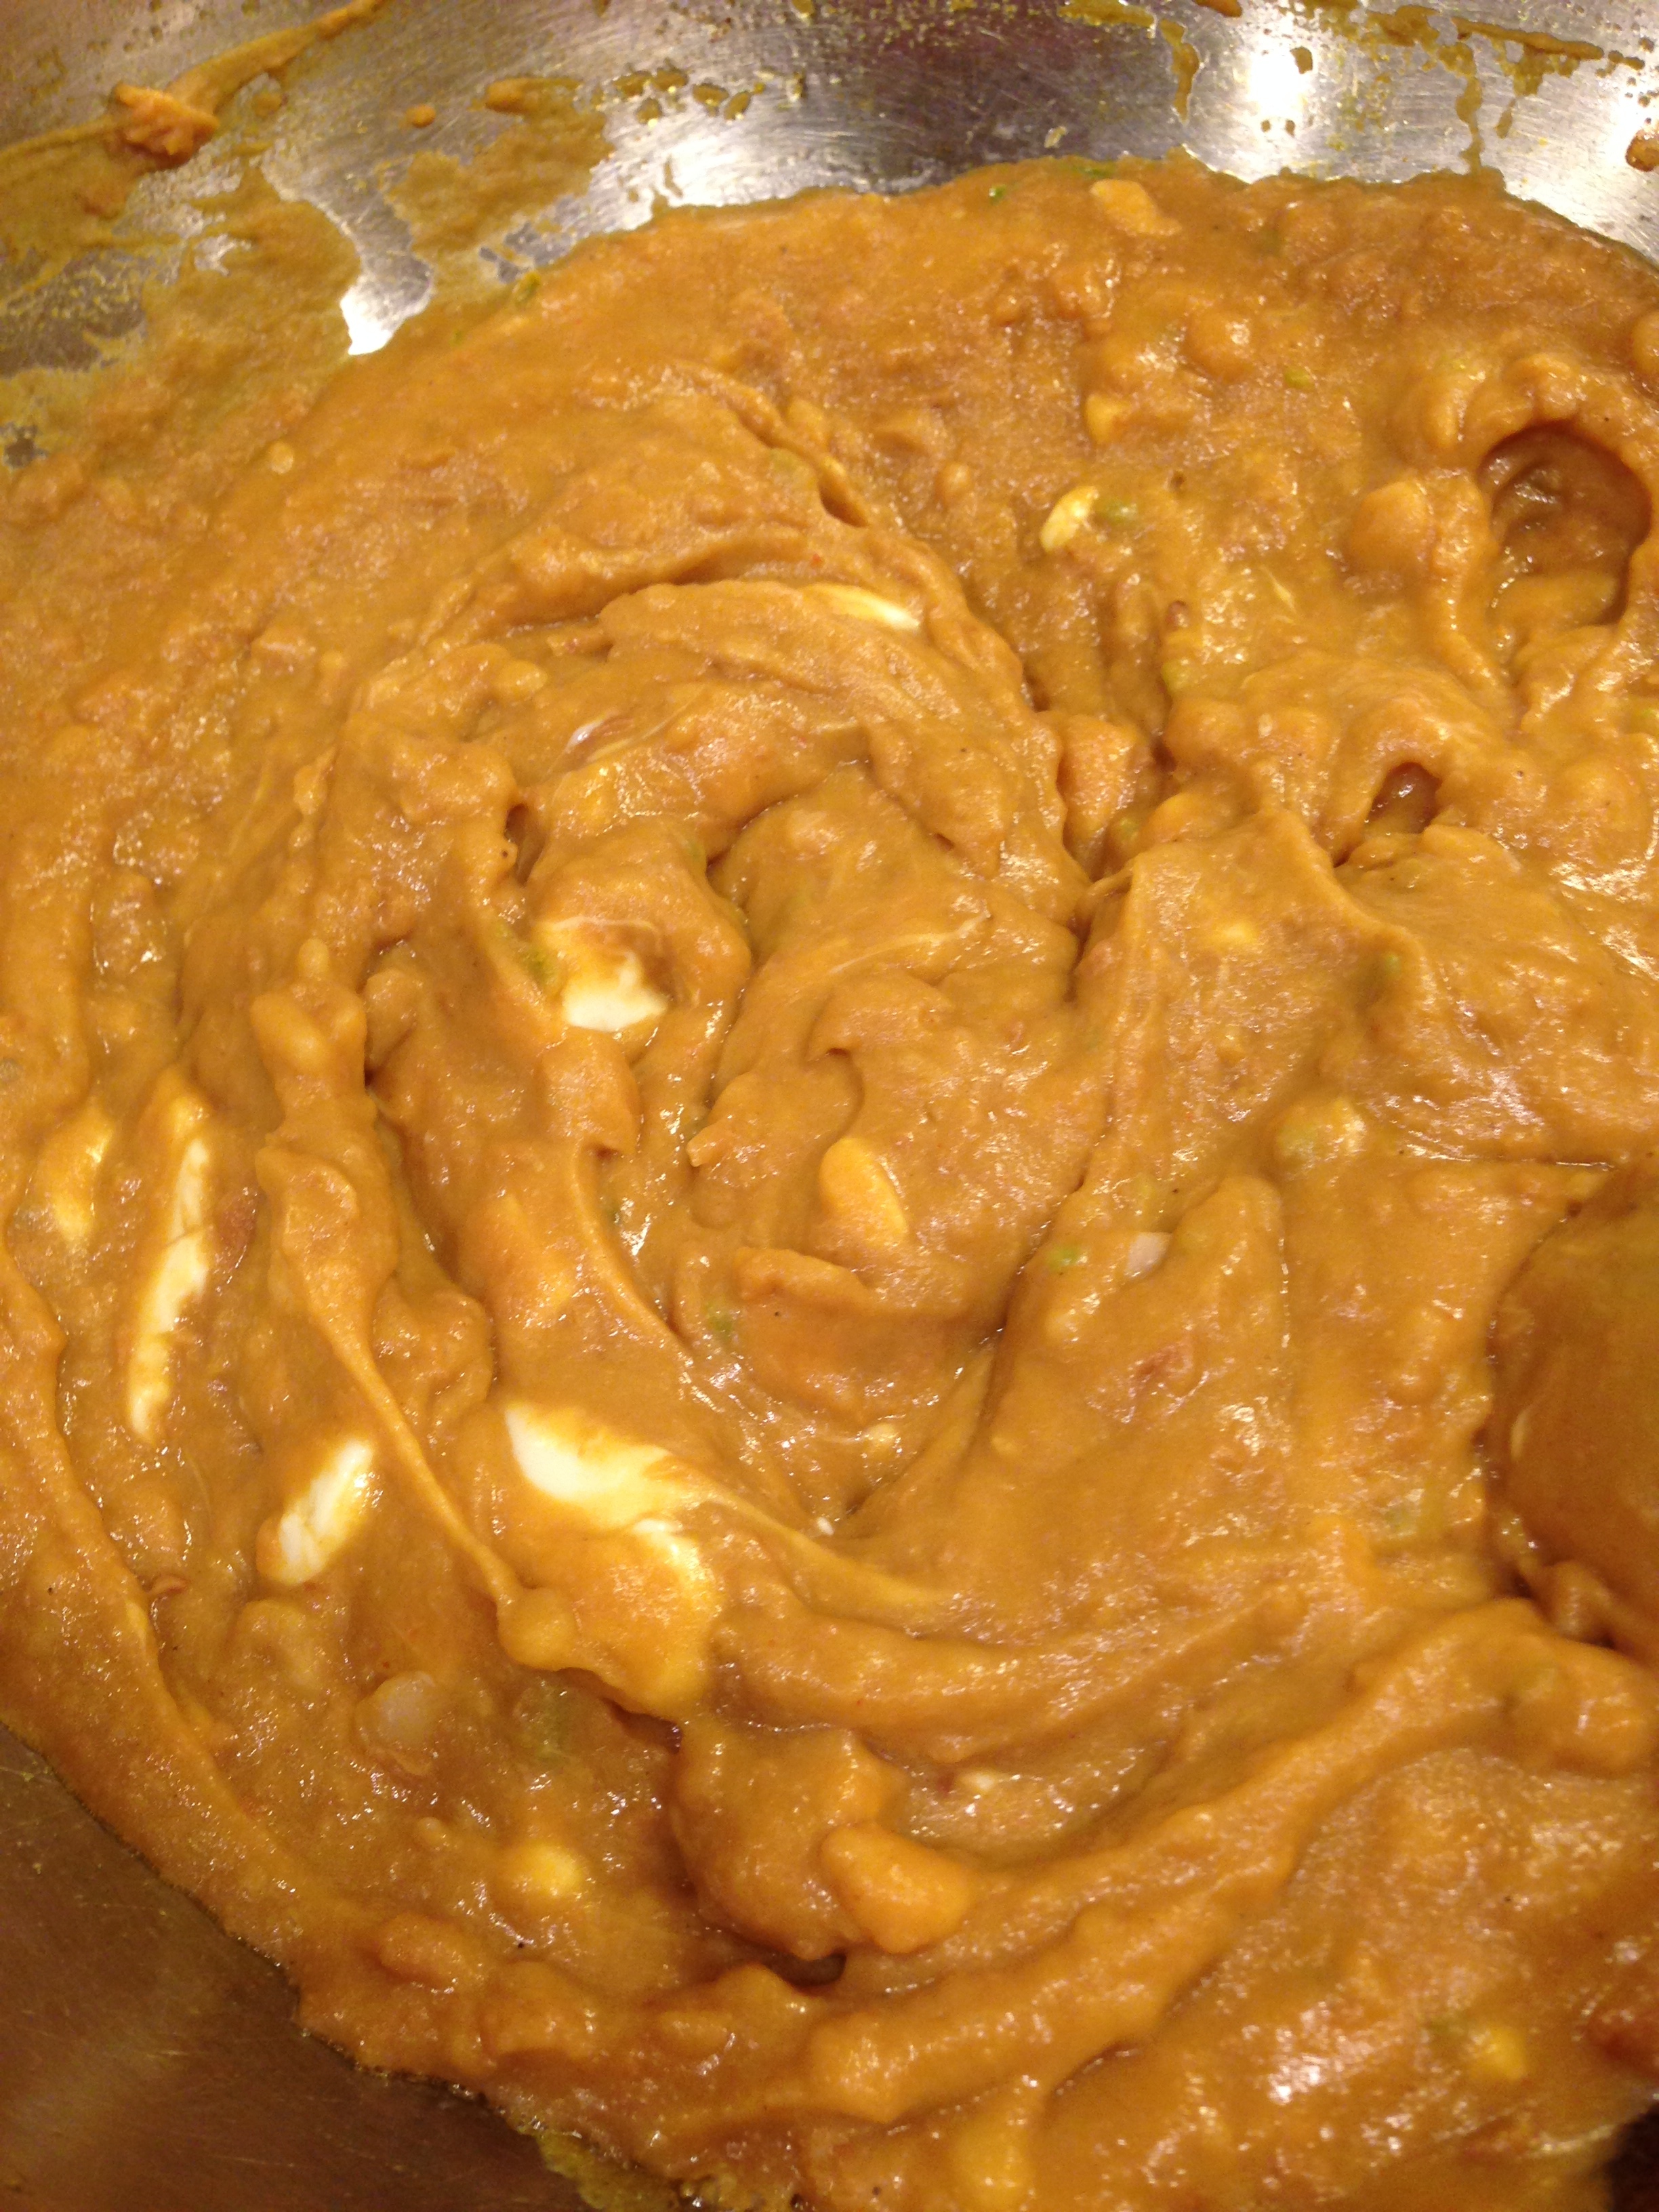
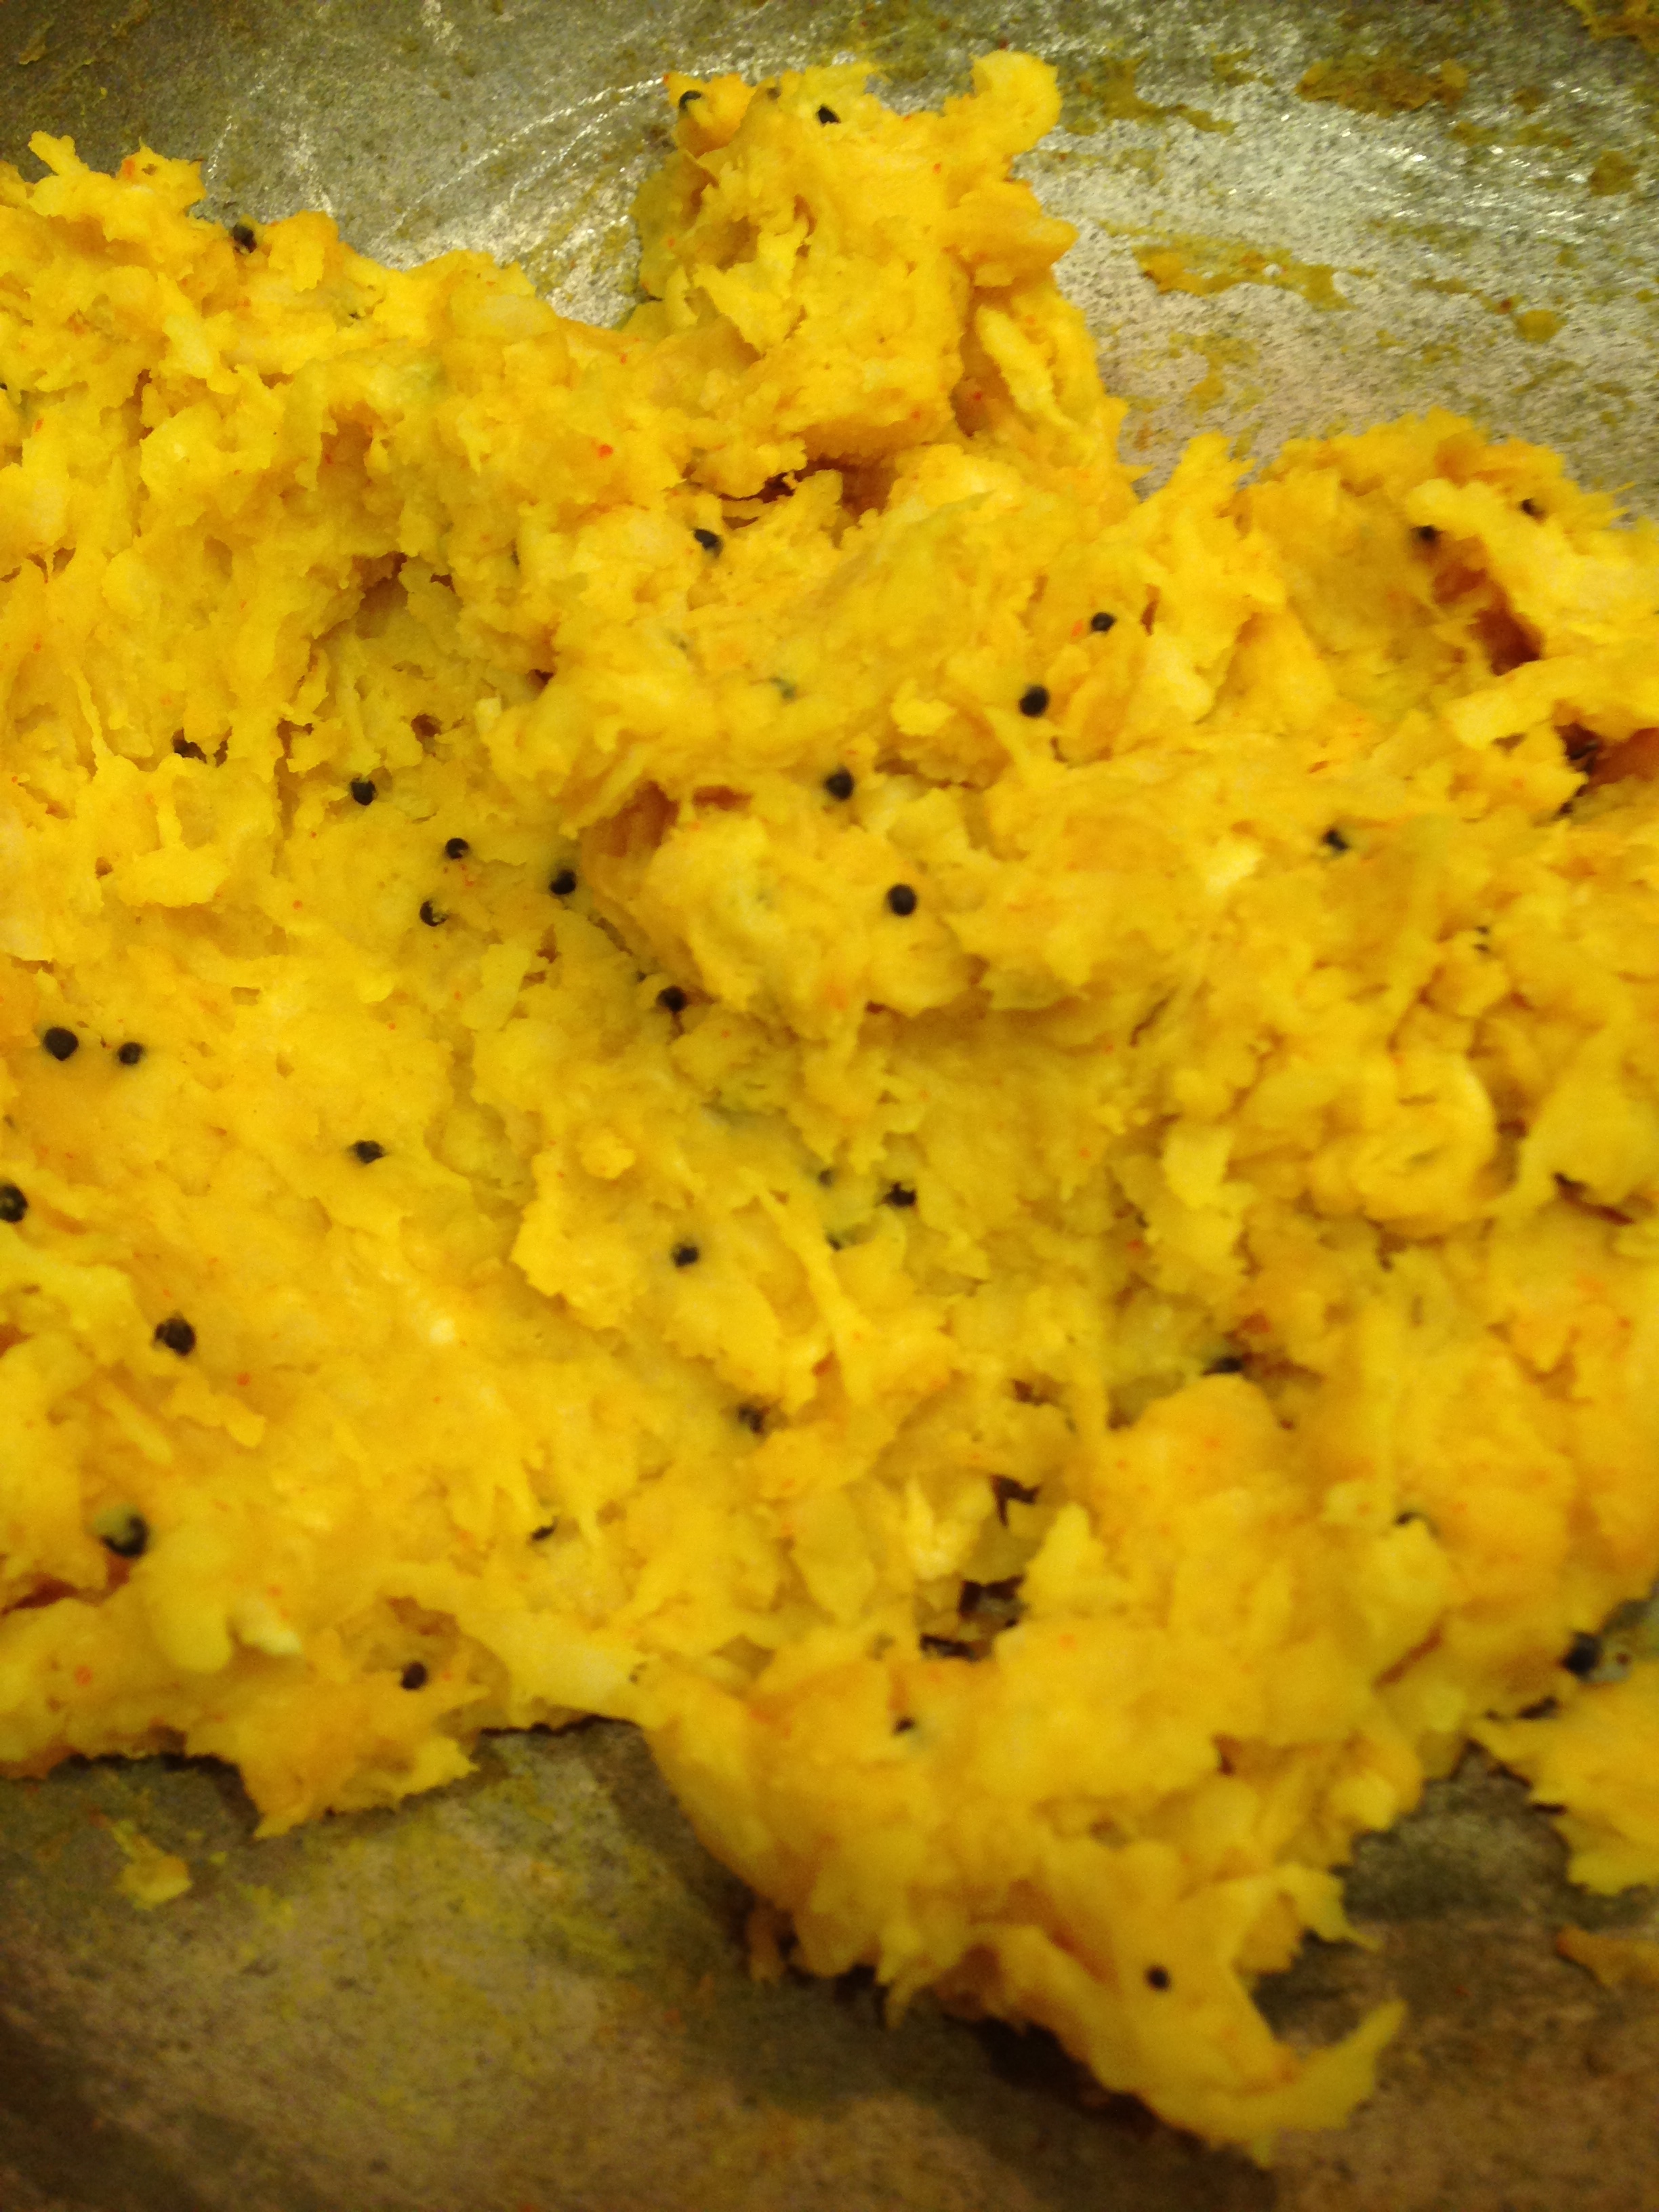
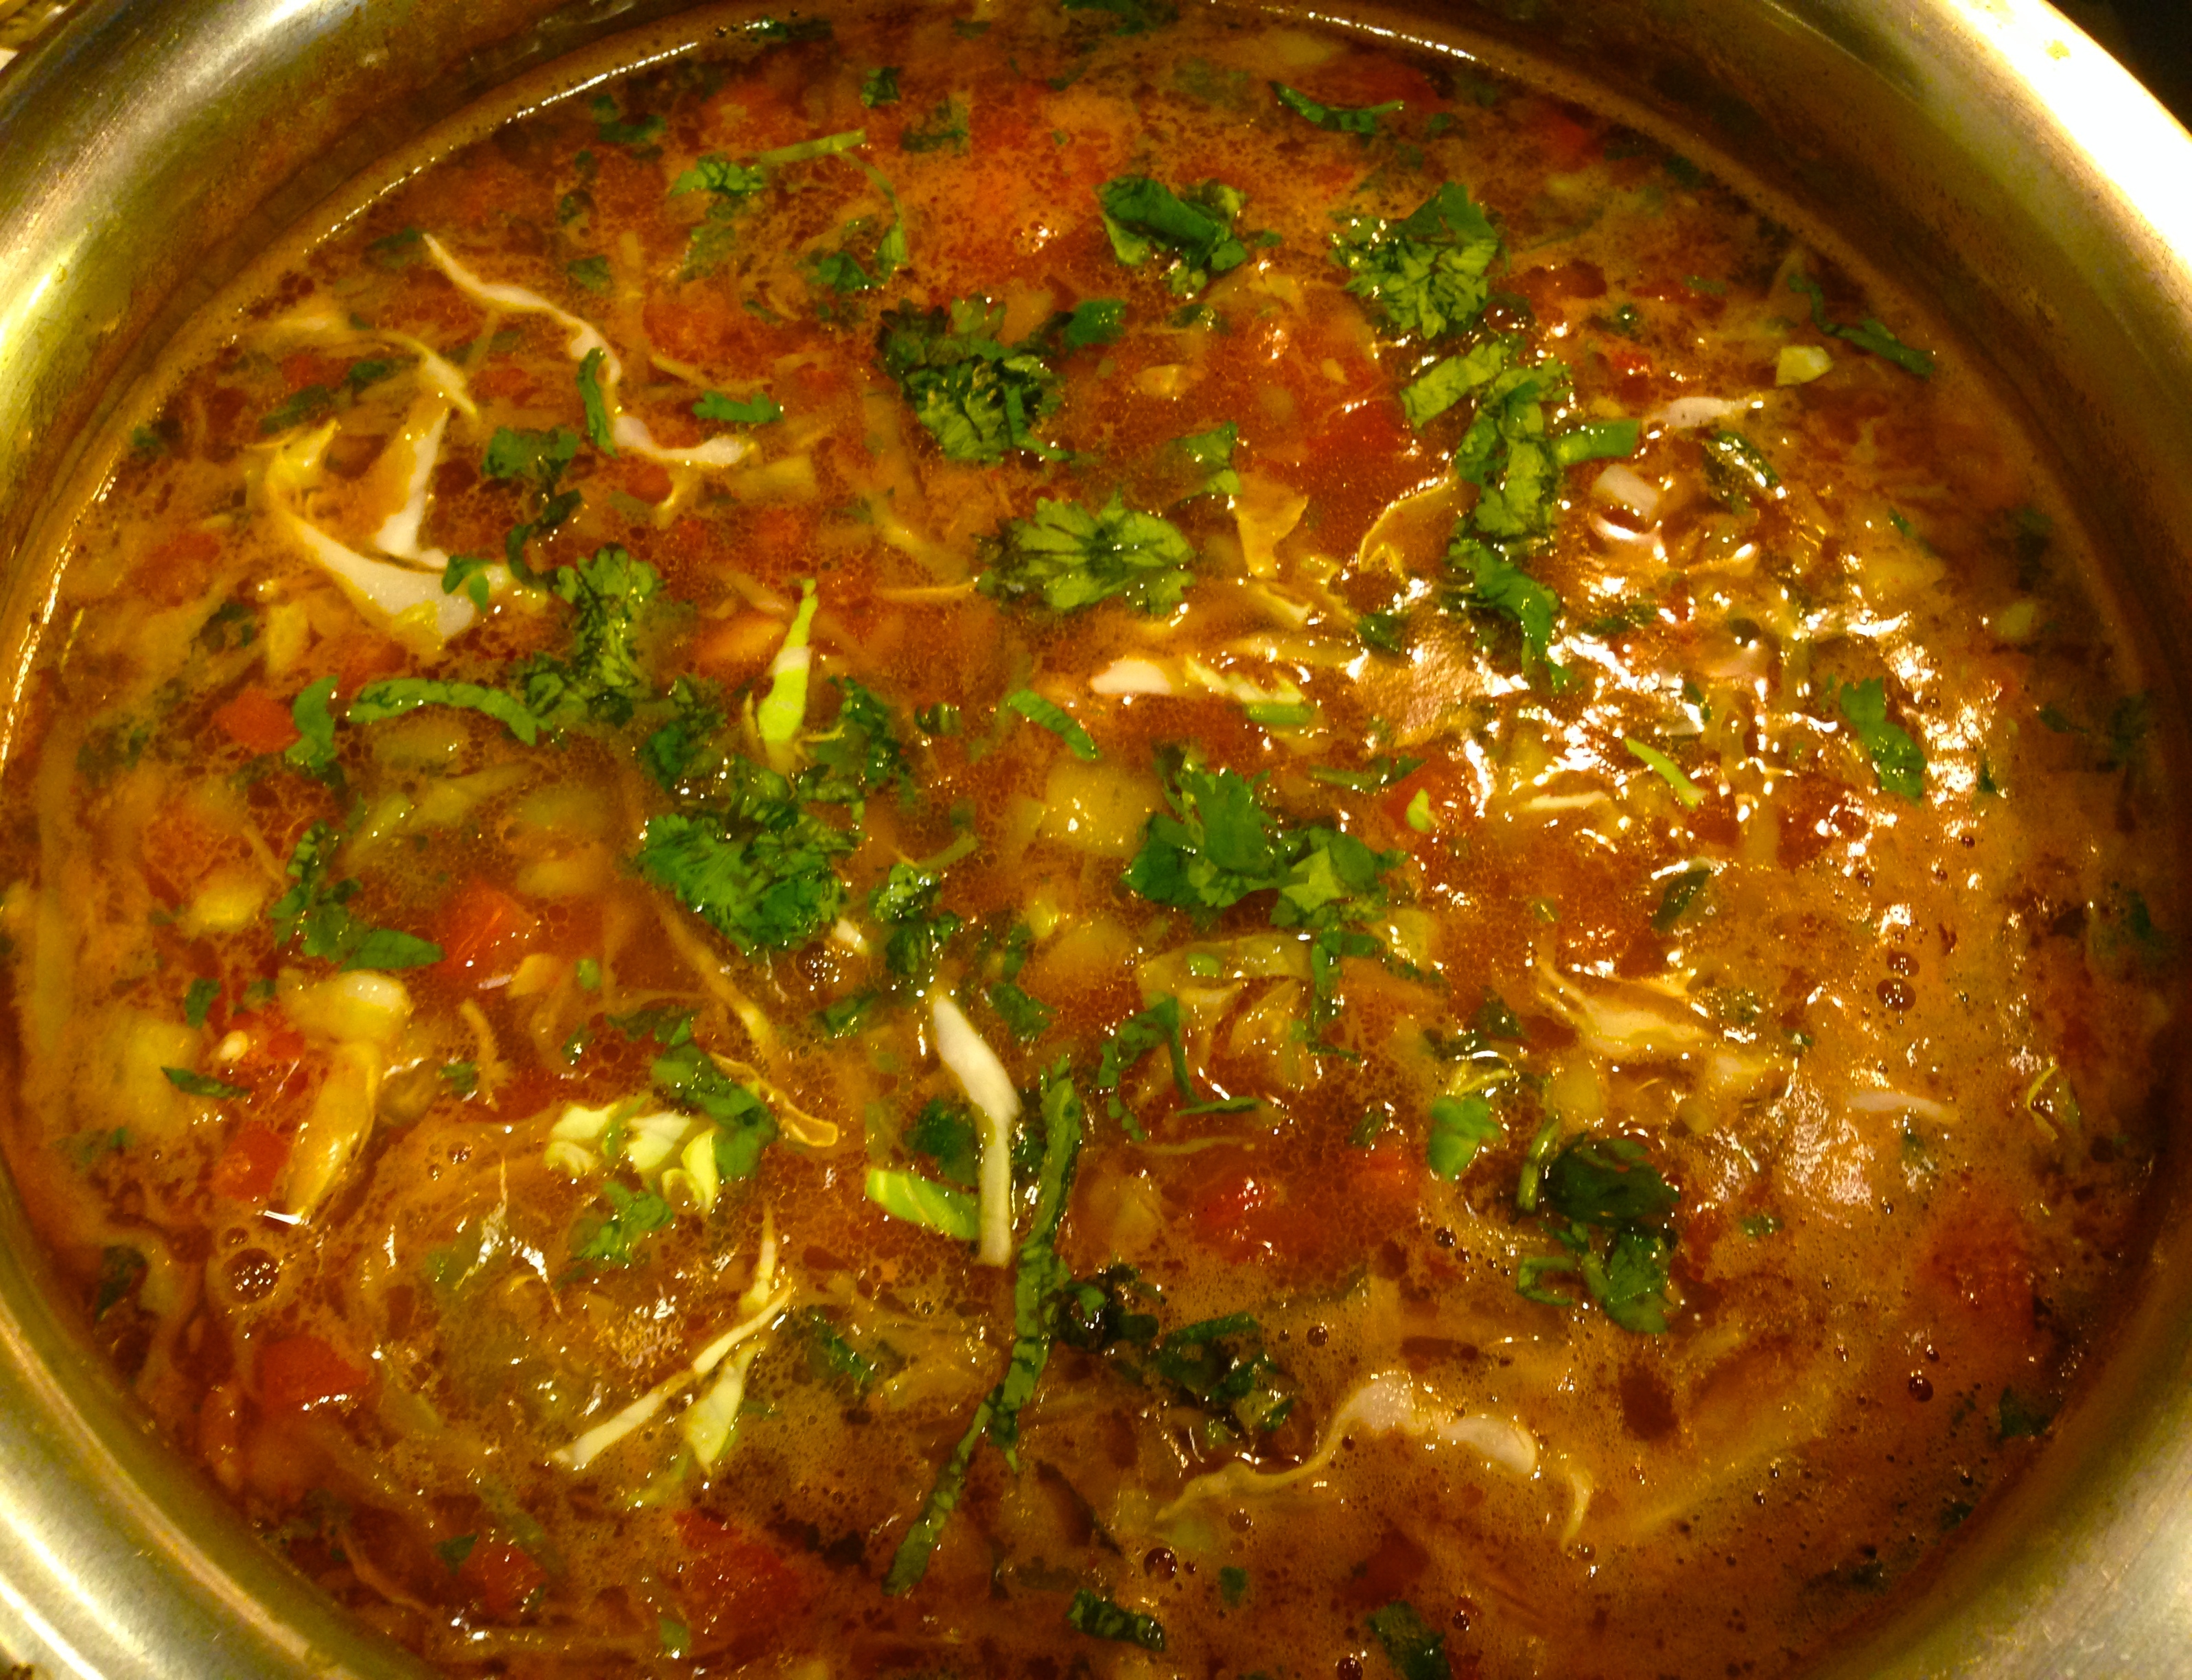
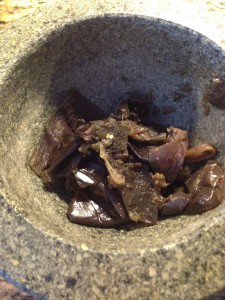
  • Remove the skin from the eggplant and grind it in a mortar pestle.
  • IMG_3952
  • Add the grinded eggplant skin, tomatoes, salt, turmeric and drained cooked water to onions .
  • Simmer for 10 min.
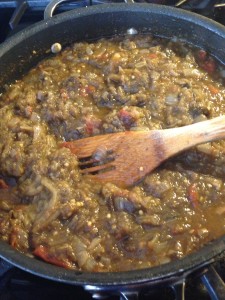
  • Add the boiled eggplant plant, sugar and simmer for further 20 min.
  • IMG_3955
  • Soak the coal or wood chips in melted ghee for a couple of minutes,
  • Put the soaked coal/wood chips in the smoking box /aluminium foil and light it.
  • IMG_3968
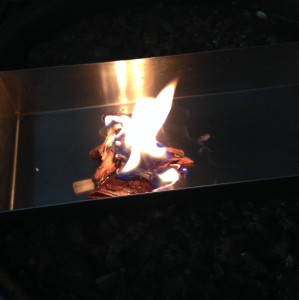
  • Put the lighted coal /wood chips in the middle of the vegetables.
  • IMG_3969
  • Let the flame  burn for a two burn minutes.
  • Cover the vegetable with a lid and put weight on it if need be so that no smoke is released .
  • Remove the lid only at the time of serving, after keeping it covered for an hour or so.
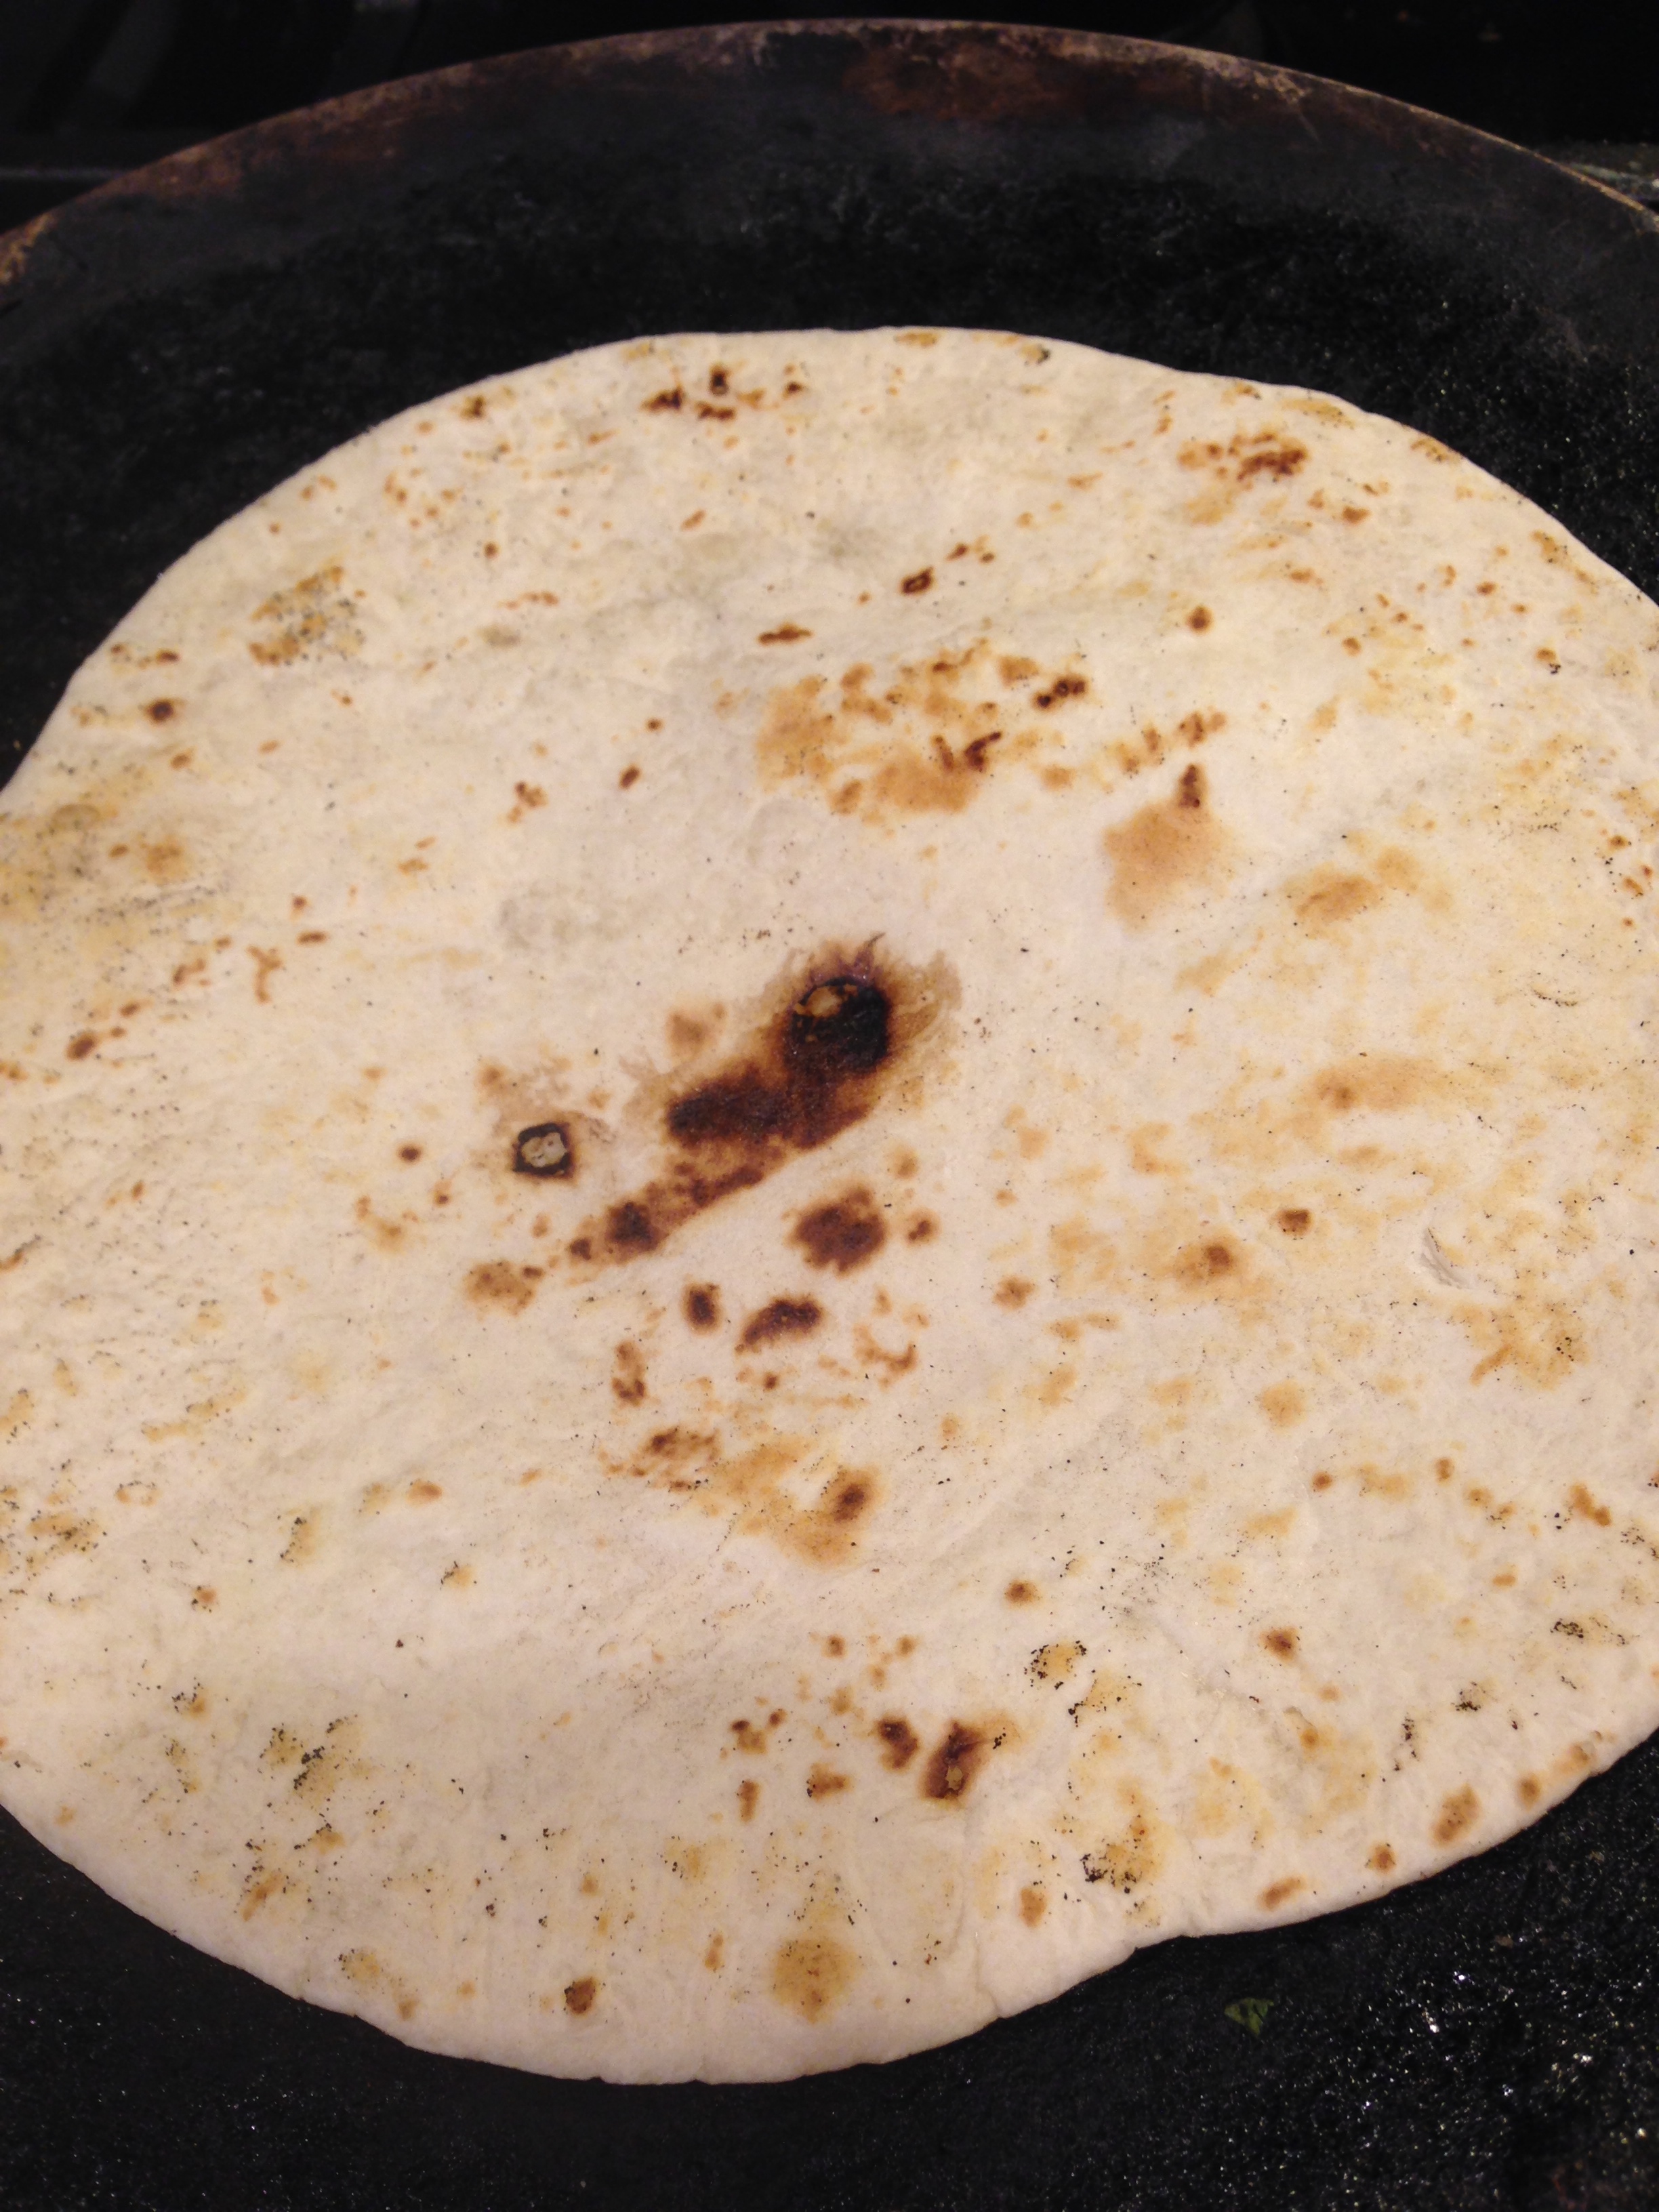
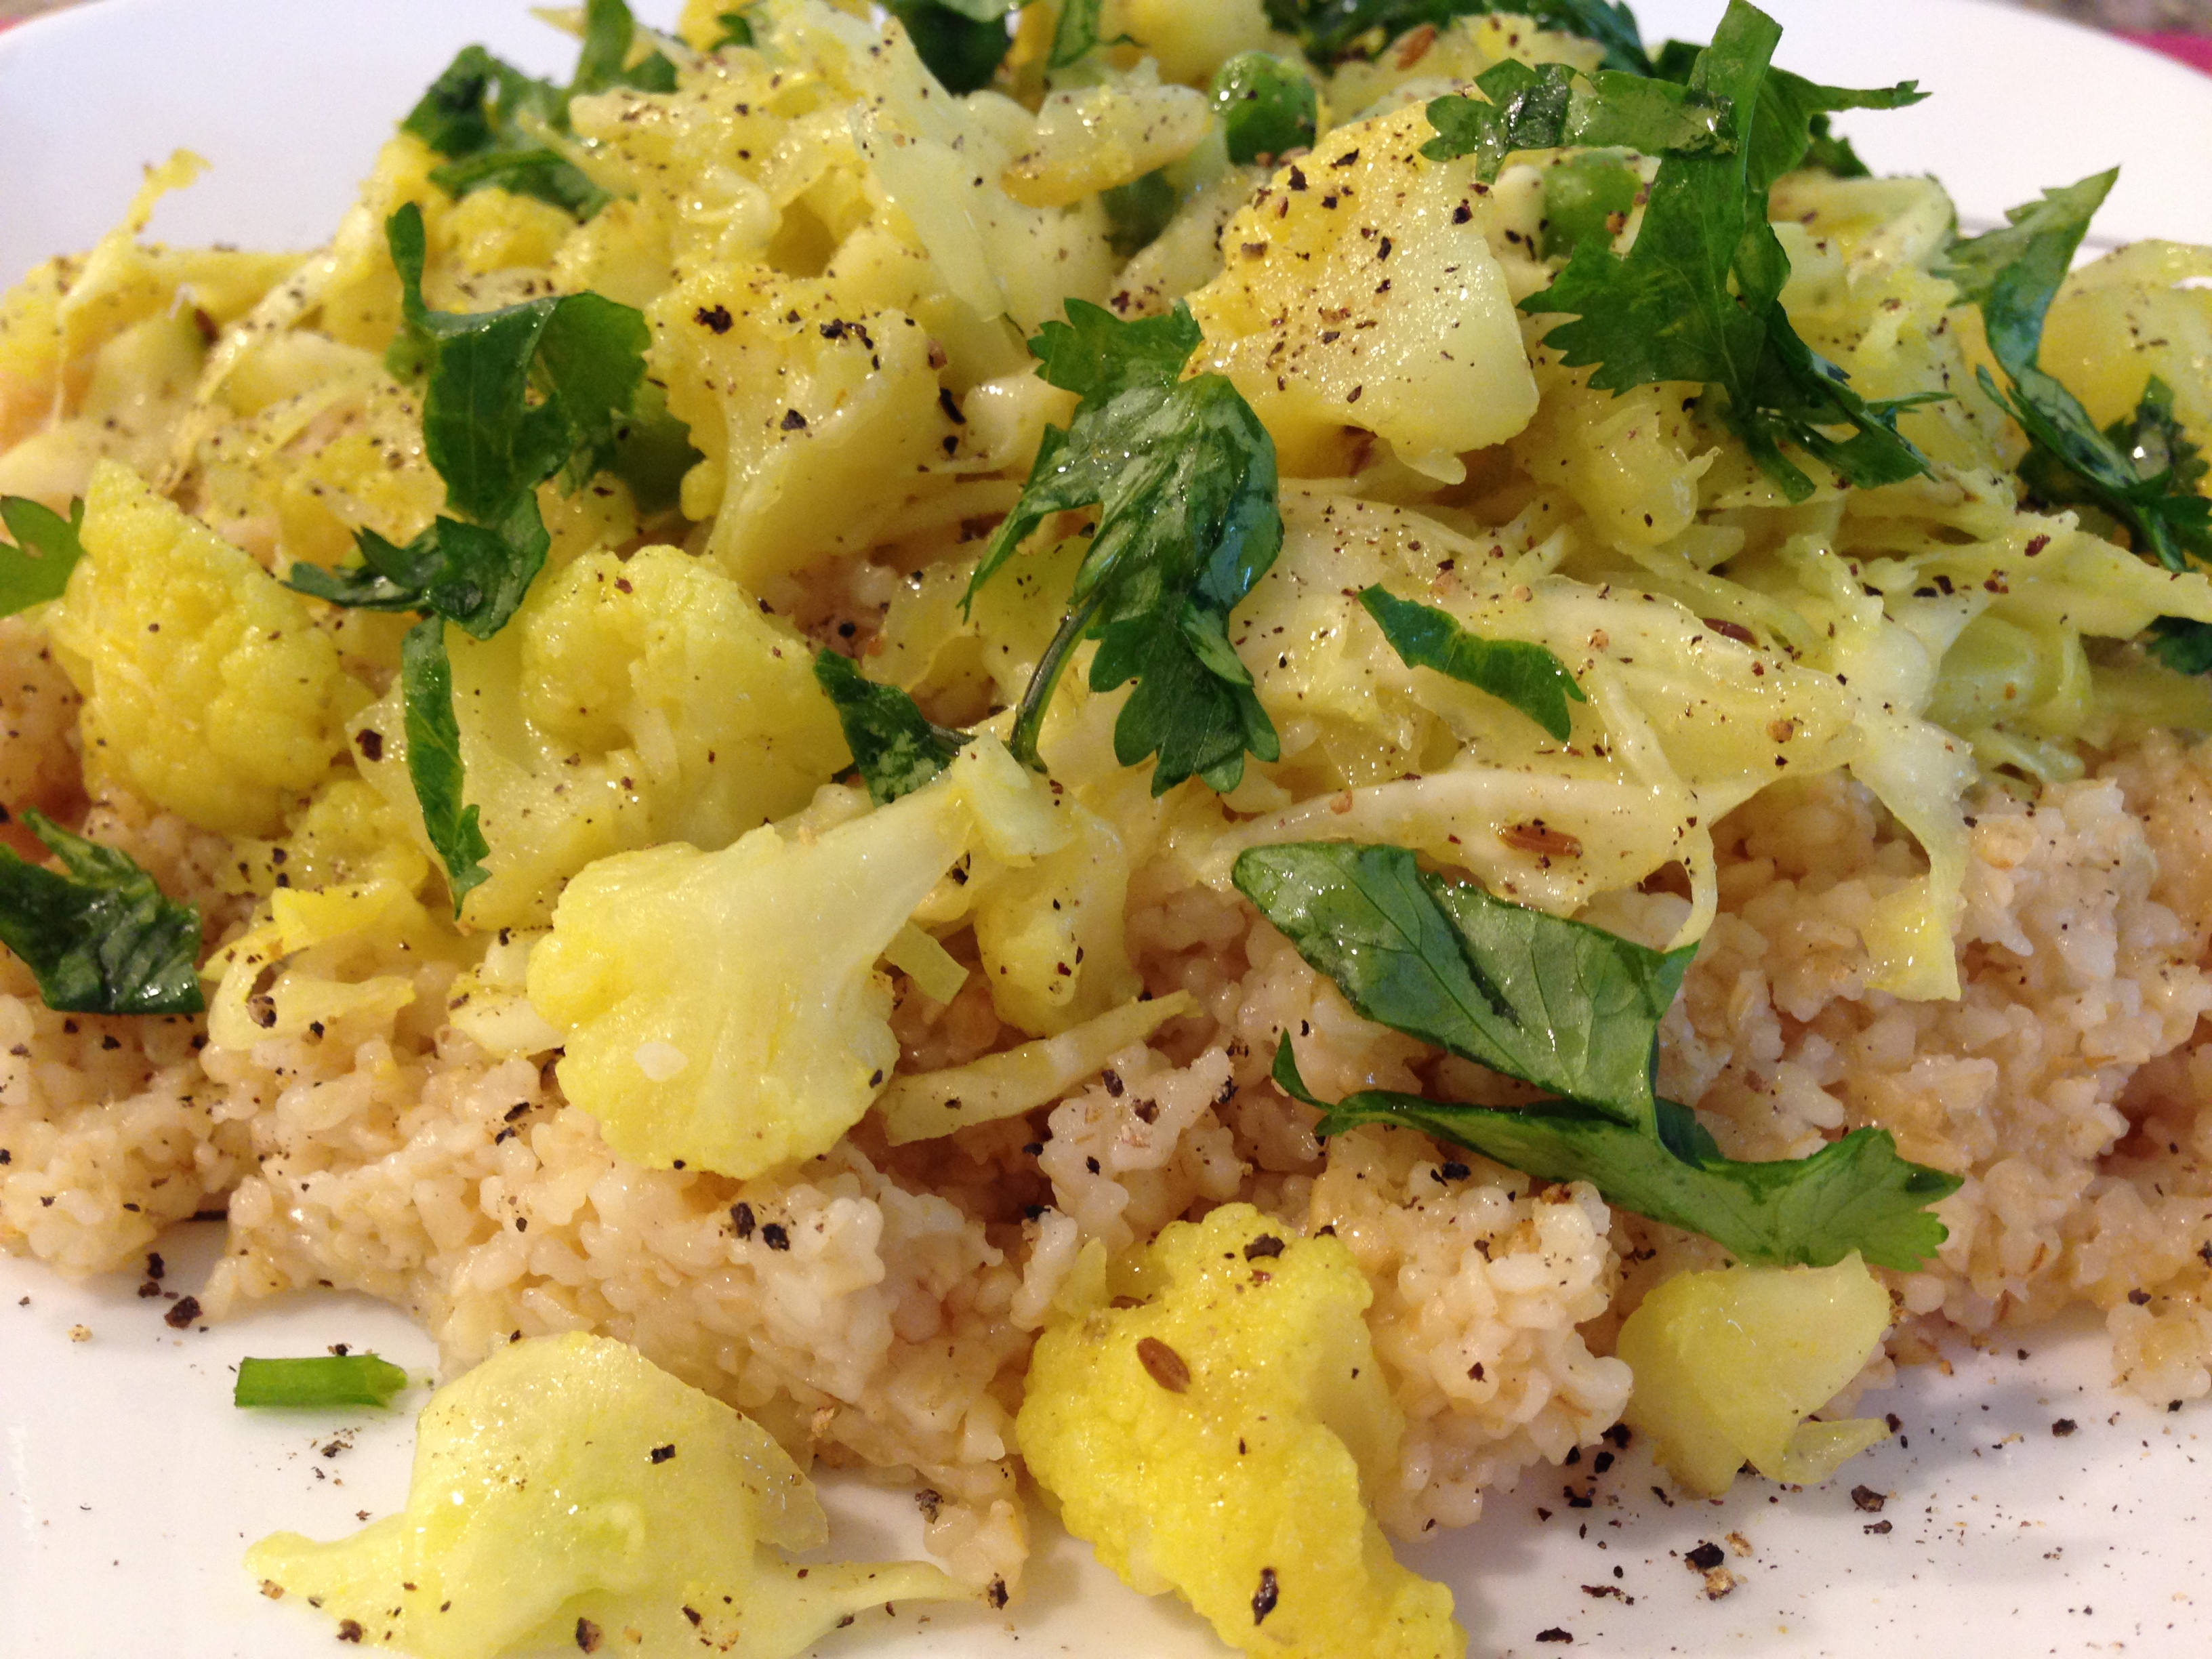
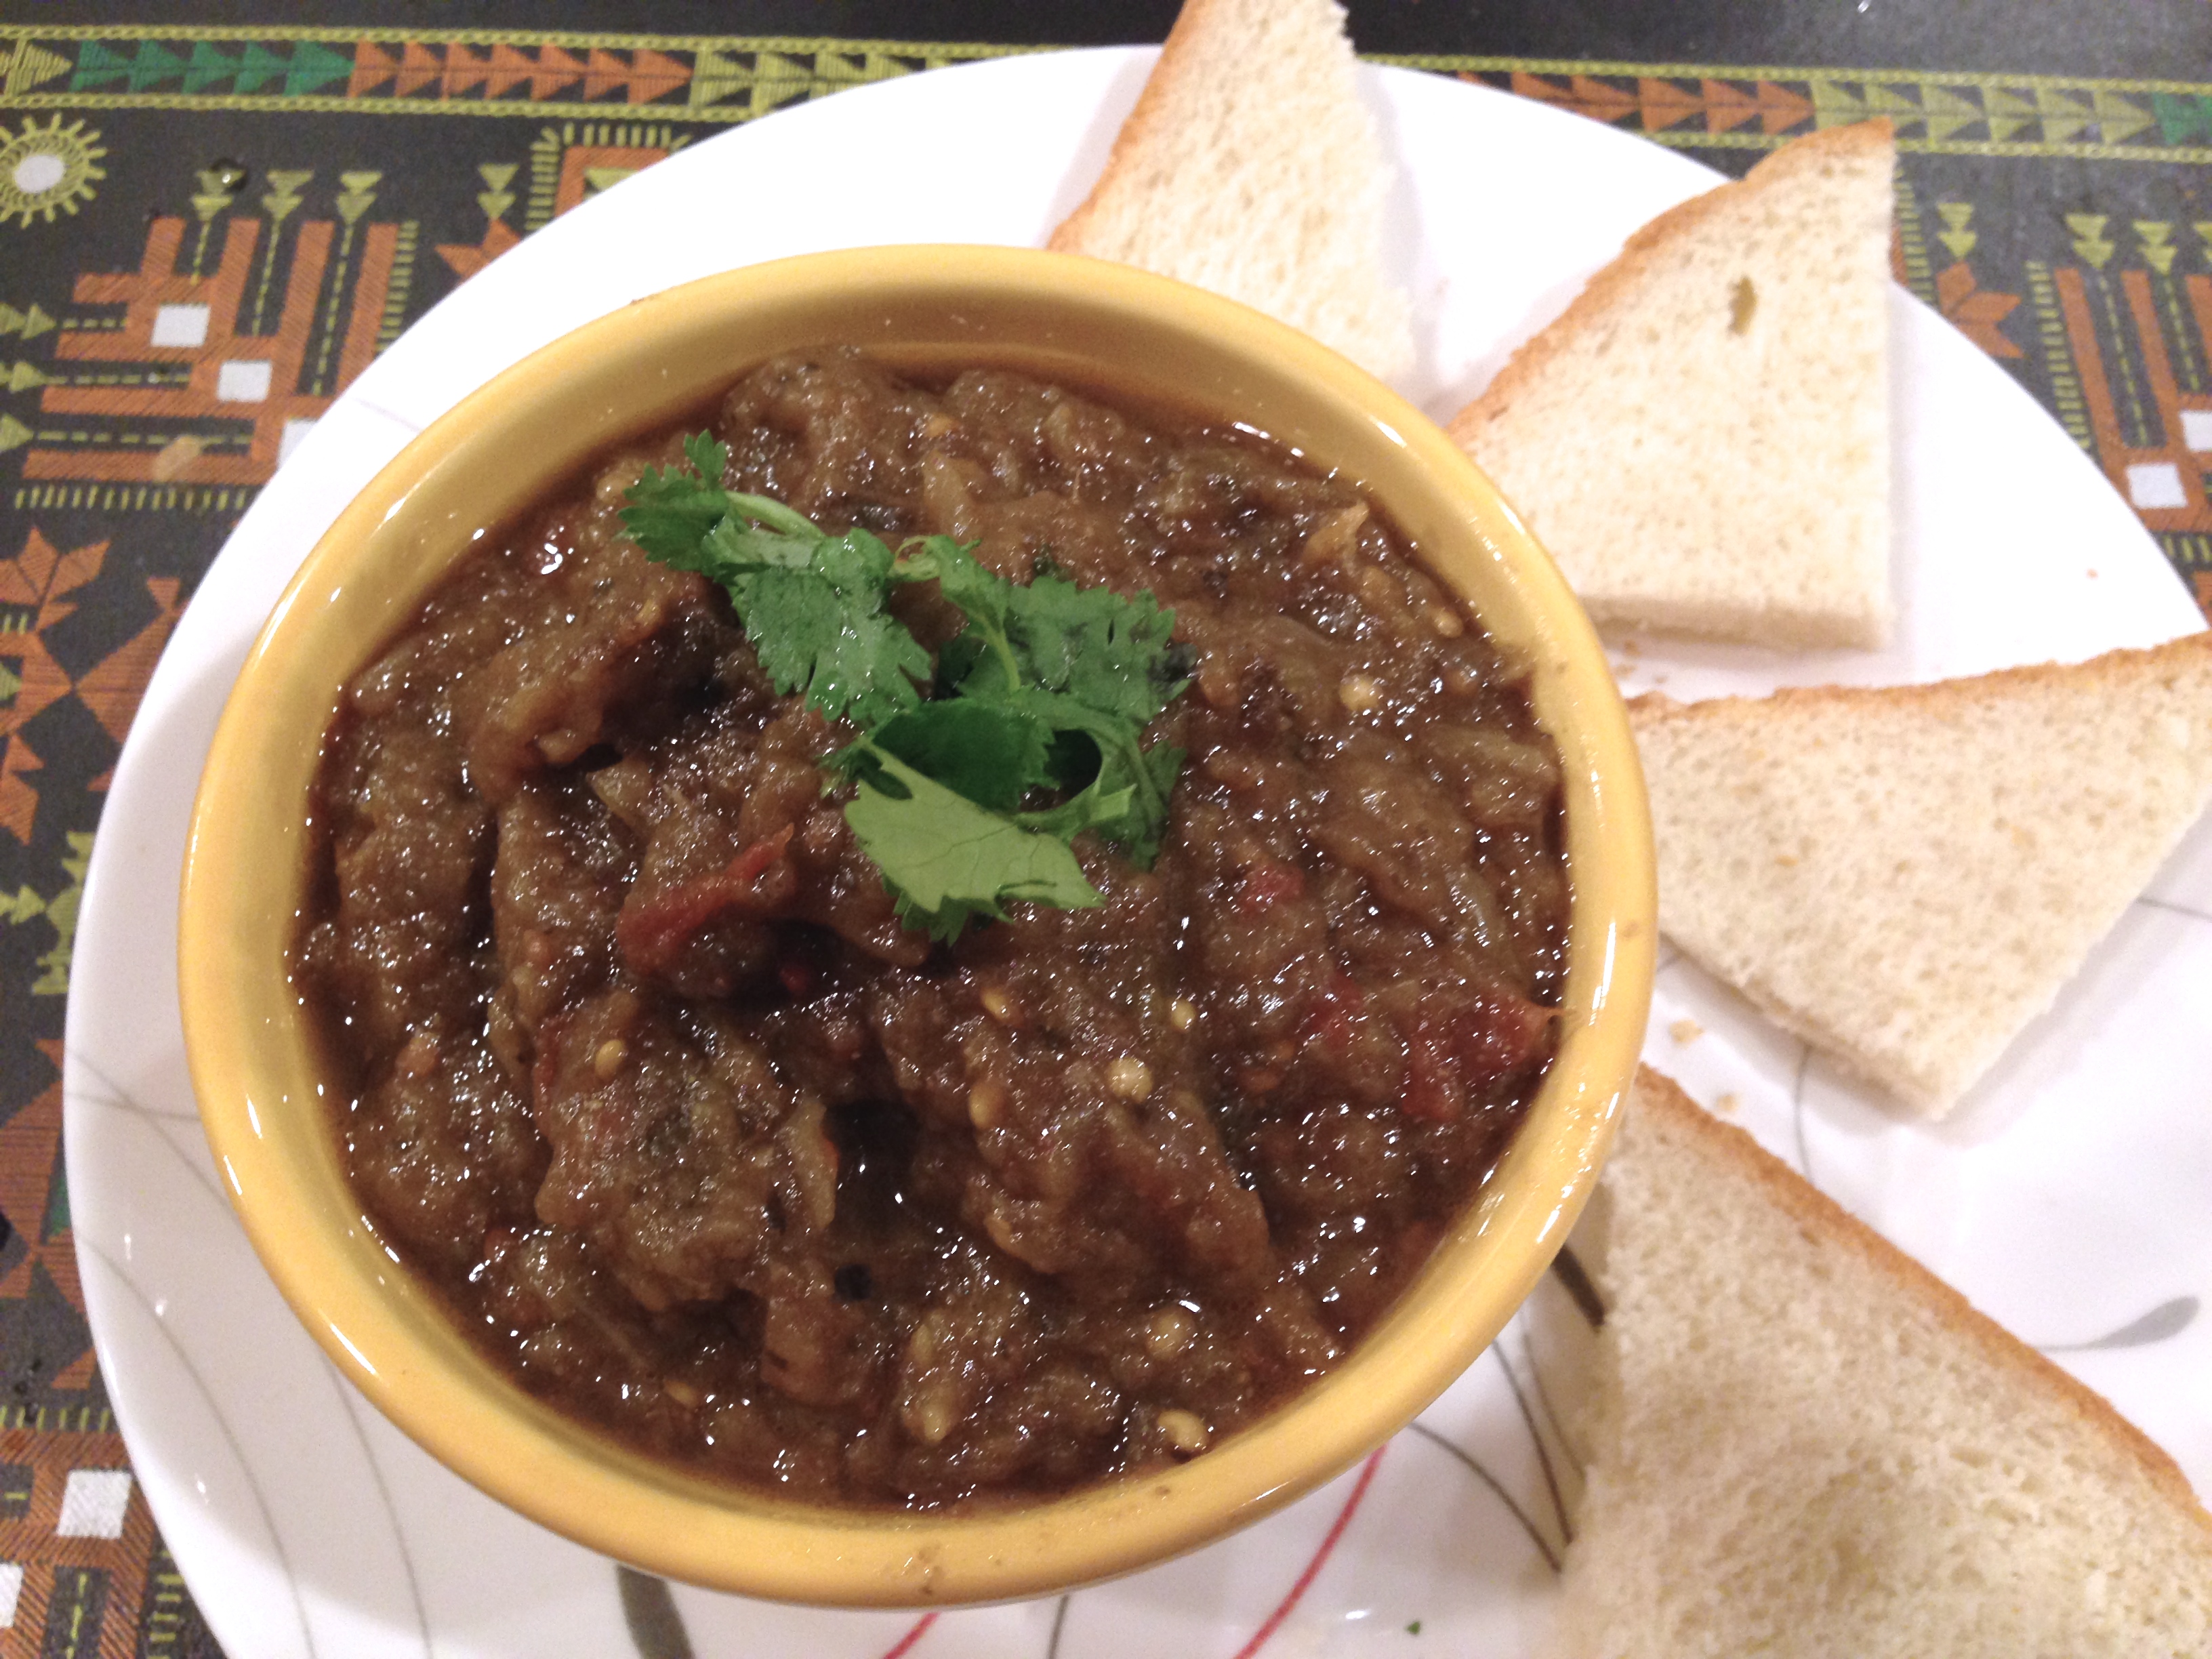
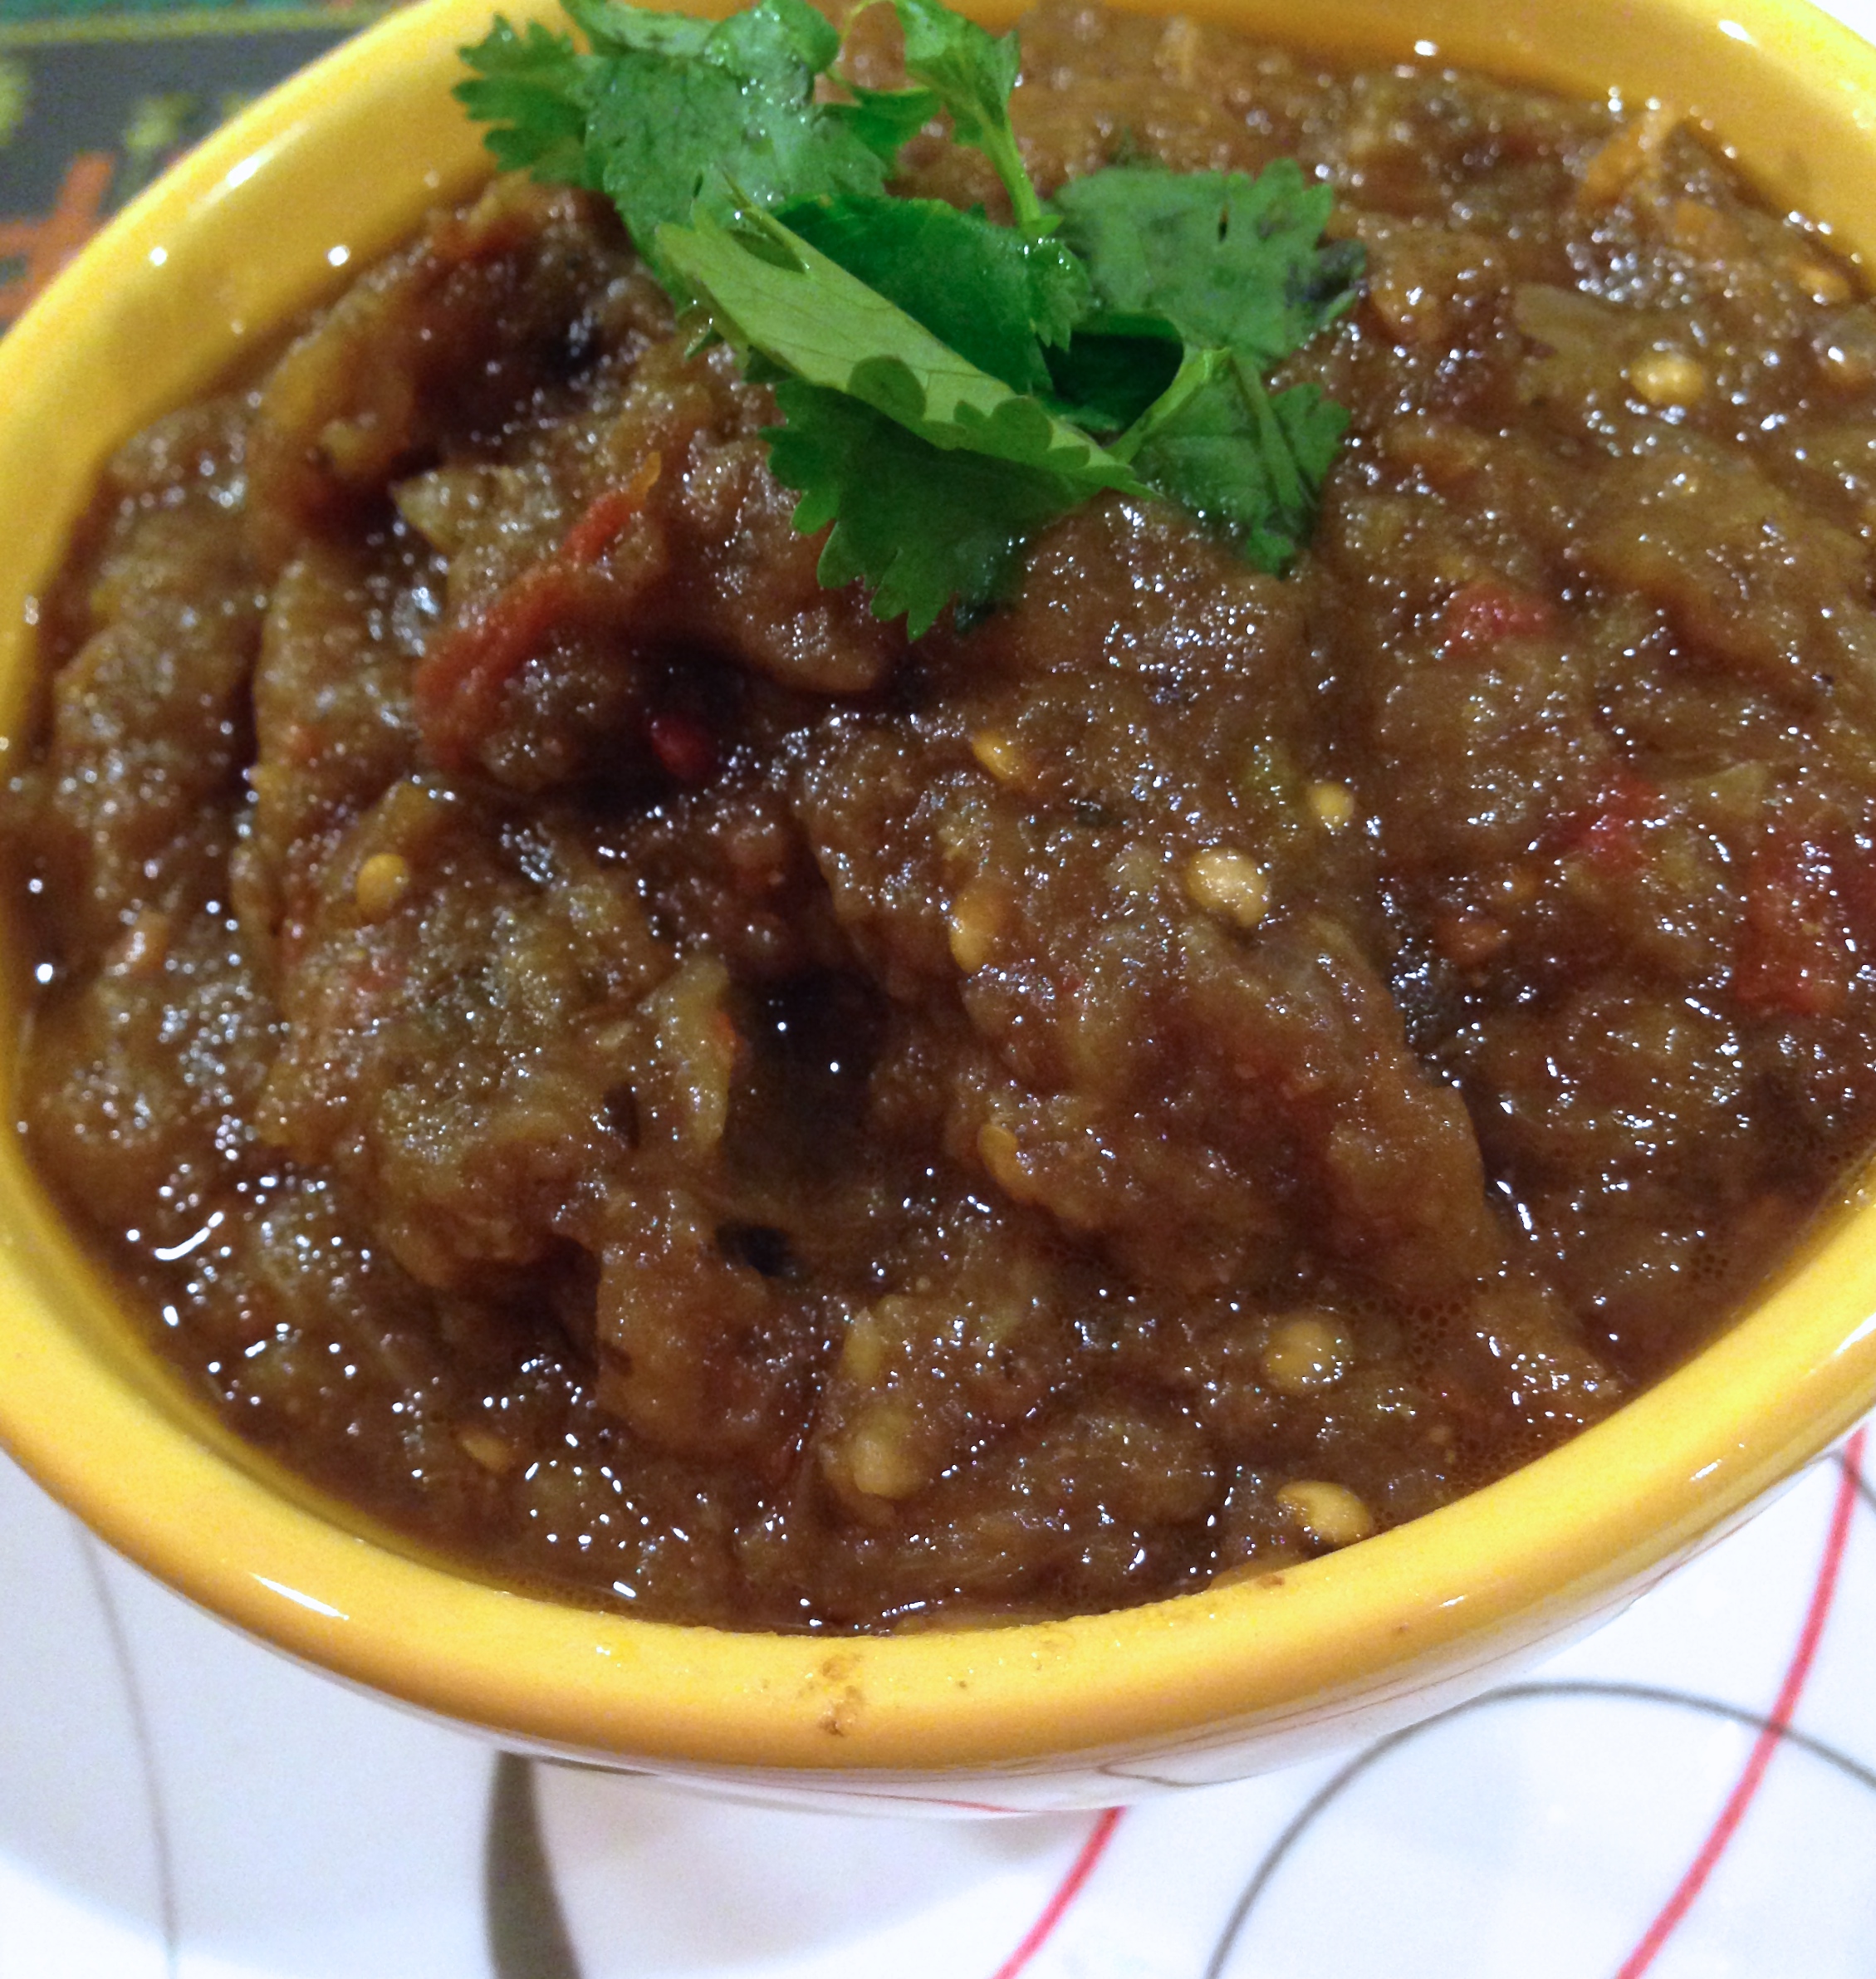
  • Garnish with coriander , heat and serve with Roti Paratha, Pita  or Bread Slices.
  • IMG_3978

Tips

Microwave the ghee and then soak the wood chips in it, for an even coating and easy lighting.

Make sure the coal/chips are dry for it to catch flame.

Instinct Factor

In US, it is better to use wood chips than coal, as most coals are soaked in kerosene fuel and do not give a very appetizing fragrance.

Feel Factor

Rich in dark color, with a bit of tangy taste to the pulp of eggplant  and there is  depth in taste due to smoked  wood chips. Smoked eggplant baingan bharta is an entree that is simple yet rich  and  while devouring it and licking my fingers,  I  felt as if I was back in India, just enjoying this rural delicacy along with its traditional accompaniments.
[shopeat_button]

Posted on

Khaman Dhokla Gram Lentil Steamed Cake

People in India and  around the world  are filled with curiosity about Mr. Narendra Modi, India’s Prime Minister elect, on account of the sweeping victory claimed by him and his political party. So even I decided to join the club and do some more research about him, to know more about him as a person. Food being my passion, any information related to that sparked my interest. I came across this NDTV weblink on the top 5 favourite food of Mr. Narendra Modi at http://cooks.ndtv.com/article/show/narendra-modi-s-top-5-favourite-foods-525352. Needless to say they are all from Gujarati cuisine- Khili Khichadi, Khandvi, Dhiokla, Mango Chhundo( Chutney) and  Badam Pista Shrikand.

The state of Gujarat has something in its soil , for it is  the state from where stalwarts like  Mahatma Gandhi,  Sardar Vallabhbhai Patel, JInnah, and now Narendra Modi to have risen to  political ranks of the country. Besides these, Gujarat has also been the state from where business man  Dhirubhai Ambani and the Patriarch JRD Tata have originated. And the foodie in me, will want to also say , that, there must be also something in what you eat that makes you rise to top!!

Taking a cue from Mr.Modi’s five favorite foods, I am glad to share the recipe of instant khaman dhokla gram lentil  steamed cake using Instant Mix. I have found  this to be very easy, consistent and tastes delicious. This is often a breakfast item in our home , and is easily cooked in 15-20 min. There are many different brands of instant packs available, of which this is definitely very reliable and  we have been using this for almost past ten years or so.

The khaman dhokla gram lentil steamed cake is soft, spongy, with a nice spicy garnish in the top. This is known for its sponginess hence, the comparison to a cake! And the good part of this is, if it does not turn out well, just crumble it and make it a Khaman mix with garnishes! So it is very forgiving dish for a new person trying it out. This is so popular that Gits has come with two varieties Khaman and Nylon Khaman. I prefer the Khaman Dhokla Mix.

The garnish on the Khaman Dhokla Gram Lentil Steamed cake could be red chilli powder, black pepper or even powdered roasted cumin seeds.  Recipe of Khandvi , another delicacy enjoyed by Mr. Modi,  can be found on this  blog at http://cookingbyinstinct.com/khandvi-bengal-gram-rolls/

I am sure we will be seeing a lot of Khaman Dhokla Gram Lentil Steamed cake and Tea at Prime Ministerial State breakfast and that is something  international dignitaries will get a good share of!!  Seeing its well acceptance and appreciation   by m  international friends and my daughter’s classmates, Khaman Dhoklas are going to be very much in demand now!

Recipe makes 20 pieces

Cooking time 15 min

Prep time 5 min

Cooling time 10 min

Ingredients
  • 1 pack Instant Khaman Dhokla mix ( Gits Brand)
  • 2 tbsp oil
  • 1 cup plus 60 ml of water

For Garnish

  • 2 tbsp oil
  • 2 tbsp chopped coriander
  • 1/2 tsp mustard seeds
  • 1/2 tsp cumin seeds
  • 5-6 curry leaves
  • 2-3 tbsp grated fresh coconut ( optional)  I use the frozen grated coconut
  • Special equipment needed- Dhokla cooker with deep plates. Alternatively you can make your own dhokla cooker, with a broad deep pan and a deep dish, with a lid to cover.
Method
  • Put about a liter of water to boil in  the dhokla cooker.
  • Grease the dhokla plate with some oil.
  • In a prep bowl, empty the contents of the instant mix
  • IMG_3873
  • In a separate bowl, mix water and oil,
  • Mix in the water oil mix into the Instant mix, so that no lumps are left, and stirring constantly while mixing in the water/oil.
  • Once the water is emptied, hold the prep bowl with one hand, and vigorously stir the mix with your hand for about 20 sec.
  • IMG_3875
  • The mix will rise a bit. As soon as  it rises, empty the mix into the greased dhokla dish.
  • Sprinkle red chilli powder or black pepper or roasted cumin powder if you desire. You can also leave it plain.
  • Insert the dish into the dhokla cooker, cover the lid and steam on fast flame for 15 min.
  • Switch off the flame after 15 min and let it cool for further 10 min.
  • IMG_1923
  • While its cooling prepare the garnish.
  • Put 2 tbsp oil to heat.
  • Add mustard seeds to it.
  • Once mustard seeds crackle, add chopped chillies.
  • After 5 seconds, add cumin seeds
  • Add curry leaves.
  • Once cumin seeds become light brown, take off from flame.
  • Spread this garnish over the cooked Khaman Dhokla Lentil Steamed Cake.
  • Make diamond pieces by making dividing the dhoklas into four parts.
  • Then turn the dish a bit  and make further 4-5 lines.
  • IMG_3879
  • Garnish with fresh coconut and coriander.
  • Serve warm with Green chutney or ketchup or just enjoy plain.
  • IMG_1824

Tips

The trick to softness , lies in the vigorous stirring of the mix.

IMG_3884

If it does not turn out well, crumble the cooked dhokla and mix in the oil garnish as well corainder and coconut. Add an extra layer of sev ( thin gram noodles )  and serve.

Instinct Factor

Check if the dhokla is cooked by inserting a fort/knife to see that it is not  liquidy in the middle.

Feel Factor

Soft and yummy, spicy and colorful, healthy and nutritious , and soon to be a popular on an international level! A very healthy breakfast, appetizer that can be enjoyed with ketchup or green chutney.

[contact-form-7 404 "Not Found"]


[shopeat_button]

Posted on

Palak Paneer with Layered Paratha ( Spinach and Cottage Cheese with Bread)

Palak Paneer the quick way – ready in under half hour and still retaining its green color along with all its nutrients. With the ease of readily available frozen paneer cubes of Nanak ( my preferred brand) , whisking this very appetizing entree in a jiffy is a breeze. Specially needed when you are  wanting something like a restaurant food but made at home, to cheer up your spirits. You are just too lazy to go out, but still want something tasty without much efforts.

Combination of Palak  and Paneer or Spinach and cottage cheese is a very delectable one,, often found in samosa, pies, calzones, artisan pizzas-to name a few so am not surprised that this is also a very popular dish in the Indian menu and liked by  all including those trying out Indian cuisine for the first time.

Healthy dose of calcium, folate and vitamin c will chase those blues away for sure! And when accompanied by fancy layered paratha, the combination is suddenly more appetizing. If you do not have the time, opt for the Malaysian Parathas or Kawan Parathas and your meal is ready to enjoy! When I was able to get a layered look, closely resembling the Kawan Paratha look, I felt good in being able to “crack the layer”  in the layered paratha and on cooking, the paratha remained soft, even though it was made of whole wheat flour.

Soft Parathas with Palak Paneer or Spinach and Cottage cheese and you evening meal is quick, satisfying . A  feel good meal as you savour the cottage cheese paneer with the slightly leafy grainy texture of Spinach with ginger and  chillies .giving it a fulfilling taste.

Recipe makes 1-2 people

Cooking time 30 min

Prep time 5 min

Ingredients

For Palak Paneer

  • 1 bunch of Palak (Spinach)
  • 5-6 Paneer Cubers ( Cottage Cheese)- Nanak brand preferred
  • 1 inch ginger
  • 1-2 green chillies
  • pinch of asofoetida
  • 1/2 tsp tomato paste
  • 1 1/2 tbsp oil
  • salt to taste

For layered paratha

  • 1 cup whole wheat flour
  • pinch of salt
  • water about cup to cup and a half
  • ghee (clarified butter) approx half a cup
Method
  • Bring about a liter of water to boil in a deep pan on a medium high flame.
  • Medium chop the Spinach and wash in plenty of water and drain.
  • As the water boils, add spinach and cook for 5-6 min.
  • Using a tea strainer, remove the boiled spinach immediately from the water and let it drain.
  • Grind the chillies and ginger in a mortar pestle
  • Put the oil to heat in abroad pan.
  • Once the oil heats, add the ginger chillies paste and saute for a minute on a medium, stirring and  making sure it does not burn.
  • Add the boiled spinach/ palak /tomato paste to the seasoning.
  • Cook on medium flame for 6 min.IMG_3574
  • Put a bowl of water to heat in a microwave for 2  minute
  • Add the frozen paneer cubes or cottage cheese to the boiled water.
  • IMG_3576
  • Let the paneer soften for 5 min.
  • Remove and make even square pieces, if the cubes are too big. Otherwise, just toss the warm paneer cottage cheese into the palak spinach and cook for 3-4 min on a medium flame.
  • IMG_3588
  • Serve hot with  layered Paratha or bread of your choice.


Layered Paratha

  • Take a quarter cup size round ball of dough
  • On a rolling board, make a flat round about 8 inches wide.
  • IMG_3590
  • Grease the top with ghee, spread evenly all around.
  • Start rolling inwards from the top of the flat circle .
  • IMG_3591
  • Once you finish rolling, make a spiral circle out of the this.
  • IMG_3594
  • This spiral circles will make layers when cooked.
  • Roll again to an 8  inch wide flat circle.
  • Grease a thick tawa or griddle.
  • Lay the rolled side down onto the tawa to cook on a medium flame.
  • IMG_3583
  • Once golden spots appear, flip it over and grease with some ghee.
  • Cook the other side similarly  until you see some layers in the paratha.
  • IMG_3584
  • Serve warm with Palak Paneer or Spinach and Cottage Cheese.
  • IMG_3587


Tips

If the dough is too stiff, the paratha will become crispier. A softer dough will help the paratha bread to turn out softer.

To match the taste and texture of restaurant or malaysian parathas, use plain flour instead of wheat flour

Instinct Factor

Layered paratha bread is little tricky to cook, but trust your instinct in knowing it right. Medium flame and soft dough will give you the best results.

Feel Factor

In the Palak Paneer with Layered Paratha, The crispy look with soft taste of the layered paratha bread with the colorful green palak paneer or Spinach and Cottage cheese is a mouth watering combination .This is a visually appealing  and highly appetizing meal that fulfills your appetite and cravings for a tasty yummy meal!  The spice of chilli ginger in Palak Paneer or Spinach Cottage cheese gives it just the right zing to make it an appetizing entree and when you are successful in cooking the layered paratha correctly, you just raised the bar!

[contact-form-7 404 "Not Found"]
[shopeat_button]

Posted on

Beans Quesadilla

Quesadilla, a Mexican delicacy , with a musical ring to its name,  is made up from two Spanish words Queso for cheese and Tortilla for flat bread. Interesting for sure. And extremely easy to make, specially when you just heat in microwave using a quesadilla maker. I happened  to find this highly dependable microwave quesadilla maker, that makes  this amazing dish in minutes.

Quick, easy to make has been my focus for the last month or so as  some remodeling is being done in my house and hence am out of workable  kitchen space for some time. This is also the primary reason why I have not been able to share more  recipes of late.  But nonetheless will keep the momentum on for writing and sharing, even though renovation is never a time bound or and easy task as many would agree.

Even if you do not find a quesadilla maker, this can be cooked over a flat griddle needing  a couple of more minutes to cook, and will also give a nice crunchy flavor when cooked in a healthy does of oil on a griddle.

This recipe can be easy to make for lunches to go, or a quick TV dinner menu. The inside stuffing can be alternated with rice, only cheese, or even grilled vegetables taste yummy. This can be easily one of Rachel Ray under 5 minute meals!! I am sure many of us make this at home and it is no great technique, but the reason I was compelled to blog about this, was to share the quick microwave quesadilla maker, that I am very happy about!


Recipe Makes 2 Pieces of Quesadilla

Ingredients
  • 4  Corn flour Tortilla(El paso Brand)
  • 2 cups  Refried Vegetarian Beans ( El paso Brand)
  • 3 lettuce leaves chopped
  • 1 tomato dice
  • 3-4 red/orange sweet peppers diced
  • 1 green chlli finely chopped
  • 1/2 cup Grated Mexican Three cheese ( Montrey Jack, Cheddar or Colby Jack) or even Plain Old Amul Cheese would work.
  • 5-6 tbsp Corn Salsa or Tomato Salsa
  • Nacho Cheese Sauce for topping (optional)
  • Sour cream for Topping(optional)
  • FOR ALTERNATE stuffings:
  •   2 cups grilled mix vegetables ( zucchini, bell peppers, sweet peppers, sliced red onions with some sea salt and groud pepper)
  •   2 cups cooked rice, blended with lemon, salt, boiled corn and chopped cilantro

Method

  • In a pan heat the oil and chilies and refried beans. Heat for about 30 sec.
  • Lay a tortilla flat on the flat dish of the quesadilla maker and layer it with  half the quantity of refried beans, lettuce, tomatoes, peppers, some salsa and cheese.
  • IMG_3092
  • Cover it with another tortilla.
  • IMG_3094
  • Close the lid
  • IMG_3095
  • Microwave for 3-4 min.on high.
  • You will know its done when it rises in the center.
  • IMG_3096
  • Open the top lid and flip it over .
  • IMG_3098
  • Place the sharp edges perfectly in the center and roll up and down on each edge, making clean vertical cuts in order to have triangles.
  • IMG_3100
  • Remove carefully.
  • Top it with your choice of cheese, salsa, sour cream or even no topping.
  • Enjoy warm or even after a few hours.


Tips

You really don’t need tips over here! Its just mix , heat and eat!

Well if you do not have a quesadilla maker, I would grease generous amount of oil on a flat griddle, heat the griddle and cooked the stuffed tortilla to golden brown on both the sides and cheese inside melts. This is my preferred way of relishing quesadilla as I prefer a crunchy texture to a soft texture.

Instinct Factor

How about trusting your microwave!

Feel Factor

When you are feeling lazy, but still want some exciting food, Beans Quesadilla would be my menu. Specially when you have access to ready made cans of Refried Beans, Tortillas, mix of Salsas and Cheese. Everything just melts into your mouth, and also gives a bit of spicy flavor,  making a routine lunch meal entertaining at home, school or office. I prefer the Beans stuffing to rice or Grilled Vegetables in a Quesadilla.


[contact-form-7 404 "Not Found"]


[shopeat_button]

Posted on

Mexican Chimichanga with an Indian Touch

Mexican Chimichanga- it is the name that caught my fancy and I wanted to try this! I instantly appreciated the similarity of a crunchy Indian Samosa with the Chimichanga crust. Of course the filling was different, but it looked so colorful and crunchy,  that was simply hard to resist. If you are red kidney bean fan and crunchy samosa fan, this will definitely become your one of the favorites soon.  The veggies on top add to texture and color and give a good contrast to the mashed kidney beans. You can either top it with guacamole or avocado. My avocado was not that ripe to make guacamole so diced it and tasted fine. I truly cherish this deep fried tortilla dish with my friends and family as somehow Chimichanga has happy ring to its name!

I am reminded of a friend who would take the refried beans and tortillas from USA to India and make Mexican Chimichanga  for her family  in India, as they use to enjoy this highly! This should prove the popularity of Mexican Chimichanga amongst Indians for sure!

Receipe makes 6 pieces of  Chimichanga

Cooking time: 15 min

Prep time : 15 min

Ingredients
  • 1 can plus 1/3 cup Vegeterain Refried  Beans
  • 3 tbsp oil
  • 6 hot green chillies finely choppped
  • 2 tbsp coriander finely chopped
  • 2 slices of cheese
  • 1/4 tsp turmeric powder
  • 1/8 tsp asofoetida
  • salt to taste
  • 1 pack corn tortilla (6 pieces)
  • oil to fry

For garnish

  • 2 cups lettuce thinly sliced
  • 1 cups tomato diced medium
  • 1/2 cup diced yellow red peppers
  • 1/2 cup diced avocado
  • Medium spiced tomato salsa
  • Guacomole
  • Sour Cream
Method
  • In a deep pan put the oil to heat.
  • Add asofoetida,  turmeric, chillies and stir for 20 seconds.
  • IMG_2873
  • Add red beans, salt and stir for 2-3 min
  • Add cheese slices and melt it  into the mix.
  • IMG_2875
  • Add coriander and remove from flame.
  • Heat a flat griddle
  • Put a corn tortilla to heat for 10-15 seconds on medium flame.
  • IMG_2878
  • Flip it over and heat the other side for 10-15 seconds and remove from flame.
  • Divide the red beans mix into 6 parts.
  • Layer 1/6th of the mix horizontally in the middle of the cooked tortilla
  • Fold over to the middle from the top and bottom.
  • IMG_2879
  • Fold over from both sides and flip it over.
  • Do this for all tortillas and red beans mix.
  • IMG_2881
  • Heat oil in a frying pan.
  • On a medium high flame, fry the refried bean stuffed tortilla( chimichanga) to golden brown
  • IMG_2886
  • Garnish  the chimichanga with some lettuce, tomatoes, peppers, avocado, guacamole,  sour cream, and salsa and serve hot.

IMG_2891


Tips

Just needs some technique in folding and frying,- fry with folded ends to the bottom of the frypan, as this will cook first and enclose the stuffing.

Instinct Factor

Heat the tortilla on a medium high flame, and do not have brown burnt spots as it will crack. when you fold and fry the tortilla

Feel Factor

I want it NOW, as my family members would say!! And you can have it too, as it is so quick to make!

[contact-form-7 404 "Not Found"]

 
[shopeat_button]

Posted on

Muli Paratha White Radish Bread

Muli Paratha, is bread stuffed with White Radish and spices. White Radish is also known as Daikon, meaning large root in Japan, the land it is suppose to originate from.  It is also a winter vegetable and on researching I found it contains up to 27% of daily vitamin C. Some people can take the pungent taste of raw white radish, but I prefer the taste of white radish or Muli mixed with Bengal Gram flour. A lot of recipes details raw white radish with spices which I find difficult to roll, as  water in the white radish makes it difficult. Hence I prefer the recipe with gram flour, which absorbs the excess water as well as makes the white radish easy to warm up to.

The addition of bengal gram flour makes it fulfilling and when it is accompanied with yogurt or boondi raita or pickle, it gives you the pleasure  of consuming homely food! The leaves of white radish also taste well  when cooked with bengal gram flour and often people make this as a side vegetable dish too. More on this next time I able to get some nice fresh green leaves along with the white radish. In Rajasthan, this is also used to make dhokli.

The credit of showing me this recipe goes to my mother in law, who first made Muil Parathas for me, and I still admire her soft, tasty Muli Parathas White Radish bread, as they are very delicious.  Making Muli Paratha White Radish bread is easy, filling and can be a good variation to lunch meals or brunches or heavy breakfast on a weekend! Very little attention is needed while preparing the stuffing, so often this is  my go to recipe when I am tied at various ends.

Recipe makes 8 parathas

Cooking time 40 min

Prep 10 min

Ingredients
  • 3 cups grated white radish or white muli
  • 6 heaped tbsp of gram flour
  • 1/4 cup oil
  • 1/8 tsp asofoetida
  • 1/2 tsp mustard seeds
  • 1/2 tsp turmeric
  • 1 tsp red chilli powder
  • 5 pinches of  dry samosa kachori masala or garam masala
  • salt to taste
Method

For the stuffing

  • In  a broad pan heat oil on medium flame.
  • Add asofoetida first, then mustard seeds
  • When mustard seeds crackle, add grated white radish or muli
  • Add salt, turmeric, chilli powder and bengal gram and mix well.
  • Cover and cook on low simmer flame for about 20 min.
  • IMG_2941
  • Open and sprinkle the garam masala or dry samosa kachori masala and remove from flame
  • Uncover and let it cool down for 15-20 min until completely cool.

For the bread

  • In a broad pan, mix wheat flour, pinch of salt and one cup of water and knead into a soft dough.
  • Cover and Refrigerate the dough for 30 min.

For rolling the paratha bread

  •  Divide the white radish stuffing  into eight parts.
  • Take a small golf ball size wheat dough. Make a round ball
  • Using a roller pin, flatten the ball in to a round circle about 5 inches round.
  • Put one part of white radish muli stuffing onto the flatten round.
  • IMG_2943
  • Enclose the stuffing my covering from all sides towards the center.
  • IMG_2945
  • Twist the closed stuffing and remove excess dough that protrudes beyond the round ball.
  • Flatten a bit with the hand and using a roller pin and dusting flour(wheat flout), roll the stuffed ball into 7 inches flat circle.
  • IMG_2947
  • Grease a flat pan with oil and heat.
  • Cook the flattened circle on medium heat.
  • When brown spots appear, flip and  pour a few drops of oil on the center and the side.
  • IMG_2951
  • Cook the other side and also pour some drops of oil and flip.
  • Serve hot with boondi raita, plain yogurt or pickle.
  • IMG_2953


TIps

Rolling the paratha with light hand and making sure that the middle of the paratha bread is not thick, will help in making the cooked paratha soft.

Instinct Factor

Even if some stuffing sticks out, while you roll the paratha bread, that is fine, as it will all get cooked and will look similar with the paratha. If the dough gets too sticky you may find it difficult to roll, so trust your instinct in preparing the dough and rolling it.

Feel Factor

A quick , easy  dinner/lunch meal that is thoroughly enjoyed in the winter season as radish is a winter vegetable and when mixed with bengal gram and spices, gives you the quota of vitamin c and heat needed for facing cold winter days.


[shopeat_button]

Posted on

Chhole Bhatura Chick Peas with Puffed Bread

Chhole Bhatura Chick Peas with Puffed Bread is a rural delicacy of North India, with taste of this recipe changing every 100 km or so! It is the most commonly available food on the road side while travelling. In fact some towns specialize in this, with this dish carrying the Prefix of Amritsar Chhole or Rawal pindi Chhole.  The one I am referring here is more like the Amritsar Chhole with Gravy. Rawal Pindi Chhole recipe, which is more dry,  I will share it at a later point. I often alternate this two styles of making chhole. This is also the most commonly found in most Indian Restaurants and highly appreciated by all, including Non-Indians. Every house hold, has their version of making chhole, and I have finally been able to replicate the mouthwatering Chhole Bhature that we had in Edison, NJ.

There are variations of making Bhatura puffed bread, some people use potatoes, as leavening agent, some use baking soda, or yogurt. I have opted for baking soda over here. The litmus test here is,  the softer and fluffier, the better !!

In Chhole Bhatura, the spicy gravy in the chickpeas chhole with the soft bread or bhatura is the quintessential north Indian  delicacy treat right in front of you, that you cannot resist to dig in!! We cannot beat the taste of this awesome food that is available in street Dhabas(roadside restaurants) in Delhi or North India, but hope this  is one more recipe of getting it right and  brings you closer to the dhaba style experience of India.

Recipe Makes for 3 people

Cooking time: 40 min

Preparation time: 15 min

Soaking time 5 hours

Ingredients:

For the Chhole

  • 1 1/3 cup  kabuli chana chole (chickpeas/garbanzo beans)
  • pinch of baking soda
  • 1/3 cup oil
  • 1/2 tsp turmeric powder
  • 1/2 tsp red chilli powder
  • 1 tsp pomegranate powder
  • 1 1/2 tsp chana masala powder(MDH brand)
  • 1 big bayleaf
  • 1 1/3 cup onions diced
  • 4 pods of garlic mashed
  • 3 green chillies finely chopped
  • 1 cubic inch ginger mashed
  • 1 tbsp coriander to garnish
  • 1/4 tsp asofoetida
  • salt to taste
  • one diced onion (optional for garnish)
  • slices of lemon ( optional for garnish)

For the Bhatura dough

  • 1 cup all purpose or maida flour
  • salt to taste
  • 1 1/2 tbsp oil
  • 1 tbsp yogurt
  • pinch of baking soda
  • 1/3 to 1/2 cup of water
Method
  • Wash thrice and rinse out the water each time.
  • Soak the chana in about 3 cups of water for 5-6 hours.
  • Add salt to taste to the quantity of chana and boil in a pressure cooker for upto 4-5 whistles.
  • Let the pressure cooker cool down.
  • In a broad pan, heat the oil.
  • Add asofoetida, then add the bay leaf.
  • As the bayleaf turns brown, add ginger and saute for 2 min.
  • Add diced onions and let it simmer on slow flame for 15 min.
  • Add green chillies and ginger and saute for 5 min.
  • Add 1 1/2 cup water, turmeric, salt, chana masala powder, chilli powder, pomegranate powder and simmer for 10  min on medium flame.
  • Blend the ingredients together with a hand blender.
  • Add the cooked chana along with its water to the gravy.
  • IMG_2428
  • Simmer together for 12 min.
  • Garnish with coriander and 10-12 drops of lemon and serve hot. Alternatively you can serve this with a slice of lemon and some chopped onions on the side.

For the Bhatura dough

  • In a broad flat pan, mix the dough, salt, baking soda and oil.
  • Whisk the dough thoroughly with hand.
  • IMG_2430
  • Add 1/3rd of half cup of water and mix into the flour.
  • Add additional 1/3rd  of half cup of water and bind the flour together.
  • IMG_2431
  • If the water amount is correct, the dough will bind perfectly, leaving no flour residue in your hand and the pan clean of any flour.
  • IMG_2433
  • If the heat temperature is high, you may need more water or if your hands are too dry.
  • Cover it with a wet paper towel, napkin for 10 min.
  • Divide the dough into 7 equal  round balls.
  • Roll the dough into a round circle about 3 inches round.
  • Roll this round circle into the dusting flour
  • Extend the circle to  about 6 inches round.
  • Heat about 3 cups of oil in a frying pan.
  • Heat to high.
  • When the oil starts smoking, insert the flat dough circle into the oil.
  • Wait for it to rise like a ball with golden spots, and then flip it over using a large strainer.
  • IMG_2439
  • Once you see the brown spots on the back side too, drain the excess oil and serve hot as an accompaniment to Chhole Chick Peas


TIps

Soaking can be done overnight for readily available to cook the next day.

If the chhole or chick peas have become too soft, you can cook only for half the time in the gravy or for 10 min max for it soak in the gravy.

Rolling perfect round circle comes with practice. For people new to rolling, I would use big round cookie cutters, and make circles from a big rectangle flat rolled dough.

Frying is ideally done in an open fryer with a frying slotted spoon with flat base, used to flip and strain

If you do not want to make Bhatura, this is equally enjoyed with ready to eat Kawan Parathas, easily available in Indian Grocery Stores.

Instinct Factor

Frying the Bhature requires some practice in flipping over, but when you see it rising in a big round ball, it makes you happy! The art lies in sliding in the oil.  the side of bhatura  that you worked on, face down, and then putting some pressure on the center, with the frying spatula.  Advised to wear an apron while frying. Gauging if the bhatura is cooked needs you to rely on the instinct. Even if it becomes too brown, it will just become a bit crispier.

Feel Factor 

An all time food that promises to bring sunny smiles every time! Eat it as a brunch, lunch, dinner or even super late night meal. I have fans of this in my family who prefer to eat one day over, as the taste just matures the next day. There is something about a big round ball of golden brown spot bread and  chick peas, that  warms the hearts of everyone  Enjoyed best in the chilly cold weather days.with the spicy chickpeas and soft warm puffed up bread. There are simply so many versions of this, but this is our family favorite, based on the taste inspired from a famous restaurant Khasiyat, in Edison, NJ. And the name says it all, the Khasiyat( speciality) of Chhole Bhatura or Chick Peas with Puffed Bread is unparalleled in taste and texture!

[contact-form-7 404 "Not Found"]
[shopeat_button]

Posted on

Cracked Wheat with Vegetables(Daliya Khichdi)

Cracked Wheat also known as Daliya or Lapsi in Hindi/Gujarati is a healthy form of eating daily nutritious food.Cracked wheat has many advantages for weight loss,  hypertension amongst other things as elaborated in this article http://healthyeating.sfgate.com/cracked-wheat-benefits-5717.html  Traditionally Indians are used to eating cracked wheat as a form of sweet item, but here it is presented with vegetables. This is a power breakfast with wheat, fibre and vegetables. The vegetables on the top have a nice tangy and refreshing taste due to lots of lemon and black pepper, which is the most delicious part for me.  This can also be an alternative to daily routine of eating oats to assist metabolism and weight loss. It is a quick meal under half an hour and it is a complete breakfast/lunch meal. You can variate the toppings of vegetables to your liking.

This is also a very comfortable baby food, and  the very first meal I gave to my daughter was this recipe without the vegetables. It is soft and nutritious and  with lots of fibre, easy to eat, after just garnishing with some black pepper and salt. An Indian way of eating  everyday oatmeal!

I like vegetables to have some crispiness when used as a topping on this, as it goes well with the softness of the pressure cooked cracked wheat, and adds a crunchy flavor through the crisp cabbage. It gives a fulfilling feeling when you have this complete meal and it is  warm,colorful and tangy! The first time I was exposed to this, I had it as a breakfast, so I continue to enjoy this as a breakfast item, and truly so,  as oats are normally considered as the best breakfast option by many. More commonly this recipe is also known as Daliya Khichdi.

Recipe makes for 3 people

Prep time : 10 min

Cooking time: 15 min

Ingredients
  • 1 cup cracked wheat
  • 1 1/2 tbsp ghee(clarified butter)
  • 4 cups of cauliflower cut into small florets
  • 3 cups of  shredded cabbage
  • 1/2 cup of peas
  • 1/3rd cup oil
  • 1/4 tsp cumin seeds
  • pinch of asofoetida
  • 1/2 lemon
  • freshly crushed black pepper
  • salt to taste
  •  2 tbsp coriander to garnish
  • 1/4  tsp turmeric powder
Method
  • In a pressure cook heat the ghee.
  • Add the cracked wheat and stir for 4-5 min on medium flame, until it changes color to pinkish brown.
  • IMG_2585
  • Add a pinch of salt and water.
  • Pressure cook that for 4 whistles on medium flame.
  • In a broad pan, put oil to heat.
  • When it heats, add asofoetida and cumin seeds(crushed in your palm)
  • Wait for it to become golden brown, and add turmeric.
  • Add the cauliflower and cook for 5 min. stirring in between.
  • Add cabbage and salt and cook for further 7 min . stirring in between.
  • Add peas and cook for 4 min.
  • IMG_2584
  • Remove from flame.
  • Remove the cooked cracked wheat from the cooker.
  • In a plate, put the warm cracked wheat at the bottom, top it with vegetables.
  • Garnish with nice dose of lemon, black pepper and coriander.
  • Serve hot.
  • IMG_2588


Tips

A lot of variation of vegetables is possible, such as carrots, spinach, but I prefer to have the above combination.

Cracked wheat can be alternated with bulgur wheat too, which will require less cooking time, as bulgur wheat is precooked. You may want to cook it to 2 whistles for bulgur wheat.

When you cook the cracked wheat and vegetables separately, you have the right texture for both of them, without overcooking either of them. And for this recipe, this is a crucial aspect.

Vegan Variation: Replace the ghee with oil and roast the cracked wheat.

Instinct Factor

Roasting of the cracked wheat to your desire, and enjoying the aroma of cracked wheat in ghee.

Feel Factor

When properly cooked, it has the perfect fluffy texture of cracked wheat, topped with the lemon yellow color of vegetables and green peas, with lots of lemon and black pepper. Inviting and fulfilling as well as extremely nutritious recipe for sure!

[contact-form-7 404 "Not Found"]
[shopeat_button]

Posted on

Vegetarian Pad Thai

Richmond. Virginia has lots of boutique restaurants that are not available up north. One such gem is Tara Thai, whose food has been enjoyed by us for a decade or so. This is one place where the price and the quality has remained consistent through the time. My first exposure to great Thai food and in particular Pad Thai was at Tara Thai.  We used to travel a lot from north down to Richmond on vacations, at which time we use to make it a point to visit Tara Thai. But there were times when we felt like having Tara Thai pad thai when not in Richmond, and hence there was a need to create a home version of the Pad Thai.  This version of mine has a bit of my personal touch via the ginger, green chillies and peppers and minus the tofu. It is spicier than Tara Thai and bit more refreshing with extra peanuts and added vegetables.

I have fondness of peanuts, probably as I come from Gujarat, where peanut farming was very high and peanut oil is the main cooking oil too. A friend’s birthday was the inspiration to make this dish, as that was one of her favorite meals of mine. Many a times we think of someone when we make a particular item and we remember them in our hearts. Food and feelings are closely linked, at least for me and makes true a statement I read somewhere,” I cook to show my love”. and this resonates with me a lot.

If you are peanut, tamarind and noodles lover, you will definitely enjoy this highly delicious Thai noodles that is extremely quick to make and uses sauted vegetables, which is highly nutritious. And to the frequent pasta noodles lover, this recipe offers a variation that is highly colorful too!

Recipe makes for 3 people

Cooking Time: 15 min

Preparation Time: 30 min

Ingredients by Volume
  • 1 cup broccoli florets
  • 1 cup red pepper diced
  • 1/2 cup green pepper diced
  • 1/2 cup carrots diced and boiled
  • 1/2 cup green onions choppped
  • 1 cup onions diced medium
  • 1 tbsp green chillies or 7-8 green chillies finely chopped
  • 1 tbsp ginger finely diced
  • 1 tbsp coriander chopped
  • 7 tbsp oil
  • salt to taste
  • 1 tbsp tamarind paste
  • 1/4 tsp chilli powder
  • 2 1/2 tsp brown sugar
  • 1  1/2cup roasted and crushed peanut powder
  • 1/2 packet flat rice pad thai noodles
  • 1 tbsp water
  • Few drops of lemon
Method
  • In about a litre of ice cold water,  put the rice noodles to soak for 15 min.
  • In the broadest pan  you have, heat 6 tbsp oil.
  • On high flame, add green chillies to the warm oil and saute for 1 min 
  • Add diced onions and saute for 3 min. on high 
  • Add salt to taste.
  • Add  ginger and saute for a min. 
  • Add broccoli florets and stir for amin.
  • Add red peppers and saute for two min.
  • IMG_2463
  • Add green peppers and saute for a min.
  • Add green onions and saute for two min. and remove from flame.
  • Mix  tamarind, one tbsp roasted crushed peanut powder, chilli powder and a tbsp water.
  • Boil a litre of water in a deep pan
  • Add a tbsp oil, salt to taste and pad thai noodles.
  • Boil on high for 5 min.

IMG_2465

  • Remove from flame, drain the water.
  • Add the rice noodles and tamarind paste to the sauted vegetables.

IMG_2472

  • Add 1 cup roasted and crushed peanuts, 3-4 drops of lemon and mix well .
  • Heat for a 2-3 min 
  • Garnish it with fresh coriander and a sprinkle of peanuts powder and serve hot.

IMG_2468


Tips

Roasted peanut crushed powder can be made in advance. Heat two cups of peanuts in a broad thick pan for 10 min on slow flame. Remove the skin and  pulse it in a blender for a minute to get a crushed consistency. Excess powder can be stored for future used.

Using pasta utensils helps in lifting and mixing the noodles well with the vegetables.  Alternatively you can run cold water to cooked noodles to cool them, so that they will not stick and mix well.

Jain Variation: Exclusion of onions, green onions ginger and carrots.

Variation: Add Fried Paneer cubes as an alternative to Tofu. I personally do not prefer Tofu, so have skipped both Paneer and Tofu.

Instinct Factor

Roasting the peanut powder to the brownness of your desire. I prefer the brown tint to it.

Cooking noodles to your perfection. Rice noodles are pretty soft so they cook fast.

Feel Factor

Tasty noodles with lots of veggies and the crunchy peanuts in between, flavoured with tamarind, ginger and chillies creates a delicious aromatic Thai meal  being cooked and relished in your home. Visually I find  the colors of vegetables against the brown of the noodles and tamarind sauce very attractive and I truly relish this asian flavoured Thai meal , whether its lunch or dinner time!


[shopeat_button]

Posted on

Spicy Rajma Soup with Salad (Red Kidney Beans Soup Salad)

Waiting for snow, enjoying the cold, walking with my friend, feeling first round of snowflakes falling on me, is a pretty good description of my day! Weather and heart often influence the choice of food that is being cooked at  my home. With such a cold, wintry or rainy day, I wanted to make something that is hot and piping, colorful and easy, something between a soup and salad and something that gives a happy and warm feeling to one and all.

A dish like this is the Spicy Rajma Soup Salad. Many of you having ties with Sudan will  know this dish as ” Sudan na Phool”. This dish originated in Sudan.  The Gujaratis living there have created this vegetarian entree of a Sudanese delicacy, and spread it amongst the community. There are special Sudanese kidney beans that are used to make this. But, due to lack of its availability on a regular basis, I often make this with Red Kidney Beans, and hence I would like to rename this as Spicy Rajma Soup Salad . The red kidney beans resemble in shape and color to the original Sudan Phool. Some Indian shops do keep the original Sudan Phool, according  to a friend of mine. 

This is easily a complete meal by itself and it is highly colorful, extremely easy, very nutritious and fulfilling too. It is delicious to taste and enjoyed by non- Indians too. As it is accompanied with bread, this can be a weekend menu or a great entree even if you have a party of ten at home. All it requires is some preparation work by chopping vegetables that can be prepared in advance. Personally, chopping vegetables is a highly therapeutic activity to me, as it brings my wandering mind to focus only on the activity I am doing, and forget about everything else. I enjoy the experience of chopping to the  right size and shape, and when I see saw many different colors and varieties in front of me, the artistic mind of mine is highly satisfied via the vegetables color palette in front of me. Readers familiar with this dish are encouraged to add any variations, if I missed out!

What I like about this dish is that as a host,  you can just present the various vegetables on the table, and the guests can choose the toppings that they want , giving the guests the choice of personalizing this dish to their taste, and reducing the work of the host. And not to mention the joy of seeing the spread of  so many colorful items on the dinner table!  

Recipe : For 4 people

Cooking time: 30 min

Preparation time: 15 min

Soaking time: 4-5 hours

 Ingredients
  • 1 1/3 cup diced tomatoes
  • 2 cup shredded cabbage or thinly sliced
  • 1/2 cup diced green peppers
  • 1 cucumber diced
  • 6 green hot or kashmiri chillies
  • 1/2 cup finely chopped coriander leaves
  • 1/3 cup lemon juice or one lemon juice
  • IMG_2326
  • 1/16  tsp baking soda
  • 1 1/2 tsp red chilli powder
  • 1/2 tsp turmeric powder
  • 1 tbsp coriander powder
  • 1/4 tsp asofoetida
  • salt to taste 
  • 2/3rd cup oil
  • 6 cups of water to cook rajma
  • 4 whistles to cook rajma
  • 2 more cups of water to be added later on
  • 12 buns
  • Fine gram floursev for garnish ( optional)
  • Butter to grease the buns(optional)

Method:

  • Soak the rajma or red kidney beans,  after washing thrice for 4-5 hours.
  • IMG_2323
  • Add 1/2 tbsp salt and baking soda, 6 cups of water and put to cook in a pressure cooker for 4 whistles on a medium flame.
  • Remove from flame and let it cool.
  • As soon as the pressure is released, open and transfer to a broader container and put to heat.
  • IMG_2331


  • Once it heats up, add asofoetida, turmeric, coriander powder, chilli powder, oil, salt and all the diced vegetables along with lemon juice.
  • Stir and cook for 3-4 minutes. 
  • IMG_2337
  • Garnish with sev.
  • Serve warm with buttered bread, plain bread or toasted buns.
  • IMG_2347


Tips

If there is excess water after the red kidney beans are cooked, you can mash a few red kidney beans in the soup so that it will thicken the consistency.

Tomatoes are best, if sliced just before garnishing, as they tend to release the juice and become soft.

I often use V shaped slicer for shredding cabbage, as it makes it quicker and gives me a uniform thickness to cabbage.

Instinct Factor

If you are feeling more colorful, feel free to add some more sweet red and yellow peppers to red kidney beans soup. Since I am used to the taste from India, Green Capsicums were the only choice of capsicum at that point of time.

Look out for the aroma of boiled kidney beans in the whistles to indicate that is done!

Even if the kidney beans are overcooked, they will still taste great in this dish.

Feel Factor

Chases away the chill on a wet rainy or cold day, with the piping hot rajma kidney beans soup with colorful salad and spices. Its a complete meal for an evening with a buttered bread. Has a lot of wow factor when guests see so many colors together and experience the spicy and tangy taste of red kidney beans soup topped with almost raw salad vegetables. Its a happy feeling to relish a highly nutritious and colorful meal.


[contact-form-7 404 "Not Found"]
[shopeat_button]