Masala Popcorn

Masala Popcorn

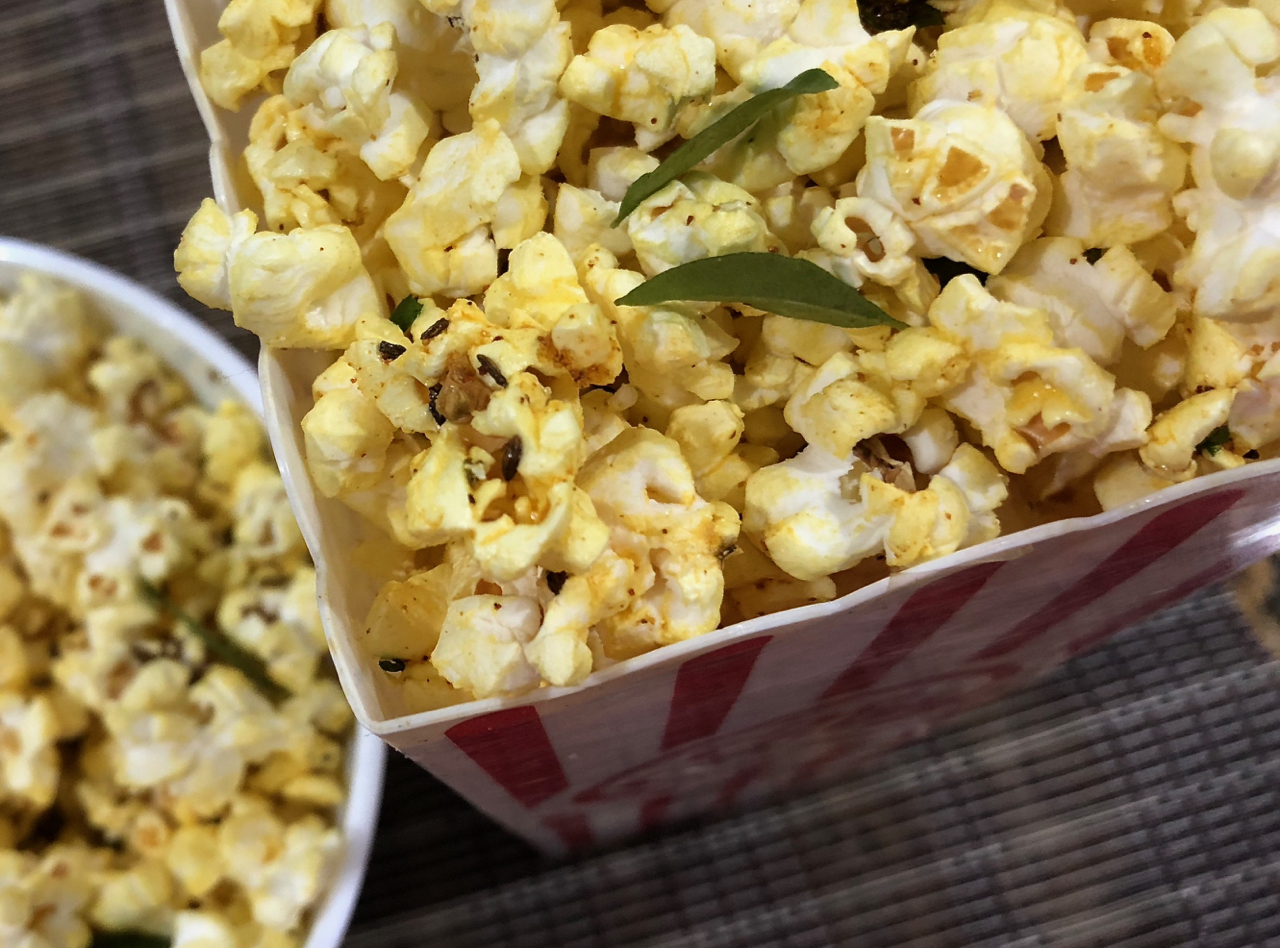
Masala Popcorn on a Friday night!  Friday night, often  a movie night in many families happened to be a movie night for me also today!  Masala Popcorn also became my dinner, as many a times when one is alone for a meal, the motivation to cook just vanishes. This interesting recipe  by Vikram Sunderam, the celebrity chef of Rasika tempted me to try it out. Rasika is known for its super quality contemporary Indian cuisine. I have over several occasions had celebration meals at the variety of restaurants under the Rasika group management, and never have we been disappointed!

Popcorn is something I have always enjoyed. Some years back I tasted jalapeño flavored popcorn at Potomac Mills. After tasting this salty and spicy flavor in popcorn, chance of this flavor being on the top flavors are quite likely. 

The recipe was created with the desire to bring the flavor of Chevda, the Indian quintessential snack. As an Indian, we always look for the comfort of the spices and  recreate the taste at the first chance we have. This recipe is truly a creative idea by Vikram, and no wonder this is a popular accompaniment at Rasika Bar. If I get a chance to meet him, I would probably get his autograph on the Recipe book that Rasika has just released it, and which I had the chance to get it on my anniversary. What more can a foodie ask for! 

I enjoyed this uniquely flavored Masala Popcorn while watching a Shah Rukh Khan and Anushka Sharma starrer When Harry Met Sejal! Movie review- A plus to Anushka for doing an amazing task of imitating a Gujjuben, and SRK is always at his best for his diehard fan! The masala in the movie was equivalent to  the masala in the popcorn, with  the use of cumin, coriander, curry leaves, chillies and spice level further raised by some red chili powder. 

Masala Popcorn has a nice kick in its flavor, while providing a comfort meal.  A two minute dinner that has all the spices, fiber and is low fat, is an interesting combination for sure. Enjoy your favorite movie, accompanied by Masala Popcorn!

Print Recipe
Masala Popcorn
Popcorn wit Indian Spices
Masala Popcorn
Course Appetizers
Cook Time 5 min
Servings
people
Ingredients
Course Appetizers
Cook Time 5 min
Servings
people
Ingredients
Masala Popcorn
Instructions
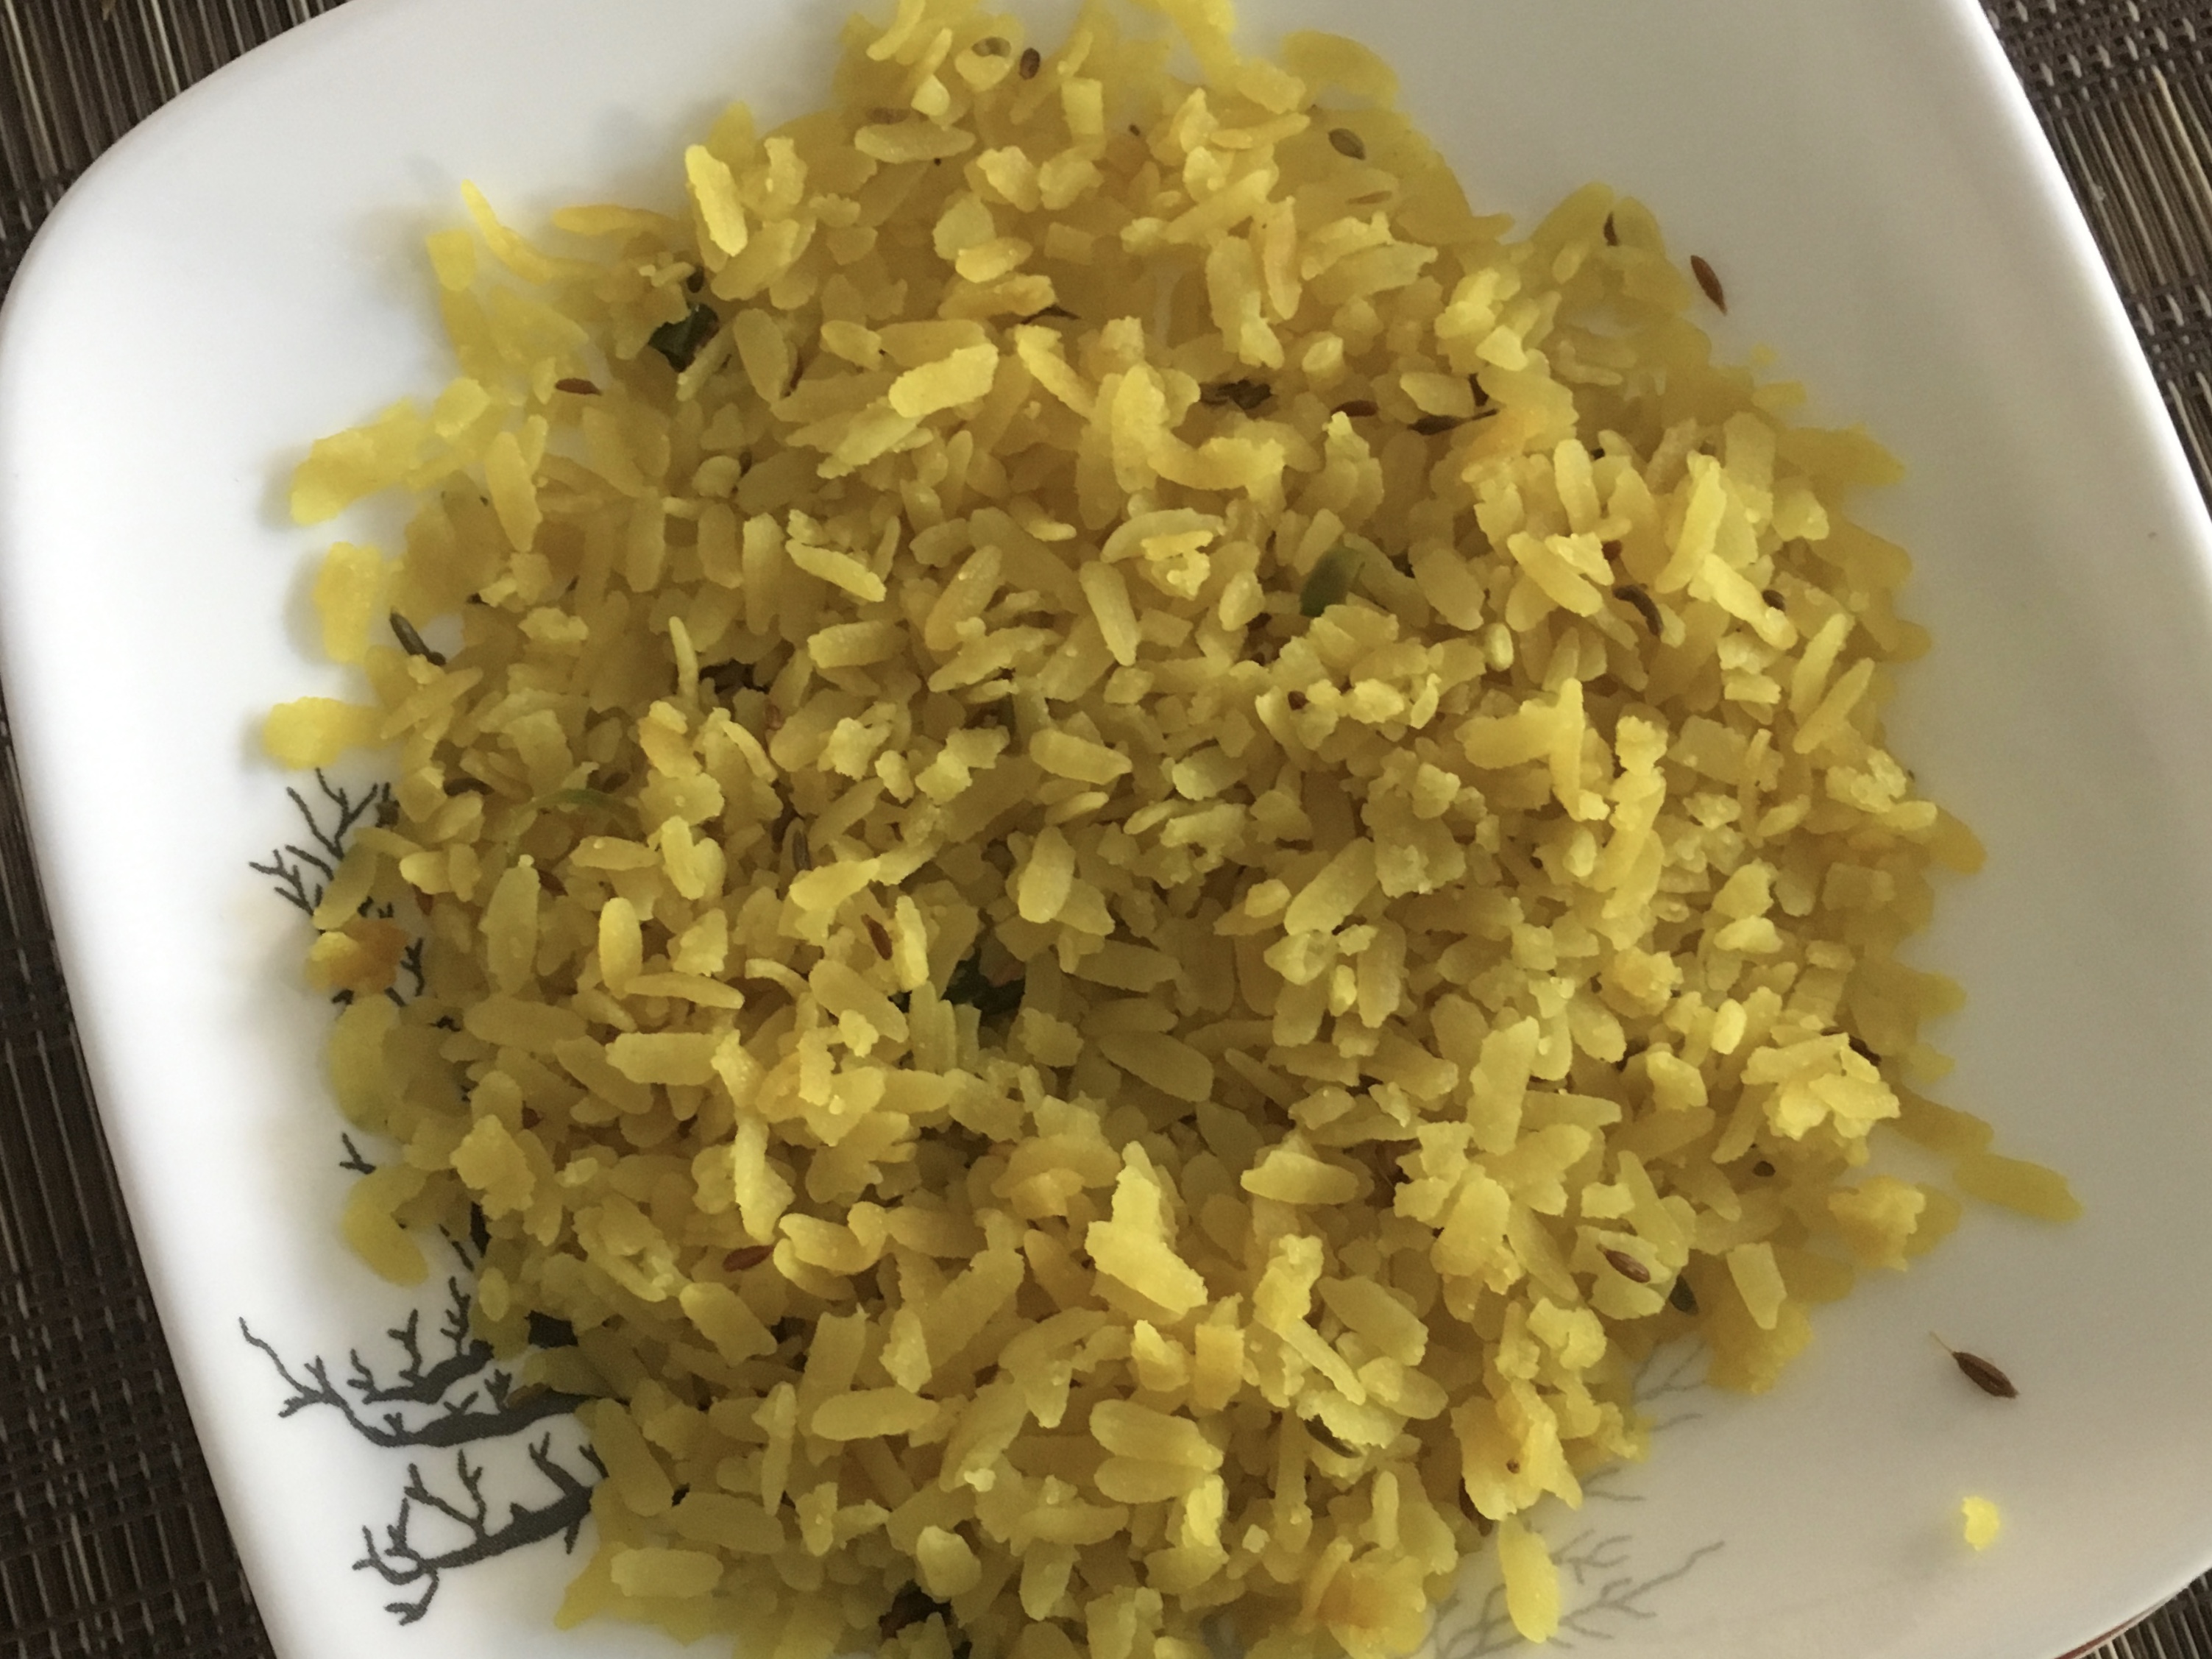
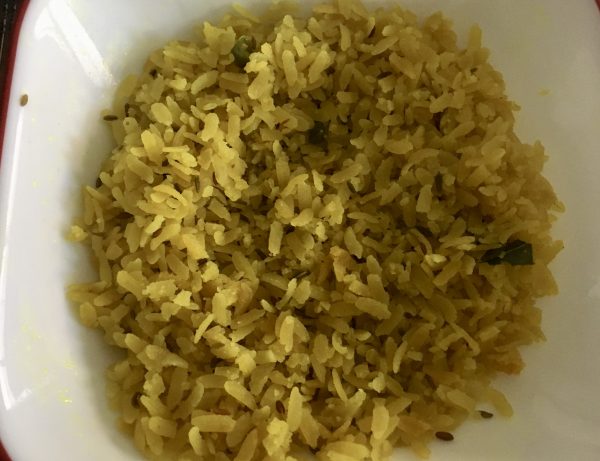
  1. Create the garnish for the popcorn first. Heat the oil in a small saucepan, Once the oil heats, add coriander seeds and asafetida. Lower the flame so that garnish does not over cook.
  2. Once coriander seeds crackle, add cumin seeds. As the cumin seeds brown, add fennel seeds. After few seconds, add the remaining ingredients and remove from flame.
  3. If cooking on gas I suggest creating the garnish first, and then mixing the garnish in the popcorn and then popping it over the stove.
  4. Otherwise, follow the microwave instructions for making the popcorn. Once the popcorn is cooked, add the masala garnish and toss it thoroughly so that the flavor is well integrated in the popcorn.
  5. Enjoy a nice family evening with Masala Popcorn and interesting movie at home!
Recipe Notes

Tips

Recently I came across this Masala flavored Popcorn by Swad having the spices of red chili powder, which might be a good alternative, though I have not tried it.

Instinct Factor

Taste of home is the main instinct factor for most of chefs!

Feel Factor

Masala Popcorn gives a great kick to the flavor of popcorn, For the really  high spice lovers, some finely chopped jalapeño will coat the popcorn well. Low fat tasty alternative to the buttery popcorn, and also possible to have more, as its not so high in calories! I had two servings and enjoyed the fennel, cumin , green chillies and curry flavor in the popcorn. Masala Popcorn while watching movie, made the movie  more enjoyable and memorable!


Sandesh Chocolate Grape

Sandesh Chocolate Grape

Sandesh Chocolate Grape was my creation for a milestone birthday that we just had celebrations for! As a young kid, memories of Sandesh made by my mother linger in my mind even now, and Sandesh is perhaps the first dessert that I really was fond of!  Even more than Rasgulla or Rasmalai, which also use the same paneer base.  My mother used to put orange segments in it, but I decided to use red grapes, as I am more fond of grapes than oranges. Red grapes would go well with the fall weather and dark chocolate flavor is what I thought.  I have a deep weakness for dark chocolates and in particular Godiva Dark Chocolates. Godiva has various levels of cocoa but decided to go for safer 50% dark level then the 75% , as I was going to offer the Sandesh Chocolates Grape to guests. Making this was a very last minute decision. I had a Dark Chocolate with Sea Salt flavor in my house, which was used and in my opinion the sea salt further enhanced the flavor of Sandesh.

On reading the blog of Cosmpolitan Curry Mania, I got to know a lot about the various ways Sandesh is made and the types of shondesh/sandesh available in West Bengal. The way I made was more of the Kachha Gola (raw uncooked sandesh), in which , the kneading of the sandesh is the key to the softness and texture of the desert. This has a different texture than the one  which is mixed with Khoya and cooked on a flame. It is interesting to note that people in Bengal have even explored with flavors like olive oil too in making Sandesh!

Reading this, made me even more happy with my creation of Sandesh Chocolate Grape which hints at flavors of Red Grapes, Paneer, and Dark Chocolate with Sea Salt. And the sugar level in this variation has been purposely kept at low levels, to feel the dark taste of chocolate.

The texture of the Sandesh Chocolate Grape was smooth, and the topping of semi sweet mint chip chocolates  gave it a colorful and tasty appeal. The grape filling was well appreciated with the chocolate flavor. This dessert was definitely the preferred dessert of the evening. What a great way to celebrate a milestone, with a favorite dessert in a favorite chocolate flavor with sea salt! A five star dessert for me for sure! And I am positive, once you try this super easy, super quick dessert, you will be making many new and exciting flavors in Sandesh. Do send me a sandesh (message) with a newer version that you created by submitting a recipe on this blog!


Print Recipe
Sandesh Chocolate Grape
Chocolate Sandesh from Chocolate Bar and Fruits
Sandesh Chocolate Grape
Course Dessert
Cuisine Indian
Prep Time 10 min
Cook Time 30 min
Passive Time 3 hours
Servings
Ingredients
Course Dessert
Cuisine Indian
Prep Time 10 min
Cook Time 30 min
Passive Time 3 hours
Servings
Ingredients
Sandesh Chocolate Grape
Instructions
  1. The chhena or paneer should be freshly made. If you need instructions on how to make fresh panner from milk, please read my recipe on Rasgoola for detailed process.
  2. Once the chhena is cooled, knead for 8-10 minutes using the palm of your hand. Continue kneading till all the paneer forms into a ball, and the grainy look of chhena turns into a smooth look.
  3. Melt 3 squares of the Godiva Dark Chocolate Sea Salt Bar in microwave for 40 seconds. Stir the squares to liquid form and immediately pour 2 tsp of melted chocolate into the paneer.
  4. Add sugar and continue to knead for 4-5 minutes. The dark chocolate will slowly spread and change the color from white to completely brown. If you see white portions then continue to knead some more.
  5. Divide the paneer into 24 parts. Roll each part into round ball, and then flatten with your fingers.
  6. Put 2 pieces of sliced grapes on the flattened part and then again make a round ball.
  7. Give it an elongated shape by pinching with all your fingers at the top like a modak shape.
  8. Garnish it with a mint chocolate chip and chill for 3-4 hours.
  9. Enjoy chilled , fruity Sandesh in Chocolate flavor!
    Sandesh Chocolate Grape
  10. Sandesh Chocolate Grape cut into half to get the inside view. The images were taken at different light environment, hence the change in the colors of the Sandesh
    Sandesh Chocolate Grape
Recipe Notes

Tips

Fresh paneer that has some liquid in it still is the best consistency, as it will give it a good smoothness to the texture. Hence  I do not hang the paneer or put weight while making the paneer.

Chocolate powder can be also used, as mentioned in another recipe  http://cookingbyinstinct.com/chocolate-sandesh-cheese-fudge/

Instinct Factor

Making use of things available at hand and creating something new out it, is truly inspiring and instinctive! That is when the best satisfaction comes to a passionate foodie! Get your instincts to guide you as you make a flavor of your choice!

Feel Factor

Its celebration time with chilled, soft, smooth, bittersweet dark chocolate flavored grape sandesh! Everyone was curious as to what is this new dessert, as the shape was different, color was different, and the taste was also very different. This dessert is healthy, as cottage cheese is healthy, not too sweet, and good for the mind  and soul as well because of its chocolate flavor. The grape filling gives a nice crunch as well as sweet tangy taste in between the chocolate flavored cottage cheese.. Something made in a jiffy and the end result was a winner in the evening dinner! This was definitely the icing on the cake in my view! And I am sure your guests will also remember this modern flavor fruit filled Sandesh Chocolate Grape!!

Chikoo Ice Cream with Cinnamon Rose MintChip


Chikoo Ice Cream with Cinnamon Rose Mintchip is made from a highly popular Asian and Mexican fruit. “Chikoo”  is also a pet name for young kids, in many Gujarati households, including mine! The fruit is also known as sapodilla or zapota  or sapota. A berry like fruit with dark black almond shaped seeds. Its skin is rough brown and the ripened flesh has a nice brown color. It is known for its sweetness and malty flavor, and this has been a favorite fruit of mine. The chance of getting to eat fresh chikoo that is nicely ripened is very slim in US. Even if I get some fresh chikoos, they do not ripen well. So in the twenty-five years that we left India, eating this favorite fruit has been a rare opportunity. Frozen chikoo slices have a sourness and so does the pulp of chikoo, with its dose of preservatives. 

Casual wandering around a newly opened a grocery store , I spotted a Chikoo Pulp can, and was immediately excited to use that.  If nothing else, I can have the popular chikoo milkshakes which have a flavor of the malted milkshakes, the older cousins of the current milkshakes. I always liked the grainy texture in this fruit which only recently  I realized gave it a malted taste.

Now came the part of trying this in an ice cream. Naturals brand in Mumbai and many other local ice cream shops across Gujarat have this chikoo ice cream readily available, but they also have a dense taste of chikoo in it. I have primarily used only fresh fruits in my ice cream so this was a bit of challenge for me as to how reduce the taste of preservative in the ice cream? Not afraid to experiment, I  let my creativity guide me. I decided to throw in some cinnamon to bring some fragrant sweetness, added rose essence for hiding the sourness on account of preservatives, and gave it  the quintessential topping of chocolate mint chips to give it a texture and appeal similar to the popular ice creams! Not knowing how the combination is going to turn, I eagerly waited for the ice cream maker to churn and for the clock to turn full twenty four hours, for me to dig in a bite of my very own concoction! 

I liked the pale pink color ice cream in which the brown mint chips  were sticking out their sunny heads! The rose essence also aligned well with pink color of the ice cream. The freshness and  cooling feeling of rose fragrance went well with the cinnamon sweetness . As you eat the ice cream, the first flavor that hits you is the rose essence, then you are introduced to the cinnamon flavor and finally you are left with the hint of the chikoo flavor. And if this is not exciting enough add, some toasted coconut chips were great as extra toppings!.  You will  probably say, this was worth my time and effort for being able to relish so many different flavors in a scoop of my favorite colored ice cream!

Chikoo Ice Cream with Cinnamon Rose Mintchip became a topic of conversation in a couple of different groups of parties, with this flavor being more popular amongst the westerners, as it was definitely a fruit that they were not aware of, but still appreciated the flavor and texture! 

Print Recipe
Chikoo Cinnamon Rose MintChip Ice Cream
Chikoo ice cream from Chikoo pulp
Course Dessert
Servings
1 quart
Ingredients
Course Dessert
Servings
1 quart
Ingredients
Instructions
  1. Ensure that the ice cream container is well frozen for 24-48 hours before using it. Mix in all the ingredients and churn the ice cream for 25 minutes, till it all forms a lump.
  2. Transfer the mixed ice cream base to a freezer container and let it set for at least 24 hours.
  3. Serve in a cone or a cup and top it with few roasted coconut flakes or any other favorite topping of your choice.
    Chikoo Ice Cream with Cinnamon Rose MintChip
Recipe Notes

Tips

Keep the whole milk and heavy cream well chilled before using it, which will give it a great consistency while churning it.

Taste for sweetness halfway through churning to make any necessary modifications.


Instinct Factor

Let your instincts guide you in modifying  this flavor as it truly as no original flavor !

Feel Factor

A totally exotic creation with a hint of boldness that people with a penchant for trying new flavors will certainly like it! For folks in India and Asian countries this will  be flavor close to home, with its use of cinnamon, rose and chikoo. And for those who do not like chikoo that much, will not be too disappointed with so many other flavors to satisfy their taste buds. Give it a shot and you might just discover something interesting in this Chikoo Cinnamon Rose MintChip Ice Cream!!


Instant Poha

Instant Poha

With a busy work life schedule, as an adult or as a freshmen at college, you are always looking for recipes that ease the task of having nutritious meals that can be cooked in shorter span of time. These days my focus is in finding ways to make easy meals that my daughter can quickly make in her college dorm in a microwave.  As a parent, I often worry about the quality of food that a college kid has and so to ease that worry, I send her this dry Instant Poha mix made at home, for her to use it as a breakfast, in between meals or when you are just craving for home cooked meals.

This idea also germinated when we were travelling to Italy this summer, and my mother being a pure Jain, would not have much option to eat out there. So carried this mix over there too, but unfortunately I discovered Italy does not have much prevalence of microwave in hotels hence it became difficult to use this there, But later, I also discovered, that I could have used boiling water and got a similar cooking result as when done in microwave,

It seems using this as a meal when traveling in India is prevalent in southern India, as well as there are a lot of vendors selling this mix in Mumbai Railway stations too. Also recently there are a lot of instant  Poha, Upma, and Pongal Mix from Deep foods, MTR foods also available, All these products got me to make an attempt to try  the Instant mix at home, as I can then control the spice level and the ingredients quality, make it a a fraction of cost then what is available in the Indian Grocery stores. It also gave me the flexibility to make it to suit Jain needs, as the Deep Foods/MTR has onion flakes in it.

Having Poha in the morning is a comfort breakfast for many families including ours. With this Instant Poha mix, my mornings have become even more relaxed! For folks who  can access boiling water on gas, there are resources on web which suggest adding the whole measure of water at one time and cover it and let it sit for 15 minutes with a lid on it. For this option, they suggest that the water should be about  half a centimeter higher than the Instant Mix in a bowl. Unfortunately some college dorm rooms do not have the facility of kitchen, hence the experiment  with microwave based approach.

It took some trial and error but  found the right measure of water and time to cook to get the right consistency of texture and softness of Poha flakes. What I personally like about this recipe, that with very minimal supervision, I can cook it, and it frees me more time on a busy morning work day! The final outcome  of Instant Poha is pretty close to gas cooking so do keep this recipe handy for quick meals, vacation meals, college and lunch meals!


Print Recipe
Instant Poha
Instant Poha
Cuisine Indian
Prep Time 3 min
Cook Time 3 min
Passive Time 10 min
Servings
people
Ingredients
Cuisine Indian
Prep Time 3 min
Cook Time 3 min
Passive Time 10 min
Servings
people
Ingredients
Instant Poha
Instructions
Preparing the Instant Poha Mix
  1. In a flat pan, heat the oil. When the oil becomes warm, add cumin seeds and asafetida. As cumin seeds turn light brown, add chopped chillies, curry leaves, turmeric, fennel seeds and stir on low flame for 10-15 seconds.
  2. Add the poha flakes, salt, citric acid crystals and optional sugar and mix everything on a low flame for two minutes.
  3. Remove from flame and cool completely. Store the Instant Poha Mix in an airtight container or a ziploc bag and it should stay fresh for 3-4 weeks and hence can be pre-made and used later for easy convenient.
Making the Poha from Instant Poha Mix
  1. For 1 measure of Instant Poha Mix, you will need approx 1 measure of water. So I tried with one cup of dry poha mix.
  2. Heat half a cup of water for 1 minute high power in a microwave.
  3. Pour one cup of Instant Poha Mix in a microwavable bowl. Add the warm half cup of water and cover tightly for five minutes.
  4. Heat the remaining half cup of water for a minute, Add half of this warm water(1/4) cup to the Poha and again cover for another 5 minutes. Before adding the second round of water, flufff the rice with a spoon gently.
  5. After five minutes, sprinkle the remaining water , fluff the poha flakes and cook the poha in the microwave for 2 minutes, making sure that the bowl in the microwave is covered with a lid, so that the Poha does not become stiff.
  6. Enjoy the Instant Poha in your college dorm or work kitchen!
Recipe Notes

Tips

If the poha flakes are very thick you will need more water or less water if the poha flakes are very thin,

Add fried peanuts to the mix which will retain its taste over a period of time.

Make sure you clean the poha of any unwanted items , as you will not be able to wash before you prepare the Poha Mix,

Instinct Factor

If making it for next day consumption, one can add boiled peas ,  potatoes, grated carrots to make it more wholesome meal.

Feel Factor

Taste of home for a college kid, a quick lunch meal, and a lazy morning breakfast at home! My husband is happy with this approach as he is always looking for ways to shorten the cooking time of meals! Its a great taste for the time and the ease it provides, so I would definitely use this as a quick meal option.  But for someone who prefer the steam gas cooking, it will fall slightly  short of their expectations, as all flavors will not integrate that well , but you gain some ,you lose some! However the above recipe of Instant Poha is definitely a recipe for when you need to do a cooking without a kitchen or take food when travelling!


[contact-form-7 404 "Not Found"]

Guava Ice Cream

An ice cream with Guava flavor? This was the question on my mind as I was presented this highly unique and refreshing flavor in Mumbai on my recent visit to India. Today I salute the spirit of Mumbai by posting this recipe of Guava Ice Cream made famous in Mumbai, by Apsara Ice Creams. Apsara is a chain that has been in existence for the past 50 years or more, and surprisingly I never encountered it during my younger days. Its first location was in Walkeshwar and it is believed that all the ice creams at Apsara are made in hand ice cream machine and hence has a rich texture and flavor. I am not too sure of this fact, but if it is true, it is truly worthy of respect for ensuring that the quality has not been compromised,

Mumbai is a town which really comes together in the face of disaster and shows what a humane spirit it has. Right from 1993 blasts to various calamities, it is the spirit of Mumbai that is indescribable, but one has to live there for a few months, to fall in love with the madness and chaos along with its gutsy, warm community.

Back to the Guava Ice cream, I had the privilege of having this on none other than the 75th birthday of my mother who is a BIG ice cream fan. The reason why this ice cream holds a special place in my heart, is because of its topping of red chili powder and salt. That combination, gives you the feeling of earring raw guavas topped with salt and red chili powder! Kind of like the Mexican chocolates which has cayenne peppers in it! That is true creativity at heart and a big salute to Apsara for retaining this flavor with its true taste.

When you eat this ice cream, you get the kick from not only the guava itself, but also from the spicy flavor on the top mixed with the sweetness of the cream and sugar. The challenge to a great flavor is having the guava ripened to the correct level. My initial try had been made with somewhat raw guavas that were more greener, and hence the taste did not compare with the one at Apsara. On later modifying it to more yellowish guava, I was able to recreate the taste to the one I had in Mumbai. Matching this to Apsara flavor brought big smiles on my daughter’s face!

A Guava ice cream treat for my readers,who have really been engaging with the blog and coming back to it, even when there were no new posts for some time. Hope you enjoy this Guava Ice cream, as much as I fell in love with its sweetness and spicy tinge! My apologies to the readers for being quiet for almost three months, as got busy with high school graduation, summer break and college preparations, but now I look forward to sharing many interesting recipes with you all. Bon Appetit!


Print Recipe
Guava Ice Cream
Eggless Guava Ice Cream
Prep Time 45 min
Passive Time 8 hours
Servings
Quart
Ingredients
For the Topping
Prep Time 45 min
Passive Time 8 hours
Servings
Quart
Ingredients
For the Topping
Instructions
  1. Chill the ice cream making container for at least 24 hours before making the ice cream.
  2. Skin the Guavas, and de seed them. Chop them into small pieces.
  3. Mix the sugar with chopped Guava and blend it into pulp.
  4. Set the ice cream container into ice cream maker, and start the ice cream maker. Once it starts, pour the whole milk, essence, heavy cream, a pinch of salt, balance sugar and guava pulp. Let it mix for about 25-30 minutes, till it binds into a lump.
  5. Remove the soft ice cream into a freezer container and let it set for about 10 hours minimum before serving.
  6. Prepare the topping by mixing salt and red chili powder thoroughly, till no white salt crystals are visible.
  7. Sprinkle this topping before serving and enjoy the multi flavored sweet and spicy Guava Ice Cream,
Recipe Notes

Tips

Ensure that the container is pre chilled for a long period of time, otherwise the ice cream will not bind well.Also ensure that the Guavas are ripe enough.

You can even try this with Pink Guavas, which apparently is a famous Italian Ice cream, where they also use some spicy toppings on it!

Instinct Factor

Re creating this flavor was possibly only as I relied on my tastebuds, memory and instinct! And the beauty of making ice cream is that even if you mess it up, you can adjust the quantities of sugar, essence, fruit pulp by thawing the original, mixing the added ingredients and re setting it in the freezer. It does not required to be churned again!

Feel Factor

Second time lucky in getting the right flavor and right blend of spices to recreate the famous Guava Ice cream of Apsara at home! Partially it also depends on the freshness and in season guavas. I am grateful to the Indian Grocery stores for carrying this tropical fruit that reminds me of my days in India. Next season I will definitely try the pink guava ice cream! One has to taste this just once and I guarantee, the chances are very high, you will fall in love with this unique flavor of ice cream!


Pineapple Kulfi

Pineapple Kulfi

Pineapple Kulfi is the recipe for this week, in sync with a mug my daughter got as an appreciation for the work she accomplished for a conference, which was engraved as ” if you were to be a fruit, you would be a fine-apple” and I cannot agree more! Pineapple is a tropical fruit that I have always liked, wether it be juice, or just slices, or as pineapple cheese sandwich or  my favorite flavor of fresh pineapple cake! So trying this flavor in kulfi would not be very surprising at all in my kitchen.:)

The effort was to have as much of pineapple displayed as possible, but could succeed only if when cutting the kulfi into pieces while serving. I tried to use the cupcake moulds besides the normal kulfi moulds, in order to display the pineapple rings more prominently, as part of the reason I like pineapple, is because of the thick circular slices. If pineapple is not a flavor you like, try the earlier recipe of Strawberry Kulfi Ice Cream.

Just remember to have a bucket of patience, as once you have that, making kulfi is a no brainer, specially when you cook in a non-stick pan. Watch a couple of TV shows while the milk evaporates to the right consistency and  then just mix some fresh pieces and chill for 15 hours or so pineapple kulfi is ready!

Today being Ugadi and Gudi Padwa, a sweet recipe was the ideal way to celebrate and wish everyone a Happy New Year to all! The temperatures are getting warmer soon, and a nice chunk of fresh pineapple in the kulfi would be akin to sunny, sweet and juicy aspect of the traditional delicious kulfi.  Hope all have a sunny, sweet and fruitful 2074 by Indian Calendar system!


Print Recipe
Pineapple Kulfi
Pineapple Kulfi
Course Dessert
Cuisine Indian
Prep Time 5 min
Cook Time 2 hours
Passive Time 10-12 hours
Servings
Ice pops or cupcake size
Course Dessert
Cuisine Indian
Prep Time 5 min
Cook Time 2 hours
Passive Time 10-12 hours
Servings
Ice pops or cupcake size
Pineapple Kulfi
Instructions
  1. Grease well a deep non stick pan with ghee at the base as well as on the sides thoroughly.
  2. Add the milk and sugar and stir on a medium flame till the sugar dissolves completely.
  3. Reduce the flame to low medium and let the milk boil.
  4. Once the milk boils , reduce it to low flame and let it simmer. till about 1/2 the original quality is left.
  5. Chop four pineapple slices into a small pieces and add to the milk to boil. Add also al 1/3 of the pineapple juice to the boiling milk also.
  6. Simmer the milk till the quantity reaches about a third of the original quantity.
  7. Remove from flame, add three more slices of pineapple chopped into small pieces.
  8. Warm a tbsp of milk and dissolve saffron into the kulfi mix. Add essence and cardamom and mix thoroughly.
  9. Allow the pineapple kulfi mix to cool completely for about an hour and a half.
  10. Fill the ice cream or popsicle moulds. adding half ring of remaining pineapple and chill for 12 hours minimum.
  11. Alternatively, use muffin or cupcake baking tray, fill the moulds with the Pineapple Kulfi mix and layer ring pieces of pineapple on the top and freeze for 12 hours.
  12. Before serving, run the moulds under warm water and release the pineapple kulfi from the mould .
  13. Cut it into pieces if serving in a bowl, that way, its easy to eat as well as it displays the fresh pineapple in it.
    Pineapple Kulfi
Recipe Notes

Tips

Using Whole mIlk and preferably organic milk , will give a rich taste and texture to the homemade Pineapple Kulfi.

Instinct Factor

Use a over boil  preventing plate, will help the milk in simmering without one having to watch over it continuously, as also using a non stick pan is a must for an easy kulfi making process.

Feel Factor

If the milk has evaporated to the right consistency  level, then the texture of the Pineapple Kulfi will be just right! The whole process of making kulfi is a test of patience and if one is patient, the rewards is definitely worth it! The texture of the pineapple kulfi was just right along with its sweetness and I specially liked the slightly tangy taste to the mix from the pineapple juice as well as dissolved pineapple. The fresh pineapple added last, retains its crunchiness and juiciness, which adds an extra depth to the traditional kulfi. I quite like this combination as it is something new and fun in the kulfi flavor so Pineapple Kulfi was definitely sunny and sweet for me!


Contact

[contact-form-7 404 "Not Found"]