Sandesh Chocolate Grape

Sandesh Chocolate Grape

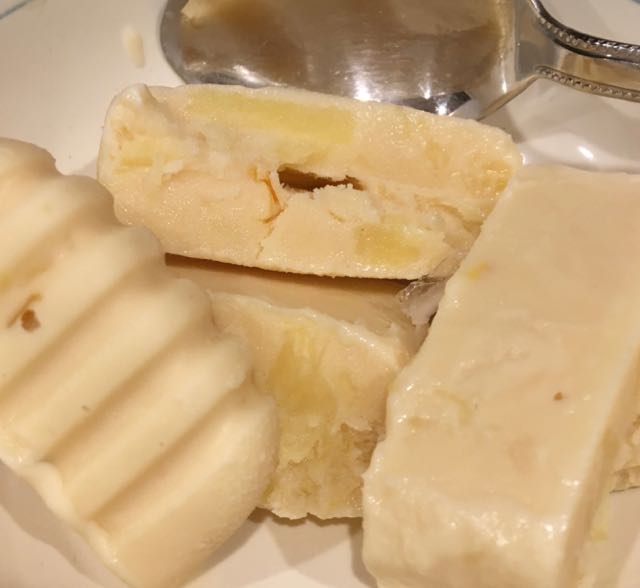
Sandesh Chocolate Grape was my creation for a milestone birthday that we just had celebrations for! As a young kid, memories of Sandesh made by my mother linger in my mind even now, and Sandesh is perhaps the first dessert that I really was fond of!  Even more than Rasgulla or Rasmalai, which also use the same paneer base.  My mother used to put orange segments in it, but I decided to use red grapes, as I am more fond of grapes than oranges. Red grapes would go well with the fall weather and dark chocolate flavor is what I thought.  I have a deep weakness for dark chocolates and in particular Godiva Dark Chocolates. Godiva has various levels of cocoa but decided to go for safer 50% dark level then the 75% , as I was going to offer the Sandesh Chocolates Grape to guests. Making this was a very last minute decision. I had a Dark Chocolate with Sea Salt flavor in my house, which was used and in my opinion the sea salt further enhanced the flavor of Sandesh.

On reading the blog of Cosmpolitan Curry Mania, I got to know a lot about the various ways Sandesh is made and the types of shondesh/sandesh available in West Bengal. The way I made was more of the Kachha Gola (raw uncooked sandesh), in which , the kneading of the sandesh is the key to the softness and texture of the desert. This has a different texture than the one  which is mixed with Khoya and cooked on a flame. It is interesting to note that people in Bengal have even explored with flavors like olive oil too in making Sandesh!

Reading this, made me even more happy with my creation of Sandesh Chocolate Grape which hints at flavors of Red Grapes, Paneer, and Dark Chocolate with Sea Salt. And the sugar level in this variation has been purposely kept at low levels, to feel the dark taste of chocolate.

The texture of the Sandesh Chocolate Grape was smooth, and the topping of semi sweet mint chip chocolates  gave it a colorful and tasty appeal. The grape filling was well appreciated with the chocolate flavor. This dessert was definitely the preferred dessert of the evening. What a great way to celebrate a milestone, with a favorite dessert in a favorite chocolate flavor with sea salt! A five star dessert for me for sure! And I am positive, once you try this super easy, super quick dessert, you will be making many new and exciting flavors in Sandesh. Do send me a sandesh (message) with a newer version that you created by submitting a recipe on this blog!


Print Recipe
Sandesh Chocolate Grape
Chocolate Sandesh from Chocolate Bar and Fruits
Sandesh Chocolate Grape
Course Dessert
Cuisine Indian
Prep Time 10 min
Cook Time 30 min
Passive Time 3 hours
Servings
Ingredients
Course Dessert
Cuisine Indian
Prep Time 10 min
Cook Time 30 min
Passive Time 3 hours
Servings
Ingredients
Sandesh Chocolate Grape
Instructions
  1. The chhena or paneer should be freshly made. If you need instructions on how to make fresh panner from milk, please read my recipe on Rasgoola for detailed process.
  2. Once the chhena is cooled, knead for 8-10 minutes using the palm of your hand. Continue kneading till all the paneer forms into a ball, and the grainy look of chhena turns into a smooth look.
  3. Melt 3 squares of the Godiva Dark Chocolate Sea Salt Bar in microwave for 40 seconds. Stir the squares to liquid form and immediately pour 2 tsp of melted chocolate into the paneer.
  4. Add sugar and continue to knead for 4-5 minutes. The dark chocolate will slowly spread and change the color from white to completely brown. If you see white portions then continue to knead some more.
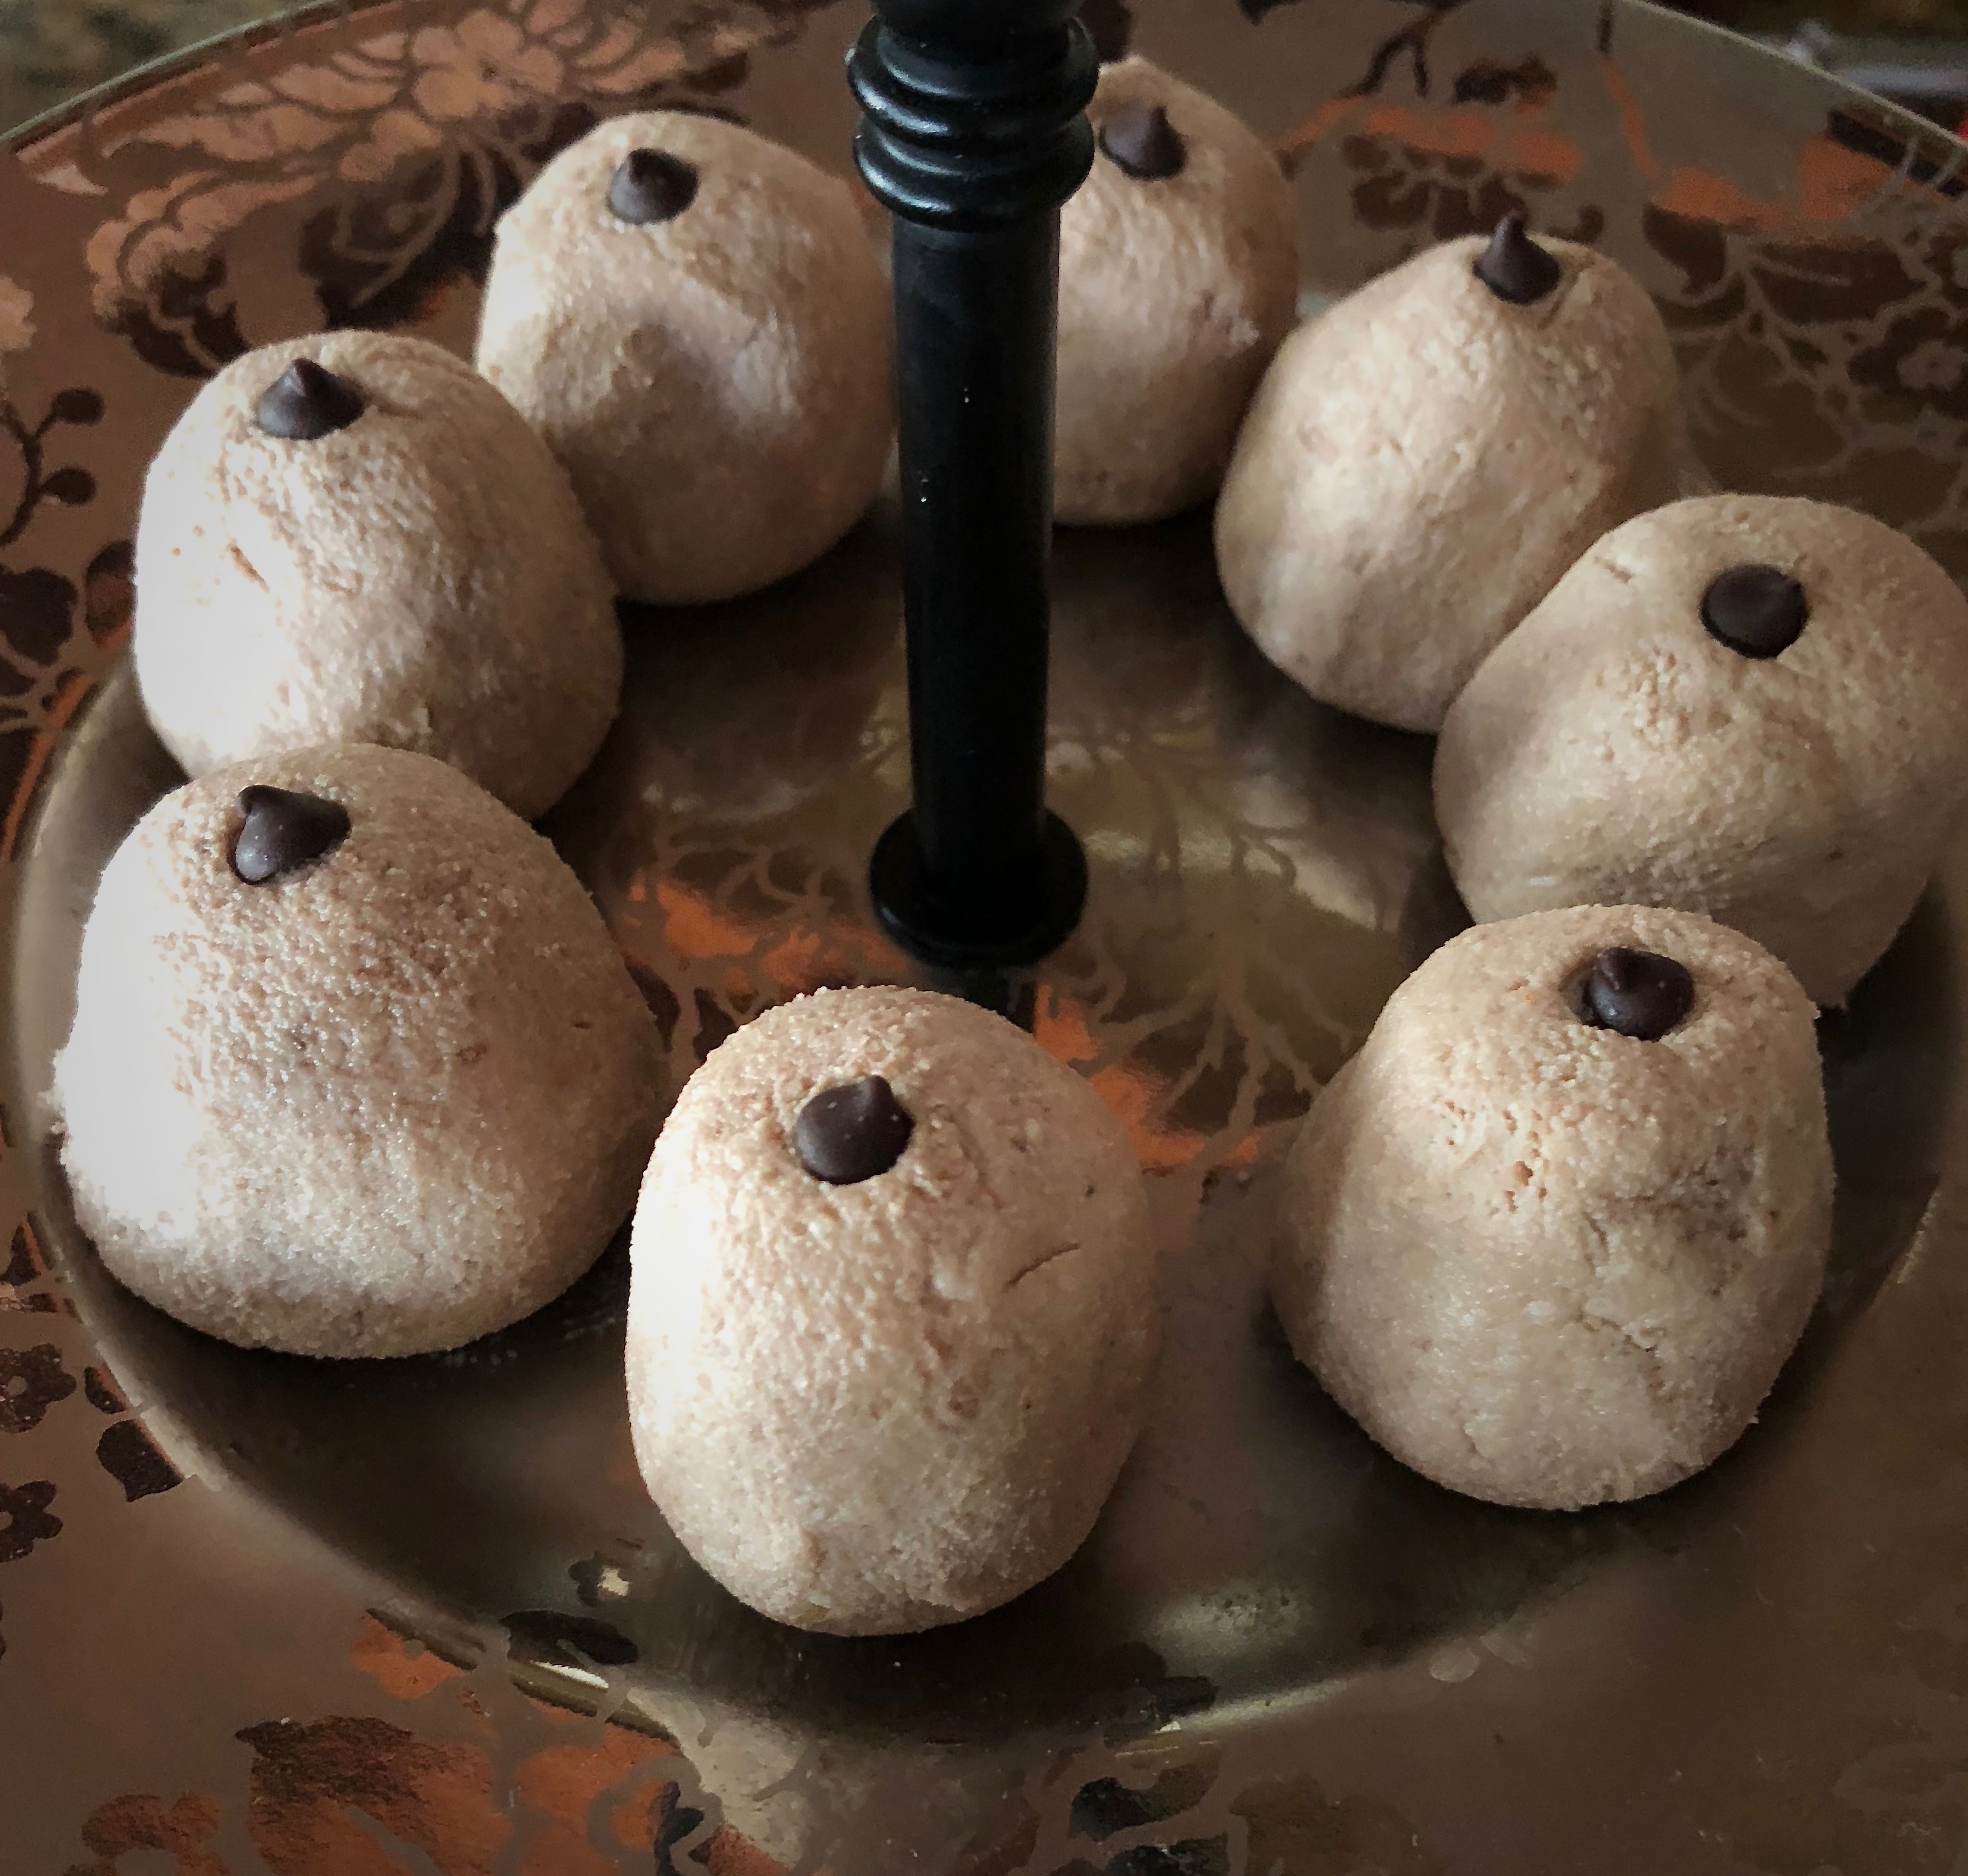
  5. Divide the paneer into 24 parts. Roll each part into round ball, and then flatten with your fingers.
  6. Put 2 pieces of sliced grapes on the flattened part and then again make a round ball.
  7. Give it an elongated shape by pinching with all your fingers at the top like a modak shape.
  8. Garnish it with a mint chocolate chip and chill for 3-4 hours.
  9. Enjoy chilled , fruity Sandesh in Chocolate flavor!
    Sandesh Chocolate Grape
  10. Sandesh Chocolate Grape cut into half to get the inside view. The images were taken at different light environment, hence the change in the colors of the Sandesh
    Sandesh Chocolate Grape
Recipe Notes

Tips

Fresh paneer that has some liquid in it still is the best consistency, as it will give it a good smoothness to the texture. Hence  I do not hang the paneer or put weight while making the paneer.

Chocolate powder can be also used, as mentioned in another recipe  http://cookingbyinstinct.com/chocolate-sandesh-cheese-fudge/

Instinct Factor

Making use of things available at hand and creating something new out it, is truly inspiring and instinctive! That is when the best satisfaction comes to a passionate foodie! Get your instincts to guide you as you make a flavor of your choice!

Feel Factor

Its celebration time with chilled, soft, smooth, bittersweet dark chocolate flavored grape sandesh! Everyone was curious as to what is this new dessert, as the shape was different, color was different, and the taste was also very different. This dessert is healthy, as cottage cheese is healthy, not too sweet, and good for the mind  and soul as well because of its chocolate flavor. The grape filling gives a nice crunch as well as sweet tangy taste in between the chocolate flavored cottage cheese.. Something made in a jiffy and the end result was a winner in the evening dinner! This was definitely the icing on the cake in my view! And I am sure your guests will also remember this modern flavor fruit filled Sandesh Chocolate Grape!!

Aloo Gobi Singara Layered Bengali Samosa

Aloo Gobi Singara Layered Bengali Samosa is traditionally known as Aloo Phulkopir Singara in Bengali. When I saw this image on the web, I was fully mesmerized by the flowing layer look atop one of the most famous Indian Snack- Samosas! It just made the samosas climb a new height in my eyes. I had been craving for Samosas and it being Diwali time, in most homes, the best and the most creative dishes are being cooked so was looking for a recipe that satisfied my creativity as well as craving for samosas.

Cauliflower stuffing mixed with the traditional potatoes, gives it a whole new taste and the traditional recipe even mixes in raisins and cashews which I avoided, as did not want a sweet taste in the singara. My exposure to Bengali samosas came from Tewari Brothers near Opera House in Mumbai, whose samosas are just simply amazing and different as they had Chhole filling in their samosas and were fried in ghee. Now interesting point to google would be did Singara came first or the Persian Sambosag

So while searching for that recipe, I came across the Aloo Gobi Singara which was definitely different in taste with an interesting look, so thought why not start the Diwali festivities with a new take on an all time favorite Samosas!! Addition of whole spices of fennel seeds, coriander seeds and cumin seeds as well as a good amount of aamchur and roasted cumin gives it a good depth and blends the cauliflower and potatoes into a nice tangy, spicy mix, and when fried in ghee, everything just becomes fragrant, My house reminded me of the aroma at Tewari Bros! In West Bengal, singara and samosas are two different items, primarily different in shape as the samosa are more triangular/flatter  and can be filled with many other stuffings, but singara has to have potatoes and cauliflower in their stuffing and are more rounder with greater amount of stuffing inside it. 

Singaras are popular tea time snacks or journey snacks and they were introduced in 13th or 14 century by central Asian traders who brought them along with them to eat and they often originally had meat and other stuffings in it. The Persians called them as Sanbosag, and the Bengalis nicknamed them as singara as it had close resemblance to the Shingoras(Chestnuts). Well that makes the Aloo Gobi Singara Layered Bengali Samosa  an even more apt fall delicacy as it is named after Chestnuts! The taste was great and the shape, texture and crispiness even greater!! The recipe below is a mix of various recipes on Singara on the web, modified to suit my personal taste. It does take some time to take, but then no Diwali/Festivity recipe is without some effort! 

As a Jain I am happy to share this, as its a recipe that only uses half the amount of potatoes, and which easily can be substituted by Green Bananas. The time to cook is slightly more than normal samosas, and one can even try this using pastry dough too!

Happy to share Aloo Gobi Singara Layered Bengali Samosa with you all and wishing everyone a Prosperous Dhan Teras!!


Print Recipe
Aloo Gobi Singara Layered Bengali Samosa
Course Appetizers
Cuisine Indian
Prep Time 7 min
Cook Time 1 hour
Passive Time 30 min
Servings
pieces
Ingredients
For the Stuffing
Course Appetizers
Cuisine Indian
Prep Time 7 min
Cook Time 1 hour
Passive Time 30 min
Servings
pieces
Ingredients
For the Stuffing
Instructions
Preparing the Dough
  1. Mix in the flour, salt, carom seeds and oil thoroughly for about five minutes, till you see small lumps can form.
  2. After that add about half the water and combine thoroughly, then add the remaining water and knead the dough into a firm yet pliable consistency, slightly smoother than a pie dough.
  3. Cover with a wet cloth for at least 30 minutes.
  4. Check for the gluten formation, by pressing fingers into the dough. If the dough bounces back, the gluten has formed.
  5. Divide the dough into twelve parts and make round balls.
Preparing of the stuffing
  1. Heat the oil and add the coarsely grounded spices to it. Stir for a minute and then add the minced ginger and green chillies and stir further.
  2. Add cubed potatoes, mix and cover for 3 minutes to cook.
  3. Add cauliflower florets, turmeric powder and cover for 3 minutes and cook further
  4. Add salt , whisk the vegetables and cover and cook for another 5 minutes
  5. Add all the remaining spices and mix in two tbsp coriander, cook for 1 minute and remove from flame and let it cool.
Making Singara
  1. Roll one round ball into oval shape about 6 inches long.
  2. Lightly fold the rolled dough into half and open again.
  3. Cut the oval into half, at the indicated half line present due to light folding.
  4. Using a pizza cutter or sharp knife make horizontal cuts across one half of the oval, about 1/2 inch apart, and also leaving a 1/4 inch border. Moisten with water all over the surface of this half
  5. Place the non-serrated/ plain half over the moistened cut/serrated half and align all the edges well.
  6. Bring the flat edged side on the top, curved side on the bottom, and also the cut side should be below, and plain half on the top. This way the cut side will become outer covering and plain side will be the inner side, when you fold the singara.
  7. Moisten the top flat edge with water.
  8. Lift from both the sides to make a V shape and pull one side over the other to close it in a cone shape.
  9. Press firmly where the two sides meet to ensure that it will be a tight bottom cone.
  10. Take 1 tbsp of stuffing and fill the inside of the cone.
  11. Moisten the top open edge of the cone and bring it down horizontally to the lower side in order to close the cone. Make the rest of Singaras in the above manner.
  12. Heat about 3/4 cup ghee in a flat pan.
  13. Once its hot, reduce it to slow flame. Add 4-5 Singaras to fry at a time on a low flame. Because you are frying in ghee, it will take time.
  14. Turn over and fry till they are evenly cooked and have an almond color texture. Remove from flame on to a paper towel to remove excess ghee.
  15. Garnish it with some chat masala and serve hot with tamarind chutney/ green chutney or sauce.
Recipe Notes

Tips

Ensure that the water for the dough is cold, and oil is warmed up. This is crucial to the dough. The consistency of dough is key to having a crispy texture to singara.

If frying in oil, the color of singaras, will be more golden as compared to when frying in ghee. The taste is much better when fried in ghee for sure. Make sure that the strip layer as well as the inside layer are well fried. Frying in ghee will take a little longer then frying in ghee.

Add 1/2 cup of peas for more flavor.

The simpler non layered version will be a much faster version of this!

Instinct Factor

Frying in ghee was an instinct based response, as I remember clearly that Tiwari Bros had an aroma of ghee at their shop and they are known to make everything in pure ghee. Having ghee also reduces acidity!

Feel Factor

Welcoming Diwali with something new, tasty, and as interesting as Aloo Gobi Singara Layered Bengali Samosa is a great way to feel happy about the festive joyous occasion! The tangy taste of the Aloo Gobi and the crispy and crunchy texture with the buttery feel due to frying in ghee, makes it a great festival recipe! It makes it unique and definitely an item when you want to impress someone with your culinary skills, and can be done in the more or less the same amount as when making the traditional samosas! Layered look gives it gourmet look so definitely a recipe to go for when you need some surprise element in your menu and a recipe that delivers!


Instant Poha

Instant Poha

With a busy work life schedule, as an adult or as a freshmen at college, you are always looking for recipes that ease the task of having nutritious meals that can be cooked in shorter span of time. These days my focus is in finding ways to make easy meals that my daughter can quickly make in her college dorm in a microwave.  As a parent, I often worry about the quality of food that a college kid has and so to ease that worry, I send her this dry Instant Poha mix made at home, for her to use it as a breakfast, in between meals or when you are just craving for home cooked meals.

This idea also germinated when we were travelling to Italy this summer, and my mother being a pure Jain, would not have much option to eat out there. So carried this mix over there too, but unfortunately I discovered Italy does not have much prevalence of microwave in hotels hence it became difficult to use this there, But later, I also discovered, that I could have used boiling water and got a similar cooking result as when done in microwave,

It seems using this as a meal when traveling in India is prevalent in southern India, as well as there are a lot of vendors selling this mix in Mumbai Railway stations too. Also recently there are a lot of instant  Poha, Upma, and Pongal Mix from Deep foods, MTR foods also available, All these products got me to make an attempt to try  the Instant mix at home, as I can then control the spice level and the ingredients quality, make it a a fraction of cost then what is available in the Indian Grocery stores. It also gave me the flexibility to make it to suit Jain needs, as the Deep Foods/MTR has onion flakes in it.

Having Poha in the morning is a comfort breakfast for many families including ours. With this Instant Poha mix, my mornings have become even more relaxed! For folks who  can access boiling water on gas, there are resources on web which suggest adding the whole measure of water at one time and cover it and let it sit for 15 minutes with a lid on it. For this option, they suggest that the water should be about  half a centimeter higher than the Instant Mix in a bowl. Unfortunately some college dorm rooms do not have the facility of kitchen, hence the experiment  with microwave based approach.

It took some trial and error but  found the right measure of water and time to cook to get the right consistency of texture and softness of Poha flakes. What I personally like about this recipe, that with very minimal supervision, I can cook it, and it frees me more time on a busy morning work day! The final outcome  of Instant Poha is pretty close to gas cooking so do keep this recipe handy for quick meals, vacation meals, college and lunch meals!


Print Recipe
Instant Poha
Instant Poha
Cuisine Indian
Prep Time 3 min
Cook Time 3 min
Passive Time 10 min
Servings
people
Ingredients
Cuisine Indian
Prep Time 3 min
Cook Time 3 min
Passive Time 10 min
Servings
people
Ingredients
Instant Poha
Instructions
Preparing the Instant Poha Mix
  1. In a flat pan, heat the oil. When the oil becomes warm, add cumin seeds and asafetida. As cumin seeds turn light brown, add chopped chillies, curry leaves, turmeric, fennel seeds and stir on low flame for 10-15 seconds.
  2. Add the poha flakes, salt, citric acid crystals and optional sugar and mix everything on a low flame for two minutes.
  3. Remove from flame and cool completely. Store the Instant Poha Mix in an airtight container or a ziploc bag and it should stay fresh for 3-4 weeks and hence can be pre-made and used later for easy convenient.
Making the Poha from Instant Poha Mix
  1. For 1 measure of Instant Poha Mix, you will need approx 1 measure of water. So I tried with one cup of dry poha mix.
  2. Heat half a cup of water for 1 minute high power in a microwave.
  3. Pour one cup of Instant Poha Mix in a microwavable bowl. Add the warm half cup of water and cover tightly for five minutes.
  4. Heat the remaining half cup of water for a minute, Add half of this warm water(1/4) cup to the Poha and again cover for another 5 minutes. Before adding the second round of water, flufff the rice with a spoon gently.
  5. After five minutes, sprinkle the remaining water , fluff the poha flakes and cook the poha in the microwave for 2 minutes, making sure that the bowl in the microwave is covered with a lid, so that the Poha does not become stiff.
  6. Enjoy the Instant Poha in your college dorm or work kitchen!
Recipe Notes

Tips

If the poha flakes are very thick you will need more water or less water if the poha flakes are very thin,

Add fried peanuts to the mix which will retain its taste over a period of time.

Make sure you clean the poha of any unwanted items , as you will not be able to wash before you prepare the Poha Mix,

Instinct Factor

If making it for next day consumption, one can add boiled peas ,  potatoes, grated carrots to make it more wholesome meal.

Feel Factor

Taste of home for a college kid, a quick lunch meal, and a lazy morning breakfast at home! My husband is happy with this approach as he is always looking for ways to shorten the cooking time of meals! Its a great taste for the time and the ease it provides, so I would definitely use this as a quick meal option.  But for someone who prefer the steam gas cooking, it will fall slightly  short of their expectations, as all flavors will not integrate that well , but you gain some ,you lose some! However the above recipe of Instant Poha is definitely a recipe for when you need to do a cooking without a kitchen or take food when travelling!


[contact-form-7 404 "Not Found"]

Khatta Sandwich Dhokla

Idli and White Dhokla both use similar ingredients, and what I learnt from my visit in India is how to combine the two and make quick Khatta Sandwich Dhokla! India has the luxury of expertise available at comparatively low costs with quite creative talent. The chefs in India who come to cook, probably cover 10-12 kitchens prep and cooking through the day. So they definitely know how to finesse their task and make things work faster for them. One such trick was shared by one such creative chef who comes to our house. Knowing my passion for food and cooking, she suggested I should definitely try her Khatta Sandwich Dhokla from Idli batter. I was so impressed by the outcome, I had to try out this quick, one more easy way of making Dhoklas.

My first challenge was getting the fresh Idli batter in USA, especially when one is living in an area without high concentration of Indians. So decided to try the next best thing, which was the ready Idli Batter available at the grocery stores, viz Shreeji’s Idli Batter. Various other brands are also available, but I did not have much luck with them. Maybe the stock was old, or not well fermented.

After persisting a bit more, was able to arrive at the right consistency and softness in the texture for the Khatta Sandwich Dhokla, What worked was diluting the mixture a bit, and adding a pinch of bicarbonate soda. In a Gujarati household, fresh green chutney is a staple and hence always have a stock of it at home. And adding a layer of this chutney in between, gives it a kick as well as the color. You can even not garnish it, and have them plain, if you are watching calories, and you will find them tasty as well.

Dhokla as people now know it, is actually known as Khaman (Yellow Dhokla) in Gujarat, on which I have blogged earlier Khaman Dhokla from Instant Mix  .The real Dhoklas are the Khatta or White Dhoklas. So enjoy one more version of Dhokla and keep this recipe in mind, if you have left over Idli Batter to fix some snack during the day or for a quick bite in the evening, or just have it for dinner, as a friend of mine did! She tried with fresh Idli batter! Any guess her state of residence? NJ 🙂

Hers came out soft and fluffy without any additions or alterations of the batter dough! Hope you enjoy this quick version of Khatta Sandwich Dhokla especially with the Diwali festivities on the way!

Print Recipe
Khatta Sandwich Dhokla
White Sandwich Dhokla using Idli Batter
Course Appetizers
Cuisine Indian
Prep Time 3 min
Cook Time 20 min
Passive Time 5 minutes
Servings
people
Ingredients
For Garnish
Course Appetizers
Cuisine Indian
Prep Time 3 min
Cook Time 20 min
Passive Time 5 minutes
Servings
people
Ingredients
For Garnish
Instructions
  1. Put the water to boil in Dhokla cooker and grease the Dhokla platter/thali with oil, a little more generously, covering the sides thoroughly too.
  2. Dilute the Idli Batter, by adding 1/2 cup of water and also add bicarbonate soda and mix thoroughly,
  3. Pour apport 1 cup of batter to the platter, cover and steam on high for 10 minutes.
  4. Open and check if the batter is cooked,
  5. Spread the green chutney more generously , bit more than what the picture shows, so as to cover all areas well.
  6. Then top the green chutney layer, with the remaining batter and cover and cook for another 10 minutes on high flame.
  7. Meanwhile, prepare the garnish, by heating the oil in a deep vessel. Add mustard seeds, and wait for it to crackle. Add cumin seeds and wait to to be light brown, then add white sesame seeds, chopped chillies and curry leaves and remove from gas after 10-15 seconds.
  8. Once the second layer of Khatta Sandwich Dhokla batter cooked, open and spread the garnish evenly all over and cover and let it cook further for 3-4 minutes.
  9. Make square or diamond cuts and serve with extra chutney, sauce or have it plain and you will enjoy the warm soft texture of Khatta Sandwich Dhokla!
Recipe Notes

Tips

Ensure that the consistency of the batter is dropping consistency.

You can also add ginger chillies paste in the mix to make it more spicier.

When the dhokla  leaves the edges of the thali/platter,  it indicates that it is nicely cooked. Other way of checking is to insert a knife/fork and check for the firmness/cooking of the batter.

If you want to try an instant mix variation, check out another post on  Khaman Dhokla Instant Mix Recipe

Instinct Factor

Persistence and instinct plays a great role in getting things right!

You can variate different types of chutneys for exploring different flavors. I might do with Guacamole filling to try something new with a twist!

Feel Factor

For a Gujarati household, another way of  making  Dhoklas  is always appealing and I have the chef back in India to thank for! The texture is soft and the layer of chutney makes it interesting and spicy. I cannot wait to explore this with the fresh homemade idli batter and am positive that will turn out even more fluffier and tastier! Morning breakfast got a new item on the menu! Plan to post the instant mix recipe of White Dhokla soon too, as this has been my way of making quick dependable tasty Dhoklas for all these years! Enjoy the upcoming festivities of Diwali with delicious foods of all kinds!


[contact-form-7 404 "Not Found"]

Pineapple Kulfi

Pineapple Kulfi

Pineapple Kulfi is the recipe for this week, in sync with a mug my daughter got as an appreciation for the work she accomplished for a conference, which was engraved as ” if you were to be a fruit, you would be a fine-apple” and I cannot agree more! Pineapple is a tropical fruit that I have always liked, wether it be juice, or just slices, or as pineapple cheese sandwich or  my favorite flavor of fresh pineapple cake! So trying this flavor in kulfi would not be very surprising at all in my kitchen.:)

The effort was to have as much of pineapple displayed as possible, but could succeed only if when cutting the kulfi into pieces while serving. I tried to use the cupcake moulds besides the normal kulfi moulds, in order to display the pineapple rings more prominently, as part of the reason I like pineapple, is because of the thick circular slices. If pineapple is not a flavor you like, try the earlier recipe of Strawberry Kulfi Ice Cream.

Just remember to have a bucket of patience, as once you have that, making kulfi is a no brainer, specially when you cook in a non-stick pan. Watch a couple of TV shows while the milk evaporates to the right consistency and  then just mix some fresh pieces and chill for 15 hours or so pineapple kulfi is ready!

Today being Ugadi and Gudi Padwa, a sweet recipe was the ideal way to celebrate and wish everyone a Happy New Year to all! The temperatures are getting warmer soon, and a nice chunk of fresh pineapple in the kulfi would be akin to sunny, sweet and juicy aspect of the traditional delicious kulfi.  Hope all have a sunny, sweet and fruitful 2074 by Indian Calendar system!


Print Recipe
Pineapple Kulfi
Pineapple Kulfi
Course Dessert
Cuisine Indian
Prep Time 5 min
Cook Time 2 hours
Passive Time 10-12 hours
Servings
Ice pops or cupcake size
Course Dessert
Cuisine Indian
Prep Time 5 min
Cook Time 2 hours
Passive Time 10-12 hours
Servings
Ice pops or cupcake size
Pineapple Kulfi
Instructions
  1. Grease well a deep non stick pan with ghee at the base as well as on the sides thoroughly.
  2. Add the milk and sugar and stir on a medium flame till the sugar dissolves completely.
  3. Reduce the flame to low medium and let the milk boil.
  4. Once the milk boils , reduce it to low flame and let it simmer. till about 1/2 the original quality is left.
  5. Chop four pineapple slices into a small pieces and add to the milk to boil. Add also al 1/3 of the pineapple juice to the boiling milk also.
  6. Simmer the milk till the quantity reaches about a third of the original quantity.
  7. Remove from flame, add three more slices of pineapple chopped into small pieces.
  8. Warm a tbsp of milk and dissolve saffron into the kulfi mix. Add essence and cardamom and mix thoroughly.
  9. Allow the pineapple kulfi mix to cool completely for about an hour and a half.
  10. Fill the ice cream or popsicle moulds. adding half ring of remaining pineapple and chill for 12 hours minimum.
  11. Alternatively, use muffin or cupcake baking tray, fill the moulds with the Pineapple Kulfi mix and layer ring pieces of pineapple on the top and freeze for 12 hours.
  12. Before serving, run the moulds under warm water and release the pineapple kulfi from the mould .
  13. Cut it into pieces if serving in a bowl, that way, its easy to eat as well as it displays the fresh pineapple in it.
    Pineapple Kulfi
Recipe Notes

Tips

Using Whole mIlk and preferably organic milk , will give a rich taste and texture to the homemade Pineapple Kulfi.

Instinct Factor

Use a over boil  preventing plate, will help the milk in simmering without one having to watch over it continuously, as also using a non stick pan is a must for an easy kulfi making process.

Feel Factor

If the milk has evaporated to the right consistency  level, then the texture of the Pineapple Kulfi will be just right! The whole process of making kulfi is a test of patience and if one is patient, the rewards is definitely worth it! The texture of the pineapple kulfi was just right along with its sweetness and I specially liked the slightly tangy taste to the mix from the pineapple juice as well as dissolved pineapple. The fresh pineapple added last, retains its crunchiness and juiciness, which adds an extra depth to the traditional kulfi. I quite like this combination as it is something new and fun in the kulfi flavor so Pineapple Kulfi was definitely sunny and sweet for me!


Contact

[contact-form-7 404 "Not Found"]

Govind Gatte Stuffed Dumplings in Tomato Gravy

Govind Gatte Stuffed dumplings in tomato gravy

The festival of colors Holi,which just went by is celebrated with much fanfare in the land of Rajasthan. My imagination takes flight and I imagine the royals of the land playing with colors in their elaborate costumes  and the exquisite castles filled with colorful dresses and colorful faces. At such festive occasions, the royal chefs must be busy cooking and inventing royal dishes.  and the courtyard maybe filled with  delicious sweets and snacks! One such royal dish is Govind Gatte Stuffed Dumplings in Tomato Gravy, a rich dumpling  gravy based entree, filled with richness of cashews, raisins and paneer. There is the ordinary Gatte recipe popularly known as Gatte Ki Subzi whose recipe I blogged earlier. The version detailed today is for those special moments and occasion to make them more memorable.

Differentiation between the two recipes relate to the shape, stuffing and the gravy, This is festive so it has been depicted in a triangle form, with stuffing and in a tomato yogurt gravy. It is softer and since they are blanched and fried, one can relish them as side snacks too!

The festive occasion at our end besides being HOLI was also a milestone birthday celebration, so found the perfect opportunity to try out Govind Gatte.  If short on time, the round shape gate is a which is a quicker shape for sure. The gravy has a nice tangy flavor and  one gets a similarity to malai kofta gravy and texture. This can be also cooked on aatham/chaudas menu of the Jain tithi and including this will make the menu more festive and royal for the guests and family.

Personally I enjoyed the kauri methi , raisins and cashew flavor in the Govind Gatte and the yogurt tomato mix gravy. Cone shape of Gatte make it so very festive and colorful and the perfect dish of color, taste and texture from the land of royals and color. The good part is one can make the uncooked Gatte in advance for a day or two and then cook them as desired. Alternatively fry them and have them as snacks with tea and they are really delicious to eat alone too! I am sure the person for whom this was made must be named Govind, and must be a well loved royal to have a dish on his name, from Jodhpur.

Enjoy the festivities and the richness that are ever present in the Indiau cuisine with Govind Gatte Stuffed Dumplings in Tomato Gravy!

Print Recipe
Govind Gatte Stuffed Dumplings in Tomato Gravy
A chickpea flour recipe of stuffed dumplings in a yogurt based gravy
Govind Gatte Stuffed dumplings in tomato gravy
Cuisine Indian
Prep Time 10 min
Cook Time 30 min
Servings
people
Ingredients
For the Stuffing
For the Gravy
For the dough
Making of Gatte
Cuisine Indian
Prep Time 10 min
Cook Time 30 min
Servings
people
Ingredients
For the Stuffing
For the Gravy
For the dough
Making of Gatte
Govind Gatte Stuffed dumplings in tomato gravy
Instructions
For making the stuffing
  1. Heat the ghee and add cashews and saute for 20 seconds, add raisins and saute for 30 seconds, add paneer, salt and chill powder and further saute for 40 seconds and remove from flame.
For making Gatte
  1. Mix all the ingredients and taste for spice and salt levels. Bind all the ingredients into a smooth dough.If need more water for dough add yogurt.
  2. Roll the dough into a long cylinder shape.
  3. Cut about 1/4 inch pieces of the dough. I was able to make about 22-23 pieces
  4. Make a ball of each piece and flatten it a bit between the palms and afterwards use the fingers to pat it and make it a little bigger. Fill about 1/2 tsp of the stuffing on it.
  5. Fold the edges of the dough inwards and make a con shape. If it s not easy to fold in a cone shape, first make a ball and then make a cone shape. Alternatively you can leave them as balls too. But typically this being royal, the cone shape associated was to make it extra ordinary.
  6. Boil about 3/4 liters of water and add salt, yogurt and ghee. Add the cone gatte to it, ensuring that the quantity of water is sufficient for it to be submerged completely.
  7. Boil the gatte for about 10-11 minutes till they are completely cooked and rise to the top.
  8. While the gate are boiling heat the oil in a pan, once it warms up, keep it on a low flame. As soon as the gatte are cooked, instantly drop them into the oil for frying.Once they are light beige in color, remove from oil and cool.
Making the gravy
  1. Heat the oil and asafetida, dried red chillies and cumin seeds and allow the seeds to get slightly brown. Add fennel seeds, coriander powder, chill powder,salt and sauté the ingredients on a low flame for about a minute till you get the roasted aroma of the chickpea flour.
  2. Add yogurt and continue to simmer the gravy stirring continuously as otherwise the yogurt will break.
  3. Once the oil starts separating out, add the Govind Gatte to the gravy and simmer on low flame for about 10 minutes, and add about a cup of water, so that the gravy does not thicken too much while its cooking.
  4. Remove from flame and serve immediately or before serving add some water to keep the consistency fluid and then warm and serve with bread, rice or puri
  5. Enjoy the royal feast at home with this royal dish of Govind Gatte, accompanied here with Puri, Dahivada, Moong and Kadhi. All items of a Jain aatham chaudas 🙂
Recipe Notes

Tips

The original recipe has mava powder which I replaced it with paneer,as I feel paneer is more healthier and tastier.

If you like kasuri methi, sprinkle about a tsp of methi powder in the gravy while warming before serving.

Instinct Factor

Getting the cone shape could be challenging so ensure that flatten ball of the dough is not too thin, as otherwise it will break while frying or steaming.

Feel Factor

Even though the list of ingredients are way too many, the making of the dish is relatively simple and it just fill your home with aroma of spices and one can easily fall in love with the crispy fried Govind Gatte as snack or the crisp yet soft Govind Gatte in the tangy tomato yogurt gravy. I have found another jewel of the Rajasthani cuisine that promises to be on our list of enchanting flavorful recipes.


[contact-form-7 404 "Not Found"]

Dalvada Lentil Fritters

Dalvada Lentil Fritters

Dalvada Lentil Fritters, a specialty of Ahmedabad, Gujarat, is a highly nutritious, quick and easy snack that can be easily had in a place of a meal! You will find lots of people feasting on this as they are so delicious. I had been exposed to this delicacy during my childhood days,  eating the then famous dalwadas  at Natraj Cinema  during my college days at HL College. The snack is served with fried green chillies as accompaniment and is a popular street food of Gujarat, like the Vada Pav in Maharashtra.

This snack was made popular by the street vendors and made more famous by one vendor, Shri Ambika Dalvada. In one of the interviews with the owner, it turns out he is originally from Rajasthan, and  it is no wonder that a successful dish based on lentils would be coming from Rajasthani. As Rajasthan is known for Dal Bati, Moong Chilla etc. These Dalvada will also be appreciated by people who like Pesarattu, as it contains the same Split Green Gram Lentils as in the Moong Chilla or Pesarattu.

The addition of blackeyed peas (Chora Dal or Lobia Dal) gives it the extra crunch in the Dalwada. Split green lentil is already very high in protein and assists in lowering glycemic index. Black eyed peas or chora/lobia dal is  very high in phosphorous and magnesium along with high folate content. So together this is a great combination. The added spice of green chillies, ginger, garlic mix gives it a great flavoring.

What is interesting to know is that in southern food in USA, cowpeas(blackened peas) are known to bring good luck and so southerners insist on having them on the first day of the year, to bring them good luck. So why not have some luck coming your way on the upcoming Super Bowl weekend?!!

Hope your team wins as you munch on the Dalvada Lentil  Fritters, while watching the Super Bowl and also debating on which one was the most creative commercial of all! Have a great Super Bowl weekend!

Print Recipe
Dalvada Blackeyed Peas Fritters
Nutritious snack with split green mung lentils with skin and black eyed peas(chora/lobia)
Dalvada Lentil Fritters
Course Appetizers
Cuisine Indian
Prep Time 10 minutes
Cook Time 15 minutes
Passive Time 3 hours
Servings
pieces
Ingredients
Course Appetizers
Cuisine Indian
Prep Time 10 minutes
Cook Time 15 minutes
Passive Time 3 hours
Servings
pieces
Ingredients
Dalvada Lentil Fritters
Instructions
  1. Mix the lentils and wash them thrice. Soak them in 5 cups of water for at least 3 hours
  2. Make a paste of chillies, ginger, garlic by crushing them in a mortar pestle.
  3. Keep very little water in the lentils and grind the lentils coarsely. Add the ginger paste to it and grind further. Add fresh coriander to the blended lentils.
  4. Add salt for taste, and add some water if needed to arrive at a dropping consistency.
  5. Heat the oil to smoking point and lower the flame to medium low
  6. Drop the dalwada fritters using your fingers or an ice cream scoop. The finger method works better tor me.
  7. Fry on a medium low flame till golden in color on both sides, rotating as needed.
  8. Sprinkle some chat masala and black salt powder on top and serve hot with green chutney.
    Dalvada Lentil Fritters
Recipe Notes

Tips

Grinding consistency is important to crunchiness and so is the water level in the mix.  If the mix is too watery, it will not drop well.Starting with less water will always be easy as we can add more with required.

More commonly people now use, only yellow split moong dal, so you can try that recipe too. But the dal with the skin is more fibrous and nutritious than the yellow moong dal

Instinct Factor

It will have more flavor if green chillies are chopped and added to the mix along with coriander leaves. Since I was having kids as guests too, I decided to make a paste of it. Addition of Chat masala and Sanchal or black salt powder was purely instinct driven!

Feel Factor

Enjoying the delicacy from my distant past,!  Memories unfolded as I recalled all the carefree days of my college time.Truly a nutritious snack that I plan to make more, as the weather is still cold enough to enjoy warm snacks with a cup of tea and munching a handful while entertaining guests and having easy conversations. I would like to extend my gratitude to another friend at whose place I discovered the addition of blackeyed peas to dalwada, while enjoying Hindi Kavita and discussing literature with like minded folks! The best part of the Dalvada Lentil Fritters was the crunch in it, that promised to remain so even after they were cold.

[contact-form-7 404 "Not Found"]

Temple Pongal Lentil Rice

Ven Pongal Temple

Temple Pongal Lentil Rice is the prasad one gets when one visits South Indian temples. The most famous south Indian temple is the Tirupati Balaji Temple in Andhra Pradesh. The temple is situated atop a hill and surrounded by seven hills around it. The access to the temple from the base of the city is a long winding road, and using the stairs/trails to hike up can take about 3-4 hours on foot. This is the most wealthiest of temples in India, with devotees giving large contribution as donations. This temple was what I visited post my marriage and coming from Jain household, was struck by the beauty, discipline and the utmost devotion expressed at various levels, from the learned priests to the the person working in the guesthouses over there. The temple prasad was just true delicacy, and having had my first taste of pongal as Tirupati Pongal, I am kind of spoiled by that.  A lot of restaurants serve this Pongal as Ven Pongal or Khara Pongal, but not many come close to the color, texture and taste of the original Tirupati Pongal. So on this day of Pongal, I took the time to recreate what I remembered from my visit many many years ago and hope Lord Balaji is blessing me on this attempt!

The texture of Temple Pongal Lentil Rice as I remember was more like porridge, and made out of small grain rice.  And I recollect the color as white base, and the taste of raw cumin and the yellow moong dal being seen clearly and of course dollops of ghee, cashews and black pepper!  A lot of recipes on the web talk about adding curry leaves. ginger and turmeric. However, I decided against it as that does not match with my visual memory. I could be wrong, but still wanted to make an attempt to recreate the blessings I received via the temple pongal in the way I remembered. And besides the logic that makes sense, is that this prasad would be made as simple as possible, considering the vast number of devotees that visit the temple. And the logistics of carrying curry leaves, ginger all way atop a hill and then the labor involved in cleaning and cutting would be a bit too much. Not using the added ingredients also helps me keep this recipe suitable to the aatham/chaudas menu, when green and root vegetables are not consumed in the menu.  There are some Jains who believe that the temple idol of Lord Balaji at Tirupati was originally an idol of Shri NeminathTirthankar. Whatever be the belief, the fact that today it is the most wealthiest temple and the most revered by devotees speaks volume for the faith of the devotee as well as the blessings obtained at the Tirupati Balaji Temple.

The Temple Pongal Lentil Rice is often cited as a complete meal as it has its content of grain, lentil and lots of protein via ghee and nutrition of cashews and black pepper. Black pepper was the original spice from India, used in place of red and green chillies. Pongal, festival of harvest in Tamil Nadu, is often celebrated by boiling milk over and Pongal also means boiling over.

Wishing all of you a Very Happy Pongal and loads of good wishes as you start a new year with optimism and good thoughts  with the prasad  of Temple Pongal Lentil Rice and blessings of Lord Balaji to guide you through the year!


Print Recipe
Temple Pongal Lentil Rice
Comfort and pure joy to eat this soulful rice and lentil recipe from southern India.
Ven Pongal Temple
Course Main Dish
Cuisine Indian
Prep Time 5 minutes
Cook Time 30 minutes
Passive Time 30 minutes
Servings
people
Ingredients
Course Main Dish
Cuisine Indian
Prep Time 5 minutes
Cook Time 30 minutes
Passive Time 30 minutes
Servings
people
Ingredients
Ven Pongal Temple
Instructions
  1. Dry roast the yellow moong dal in a pan for 2-3 minutes on low flame till you get the aroma of roasting,
  2. Wash the rice thrice and soak with five and half cups of water for 30 minutes. After soaking, boil this soaked rice, along with its water. Add salt, peppercorns, cumin seeds and milk to it.
  3. Keep stirring in between so that the rice does not stick at the bottom. Halfway through add the roasted yellow moong dal.
  4. Once the rice and dal are cooked, and you have reached the desired consistency of the pongal, remove from flame. If the consistency looks to soupy, keep cooking till water is reduced.
For Tempering
  1. Heat the ghee in a small vessel, and add cashews and stir till they are golden brown. Add asafetida and remove from flame. Add this to the rice and mix well, and cook rice for another 2-3 minutes for the flavor to set in.
  2. Add the crushed pepper powder and keep stirring whole time, so that the rice does not set at the bottom.
  3. Serve warm with Shakkar Pongal or with coconut chutney or pickle or just plain is also very delicious!!. Plain yogurt serves a good accompaniment to Temple Pongal.
Recipe Notes

Tips

  • Small grain rice are crucial to obtaining the texture of the pongal as well as cooking on the stove is important so that you can get the right texture. I used the Spanish Goya Rice as  thats what I had at home and it worked well.
  • Ensure that the cashews do not get burned, and stay golden, which I missed out on.

Instinct Factor

  • Quite a bit of instinct involved in recreating this recipe by memory. I could be wrong, but I hope my readers from southern India will forgive me:)  Feel free to add red chillies, some coriander, if you want to add some more spice and fragrance.

Feel Factor

Happy to have the prasad of  Lord Balaji and invoke his blessings in some way! Texture was great according to my husband, who just loves this Pongal and any Pongal on earth. So much so that the Pongal restaurant in New York City, is his Mecca for this and we have to make a visit every time we are in NYC. So a compliment from him made my effort worthwhile.. Loved the cumin, black pepper and ghee flavor in this traditional temple recipe of pongal.

[contact-form-7 404 "Not Found"]

Pistachio Almond Chikki Chewy Bites

Pistachio Almond Chikki Chewy Bites

Pistachio Almond Chikki Chewy Bites is my attempt at making a dry fruit chikki in a jaggery base, instead of the traditional base of sugar, specially for dry fruit chikki. I decided to try this base, as I prefer the more nutritious jaggery as compared to sugar. No Makar Sankranti is complete without a bite of chikki, the traditional sweet of the Makar Sankranti festival. The chewy or crispy taste of the chikki depends on the quality of jaggery as well as the duration of cooking the jaggery. Jaggery from Kolhapur, works best for chikki, specially the golden colored jaggery. This time I had more darker colored jaggery,  hence the color of the chikki is also slightly more darker than I would have preferred. I opted to also undercook the jaggery a bit, in order to keep it chewy, as preferred by my family members. The chewy texture would also do less damaging to the teeth when biting, as opposed to the extremely crispy traditional texture of chikki. Feeling a little creative, added a few drops of rose water were added to give a freshness of rose in the chikki,

Enjoy the fragrant, colorful, chewy and jaggery based pistachio almond chikki chewy bites, which is extremely quick to make. One can have a fresh batch of chikki in different flavors made every couple of  days, since it takes very little effort and time. Check out the recipes for Sesame Chikki, Chocolate Walnut Chikki and Daliya Chikki from earlier blog posts. Tomorrow I plan to make the good old Til Chikki in the extreme crispy flavor, as that is how I like it, and sankranti is not auspicious enough, till one has had the combination of til and jaggery तिल गुड़!

Wishing everyone a  happy cheerful Makar Sankranti and a season of good results and good tiding, and enjoy the display of  Pistachio Almond Chikki Chewy Bites in a flying feather shape, akin to a flying kite!

[shopeat_ingredients][/shopeat_ingredients]


Print Recipe
Pistachio Almond Chikki Chewy Bites
Cuisine Indian
Prep Time 2
Cook Time 12
Passive Time 5
Servings
pieces
Ingredients
Cuisine Indian
Prep Time 2
Cook Time 12
Passive Time 5
Servings
pieces
Ingredients
Pistachio Almond Chikki Chewy Bites
Instructions
  1. Grease the chopping board, or a plate, or sheet of aluminum foil or wax paper with some ghee and keep it aside.
  2. In a thick bottom pan, put the ghee to melt on a medium flame gas.
  3. Once it melts, add the jaggery and water and let it melt. Keep stirring on medium flame, till the color becomes dark brown like a melted chocolate for about 6-7 minutes. If you want it more crispier heat the jaggery for about 8-9 minutes.
  4. Once the jaggery is cooked well, reduce the flame to the minimum and quickly add whole pistachios, crushed pistachios, silvered almonds and rose water and mix everything into a nice big lump, stirring for a minute or she on the gas.
  5. Quickly transfer the mixture on to the greased board. Using a roller pin, roll down into as far thin as you can roll, without breaking from between. Alternatively, press it with the base of steel bowl to flatten it further.
  6. Cool for about five minutes, and make diamond pieces, by first making vertical lines, and then turning the board to an angle, and making diamond kite shapes.
  7. Cool completely for 20 minutes, and then store in an airtight container.
    Almond Chikki Chewy Bites
Recipe Notes

Tips

  • The type of jaggery you use will also determine the texture of the chikki. To make it crisper, cook the jaggery for at least 9  minutes on medium low flame.
  • For Vegan recipe, add oil, instead of ghee.
  • Add cashews, split chickpeas, peanuts, coconut, whole almonds as optional flavors.
  • If the chikki is not as crispy, or too sticky, just reheat the whole lump adding a tsp of water and cook for 2-3 minutes, till it binds well.

Instinct Factor

  • Adding rose water was a result of listening to my instincts! Be creative and add some essences to give it a different feel!

Feel Factor

If you cannot fly kites in USA, at least lets have chikki and celebrate the Sankranti in some way! The  roasted salty pistachio flavor goes well with jaggery and my family appreciated the chewy texture of this  and I loved the green color of pistachios in the chikki!

Broccoli Cheese Paratha

Print Recipe
Broccoli Cheese Paratha
The first time I was introduced to a good broccoli dish was at Blimpie's Sandwiches with a delicious Broccoli and Cheese soup. I found the creamy texture of cheese and lots of broccoli with lots of black pepper very appetizing. So, I decided to try this combination in a day to day recipe by experimenting with it as a stuffing in a Paratha or Bread. I am glad that this idea delivered results because everyone's eyes lights up in my house when this is on the menu. It's quick, easy, colorful and healthy meal. It has a bit of western flavor and bit of Indian flavor with good amount of green chilies, and optional onion and garlic, which makes it appealing to all!
Course Entree
Cuisine Indian
Prep Time 15 minutes
Cook Time 20 minutes
Servings
people
Ingredients
Course Entree
Cuisine Indian
Prep Time 15 minutes
Cook Time 20 minutes
Servings
people
Ingredients
Instructions
  1. Heat about 1/2 cup oil in a broad pan. Add chopped garlic and saute for 2 min. Add chopped onions, and green chillies and saute for 6 minutes on medium flame. Add broccoli including the thick stem part finely diced, salt and and stir. Add 3 cups of water and cook on medium high for about 15 min. Add cheese slices and stir for another 5 min. Add fresh black pepper and stir for 2-3 min. Let it cool.
  2. Making of Dough In a broad pan/dish, mix flour and 1/2 tsp salt. Add utp 3/4 cups water at intervals to the flour and knead to a soft but firm dough. Refrigerate the dough for 30 minutes at least, ideally for 60 minutes.
  3. Rolling the Paratha Divide the dough into 10 equal parts and shape into round balls. On a flat surface, using a rolling pin and dusting flour, roll a ball into 4 inch circle. Place 1/3rd cup of broccoli mix into the center. Cover from all sides towards the center and close. Twist a bit and remove the excess from the top. Roll it again to a round circle about 7 inches wide.
  4. Cooking the Broccoli Cheese Paratha Heat a round thin pan or griddle on a medium flame. Lay the paratha top side down on to the griddle. Cook on a medium flame. Flip when orange spots appear. Dot some oil on the top. Cook the back side of Paratha in the same manner.
  5. Serve hot Broccoli Cheese Paratha with pickle, yogurt or http://cookingbyinstinct.com/pomegranate-yogurt-dip
Recipe Notes

Tips:
Remove any yellow portion of broccoli, and make a point to use the thick stems which are loaded with iron, in this recipe.
If the dough is well kneaded, it will not stick while rolling the broccoli cheese paratha. Even if some chunks come in the way, it will be possible to roll, over it in such cases.

Jain Variation: Replace the onion garlic with 1/2 tsp of aamchur powder.

Instinct Factor:
Rolling to a round shape will come by practice, with the ability to apply even pressure all around.

Feel Factor:
Broccoli and Cheese, now loaded with nice dose of spicy chillies for everyday healthy meal at home.