Celebrations galore! New Years Eve, happy birthdays of niece and nephew, kids back from college for winter break and me just excited for the new year to begin on the right note! Anything good or auspicious is always invited by making something sweet! So here I share Date and Toffee pudding as a harbinger for peace, calmness and healthy new year that also lets you achieve your personal goals in life!
The chance to taste this exquisite pudding was at Rasika over anniversary celebrations! It was warm, sweet, with a bit of caramel and fruits, topped with ice cream! More interestingly it had the dates as a base, which made it even more delicious for me. Dates are something I enjoy,(pun intended)! The iron and fibre in dates pack some powerful nutrients in a colorful warm dry fruit, and hence are often used by soldiers on the front to get their instant shot of energy,
I enjoyed learning how to make caramel syrup, as had no clue about it earlier, and the brown liquid reminds me of rolling melted gold over a brown date pudding. I personally preferred this without the ice cream but with some fruits in it. Best would be to serve it with the ice cream on the side, so you can pick and choose what you want to taste.
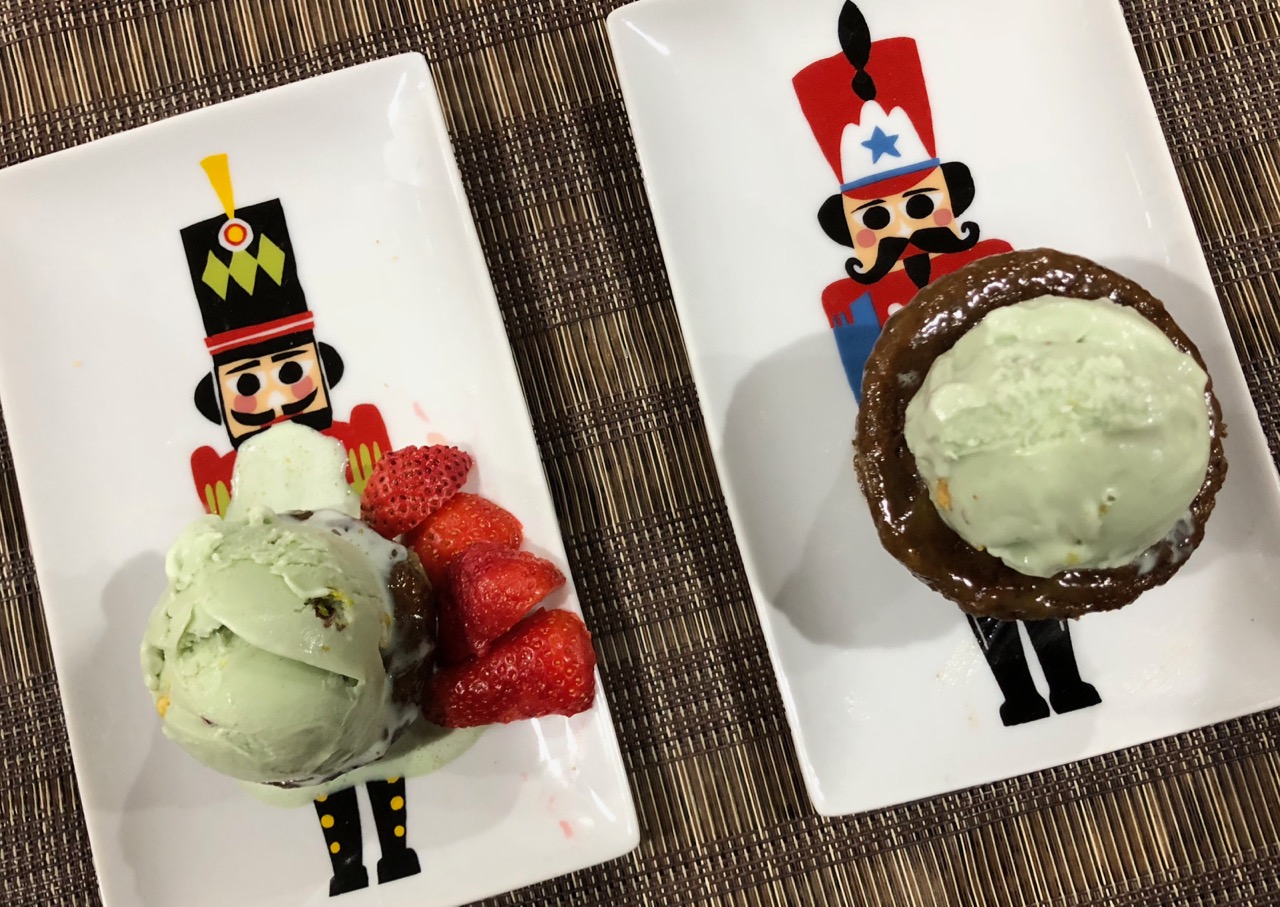
The shape at the restaurant was simple muffin shape, however I wanted to make it more fancier, as well as try something new in the baking shape. Recently I came across this ice cream corn kind of moulds, which to a garden lover like me looked more like small flower pots! The fruits arranged in the center made it a more real flower pot. The recipe has been adjusted for making it egg less.
The taste is exquisite, so is the shape making this Date and Toffee pudding, one of a kind! With the sweetness of dates, gold of caramel, colors of fruits and coolness of ice cream, I wish all of you a very Happy New Year and a spectacular 2018!
Print Recipe
Date and Toffee Pudding
A warm pudding with caramel syrup, fresh fruits and ice cream
Finely chop the dates in a grinder till it becomes a round ball.
Add baking soda and warm water and let it rest for 20 minutes.
Mix the all purpose flour, salt, and baking powder in a deep bowl.
With a whisk blade, fluff the butter for 5 minutes, till the butter is 3 shades lighter. Add 1/2 cup of brown sugar and mix in for a minute.
Pre heat the oven for 375 degrees at convection oven or 350 degrees regular oven.
Combine the soaked dates, butter sugar and flour mixed with all ingredients.Add apple sauce and water and blend well everything into a batter for about 4 minutes.
Great the muffin moulds or cone moulds thoroughly with ghee or butter. Fill the batter
If using a cone mould, layer the filled cups tray with the indent tray to make a cone shape
Bake on the second rack for 30 minutes. Remove from the oven and cool for 10 minutes,
Cover slightly so that warm air can escape.
Boil heavy cream, 1 stick of butter and 1/2 cup of sugar to make the toffee syrup.
Cool the toffee syrup for 5-7 minutes.
Prick with a fork all over the date pudding. Then pour 2-3 tbsp toffee syrup over each of them.
Soak the date pudding in the toffee syrup well, ensuring that they are well coated and let them cool for half an hour at the least.
Serving the Date and Toffee Pudding
When serving, microwave each pudding for about 30 seconds. Arrange the fruit/berries in the centre. Scoop an ice cream of your choice, and then either layer it on the top of pudding, or by the side.Serve immediately.
Recipe Notes
Tips
If the toffee syrup becomes thick, put to warm on low heat, so it is easily absorbed by the pudding.
Serving ice cream on the side, will avoid it from melting fast.
Check if the date and toffee pudding is properly baked by sticking a toothpick/fork in the middle.
Instinct Factor
A new shape for a pudding for the new year! if the pudding mix does not drop well, add another tbsp of water. Softness of the pudding will depend on how well the butter has been fluffed.
Feel Factor
Ringing the new year 2018 with this warm fuzzy Date and Toffee Pudding !! The perfect warmth,, texture softness, and caramel sweetness, surrounded by the colorful berries and coated with an ice cream of your choice! A combination of hot and cold, in this delicious dessert. The sweetness of dates combined with the toffee syrup makes this pudding a one of kind and will certainly make your family and guests feel on top of the world! Here's to more sweet recipes in 2018!
Idli and White Dhokla both use similar ingredients, and what I learnt from my visit in India is how to combine the two and make quick Khatta Sandwich Dhokla! India has the luxury of expertise available at comparatively low costs with quite creative talent. The chefs in India who come to cook, probably cover 10-12 kitchens prep and cooking through the day. So they definitely know how to finesse their task and make things work faster for them. One such trick was shared by one such creative chef who comes to our house. Knowing my passion for food and cooking, she suggested I should definitely try her Khatta Sandwich Dhokla from Idli batter. I was so impressed by the outcome, I had to try out this quick, one more easy way of making Dhoklas.
My first challenge was getting the fresh Idli batter in USA, especially when one is living in an area without high concentration of Indians. So decided to try the next best thing, which was the ready Idli Batter available at the grocery stores, viz Shreeji’s Idli Batter. Various other brands are also available, but I did not have much luck with them. Maybe the stock was old, or not well fermented.
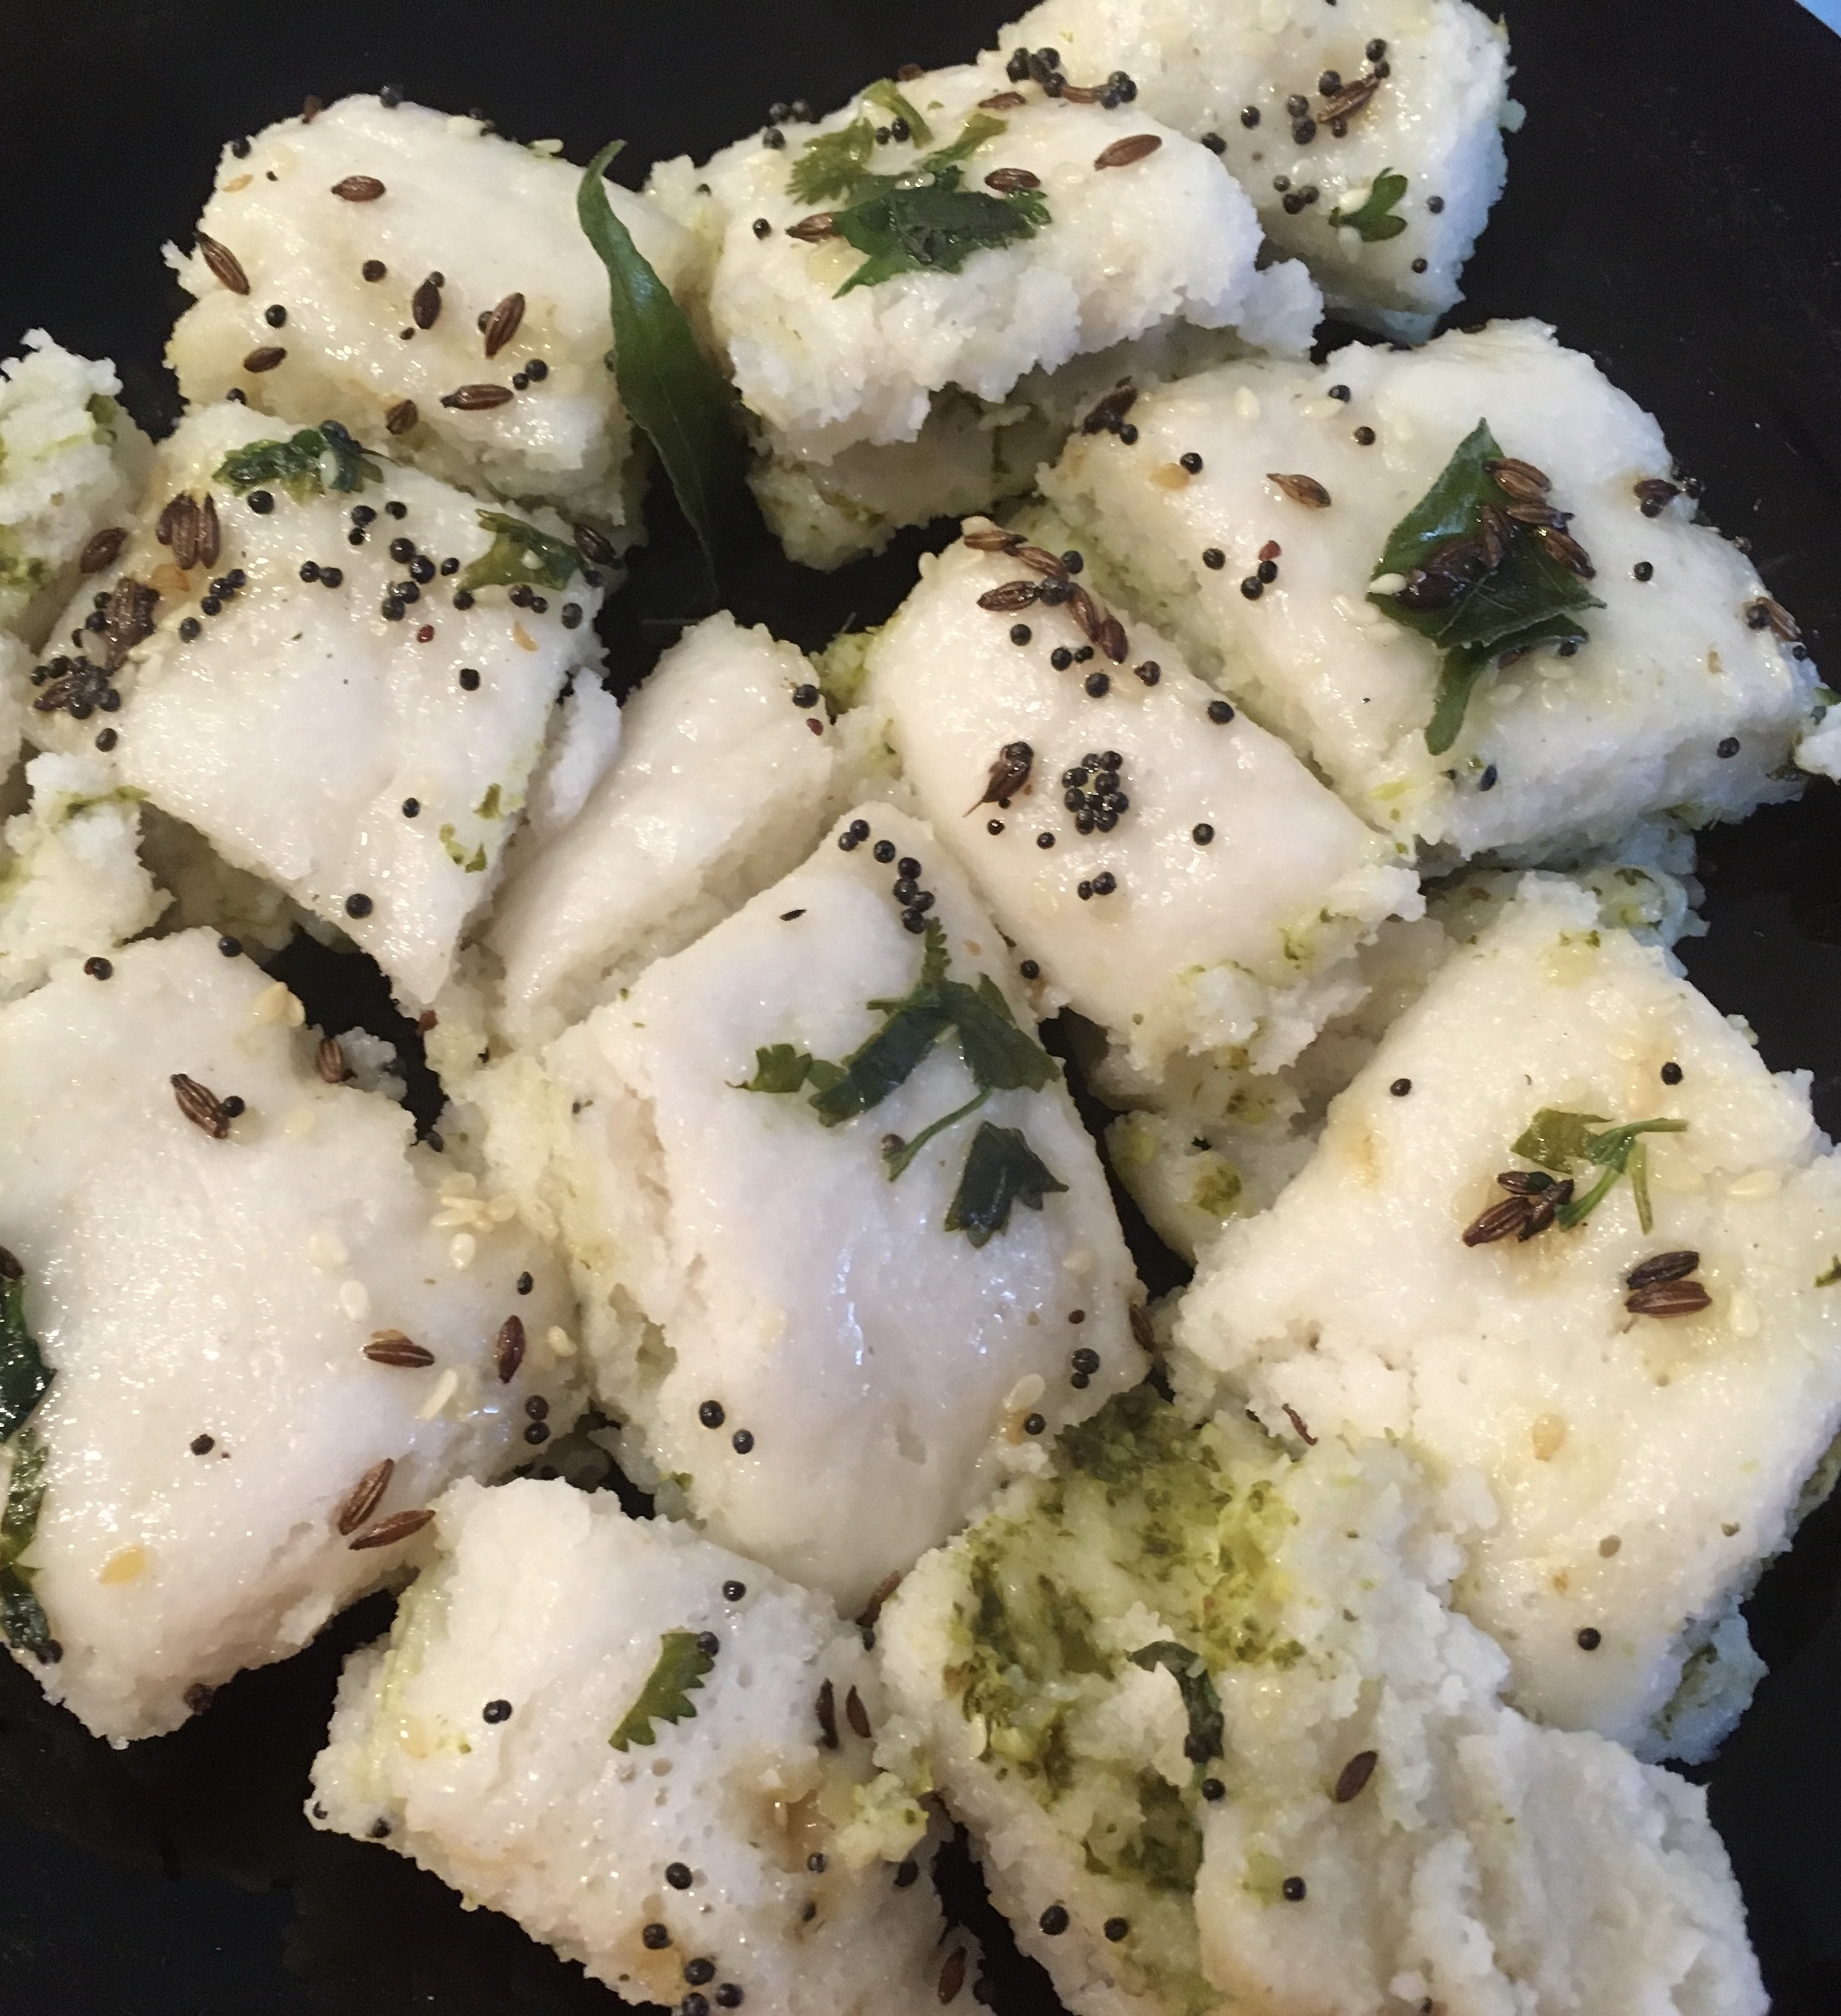
After persisting a bit more, was able to arrive at the right consistency and softness in the texture for the Khatta Sandwich Dhokla, What worked was diluting the mixture a bit, and adding a pinch of bicarbonate soda. In a Gujarati household, fresh green chutney is a staple and hence always have a stock of it at home. And adding a layer of this chutney in between, gives it a kick as well as the color. You can even not garnish it, and have them plain, if you are watching calories, and you will find them tasty as well.
Dhokla as people now know it, is actually known as Khaman (Yellow Dhokla) in Gujarat, on which I have blogged earlier Khaman Dhokla from Instant Mix .The real Dhoklas are the Khatta or White Dhoklas. So enjoy one more version of Dhokla and keep this recipe in mind, if you have left over Idli Batter to fix some snack during the day or for a quick bite in the evening, or just have it for dinner, as a friend of mine did! She tried with fresh Idli batter! Any guess her state of residence? NJ 🙂
Hers came out soft and fluffy without any additions or alterations of the batter dough! Hope you enjoy this quick version of Khatta Sandwich Dhokla especially with the Diwali festivities on the way!
Put the water to boil in Dhokla cooker and grease the Dhokla platter/thali with oil, a little more generously, covering the sides thoroughly too.
Dilute the Idli Batter, by adding 1/2 cup of water and also add bicarbonate soda and mix thoroughly,
Pour apport 1 cup of batter to the platter, cover and steam on high for 10 minutes.
Open and check if the batter is cooked,
Spread the green chutney more generously , bit more than what the picture shows, so as to cover all areas well.
Then top the green chutney layer, with the remaining batter and cover and cook for another 10 minutes on high flame.
Meanwhile, prepare the garnish, by heating the oil in a deep vessel. Add mustard seeds, and wait for it to crackle. Add cumin seeds and wait to to be light brown, then add white sesame seeds, chopped chillies and curry leaves and remove from gas after 10-15 seconds.
Once the second layer of Khatta Sandwich Dhokla batter cooked, open and spread the garnish evenly all over and cover and let it cook further for 3-4 minutes.
Make square or diamond cuts and serve with extra chutney, sauce or have it plain and you will enjoy the warm soft texture of Khatta Sandwich Dhokla!
Recipe Notes
Tips
Ensure that the consistency of the batter is dropping consistency.
You can also add ginger chillies paste in the mix to make it more spicier.
When the dhokla leaves the edges of the thali/platter, it indicates that it is nicely cooked. Other way of checking is to insert a knife/fork and check for the firmness/cooking of the batter.
Persistence and instinct plays a great role in getting things right!
You can variate different types of chutneys for exploring different flavors. I might do with Guacamole filling to try something new with a twist!
Feel Factor
For a Gujarati household, another way of making Dhoklas is always appealing and I have the chef back in India to thank for! The texture is soft and the layer of chutney makes it interesting and spicy. I cannot wait to explore this with the fresh homemade idli batter and am positive that will turn out even more fluffier and tastier! Morning breakfast got a new item on the menu! Plan to post the instant mix recipe of White Dhokla soon too, as this has been my way of making quick dependable tasty Dhoklas for all these years! Enjoy the upcoming festivities of Diwali with delicious foods of all kinds!
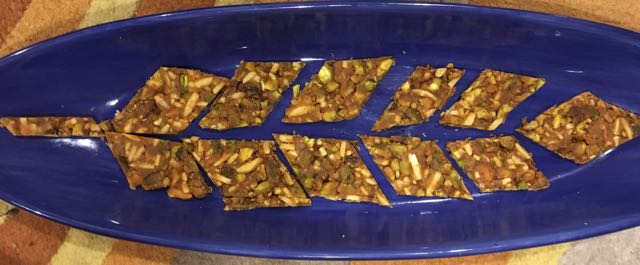
Pistachio Almond Chikki Chewy Bites is my attempt at making a dry fruit chikki in a jaggery base, instead of the traditional base of sugar, specially for dry fruit chikki. I decided to try this base, as I prefer the more nutritious jaggery as compared to sugar. No Makar Sankranti is complete without a bite of chikki, the traditional sweet of the Makar Sankranti festival. The chewy or crispy taste of the chikki depends on the quality of jaggery as well as the duration of cooking the jaggery. Jaggery from Kolhapur, works best for chikki, specially the golden colored jaggery. This time I had more darker colored jaggery, hence the color of the chikki is also slightly more darker than I would have preferred. I opted to also undercook the jaggery a bit, in order to keep it chewy, as preferred by my family members. The chewy texture would also do less damaging to the teeth when biting, as opposed to the extremely crispy traditional texture of chikki. Feeling a little creative, added a few drops of rose water were added to give a freshness of rose in the chikki,
Enjoy the fragrant, colorful, chewy and jaggery based pistachio almond chikki chewy bites, which is extremely quick to make. One can have a fresh batch of chikki in different flavors made every couple of days, since it takes very little effort and time. Check out the recipes for Sesame Chikki, Chocolate Walnut Chikki and Daliya Chikki from earlier blog posts. Tomorrow I plan to make the good old Til Chikki in the extreme crispy flavor, as that is how I like it, and sankranti is not auspicious enough, till one has had the combination of til and jaggery तिल गुड़!
Wishing everyone a happy cheerful Makar Sankranti and a season of good results and good tiding, and enjoy the display of Pistachio Almond Chikki Chewy Bites in a flying feather shape, akin to a flying kite!
Grease the chopping board, or a plate, or sheet of aluminum foil or wax paper with some ghee and keep it aside.
In a thick bottom pan, put the ghee to melt on a medium flame gas.
Once it melts, add the jaggery and water and let it melt. Keep stirring on medium flame, till the color becomes dark brown like a melted chocolate for about 6-7 minutes. If you want it more crispier heat the jaggery for about 8-9 minutes.
Once the jaggery is cooked well, reduce the flame to the minimum and quickly add whole pistachios, crushed pistachios, silvered almonds and rose water and mix everything into a nice big lump, stirring for a minute or she on the gas.
Quickly transfer the mixture on to the greased board. Using a roller pin, roll down into as far thin as you can roll, without breaking from between. Alternatively, press it with the base of steel bowl to flatten it further.
Cool for about five minutes, and make diamond pieces, by first making vertical lines, and then turning the board to an angle, and making diamond kite shapes.
Cool completely for 20 minutes, and then store in an airtight container.
Recipe Notes
Tips
The type of jaggery you use will also determine the texture of the chikki. To make it crisper, cook the jaggery for at least 9 minutes on medium low flame.
If the chikki is not as crispy, or too sticky, just reheat the whole lump adding a tsp of water and cook for 2-3 minutes, till it binds well.
Instinct Factor
Adding rose water was a result of listening to my instincts! Be creative and add some essences to give it a different feel!
Feel Factor
If you cannot fly kites in USA, at least lets have chikki and celebrate the Sankranti in some way! The roasted salty pistachio flavor goes well with jaggery and my family appreciated the chewy texture of this and I loved the green color of pistachios in the chikki!
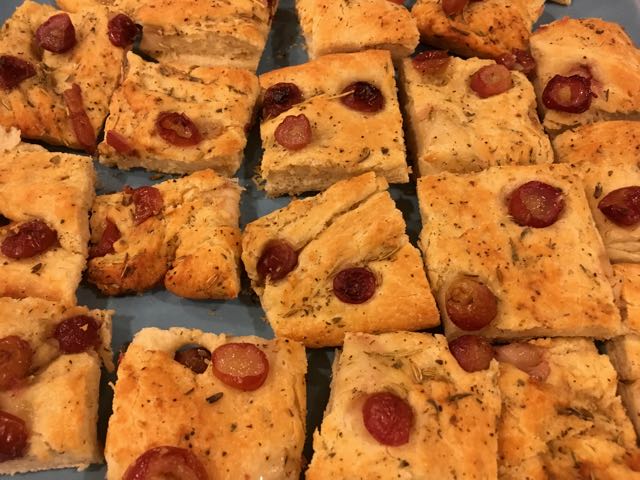
Grape Focaccia is a bread from Northwest Italy, where there is a tradition of having dolce focaccia, meaning sweet focaccia, topped with raisins, honey and sugar. Focaccia bread has lots of olive oil, herbs and salt and could be thick or thin. When I first heard about the word, Focaccia, I was quite intrigued by it. The traditional meaning is “hearth baked flat bread”. The first time I had focaccia bread, in New Zealand it was thick and soft version and had grapes inside it and we fell in love with it. The ingredients in terms of butter, olive, grains in New Zealand are in my opinion the world’s best, because of so little commercialization and population. It’s still very pristine, and our experience of having Focaccia was 18 years ago. Would love to go there, and eat this bread again in Wellington, hoping that bakery/deli shop still exists! Kind of taking a parallel from a current movie Lion, which runs on a similar theme, where a lost boy finds his way home in India, all the way from Australia. I would like to do the reverse to find this sandwich place in Wellington:)
Till then, I will just have to try out my version of the same. And interestingly enough, came across this recipe in Southern Living, and it immediately caught my attention. Though the size was flat, it had an interesting flavor and taste, with olive oil, salt, rosemary, thyme and lavender herbs and the sweetness of red grapes. Using organic and unbleached bread flour, will make the bread more light and flavorful The color and size makes it an attractive appetizer, side dish. Having this on a snowy evening, uplifts you with its sweet aroma and gives you a perfect accompaniment to celebrate the joy the nature provides you everyday!! Providing you this recipe in a new plugin which seems to provide all my needs as an author. Let me know if you like it, by commenting on the contact form!
Happy to be baking and celebrating the first snow of the season, with the warm,sweet, savory flavor of Grape Focaccia!!
Warm the water for 20 seconds in the microwave. Add the water and yeast to the bread maker bowl and leave it for 5 minutes.
Add bread flour, salt, 1/4 cup of olive oil and 1 tbsp of herbs to the yeast. Select the bread maker to dough and make the dough. The cycle should last about 1 1/2 hours, during which the dough should rise.
Alternatively, if you don't have a bread maker, mix everything in a blender bowl, and mix using a dough blade , mix on medium high for five minutes. Grease some olive oil in a bowl and put the sticky dough in it, and wrap it with plastic wrap and let it rise to double in size in a warm place( under the oven light) for about an hour or more.
Remove the dough after an hour, and transfer to the baking pan. Grease the baking pan lightly with oil, add another 1/4 cup of olive oil, and punch the dough with knuckles. Mix in about 1/3 quantity of grapes and cover again the dough and leave it to rise for another hour.
After an hour, flatter the dough further to the thickness you would like to have, add the balance grapes on top. Garnish it with sea salt, pepper, balance herbs and remaining 1/4 cup oil.
Pre heat convection oven to 425 degrees and bakes for 30 minutes till the top is golden brown.
Remove from the oven and cool for couple of minutes. Slice into square shapes and serve.
Enjoy your bite of Grape Focaccia!
Recipe Notes
Tips
Feel free to explore with fresh olives, or raisins or any topping of your choice. Fresh Basil also will give a great flavor in the bread.
Instinct Factor
Normally the focaccia is served in square pieces, but even triangles shapes would look good, and give a pizza feel!
Feel Factor
Warmth, love, happiness and joy from outdoors into the indoors! Love the red color of grapes on top, the orange glow of baking and crispiness of the bottom texture in the Grape Focaccia. The crunch mingled with softness of the inside and the fragrance of the herbs and olive and hint of sea salt! Wow baking bread is so so easy and satisfying and the house also warms up the bread aroma!! Bon Appetit!
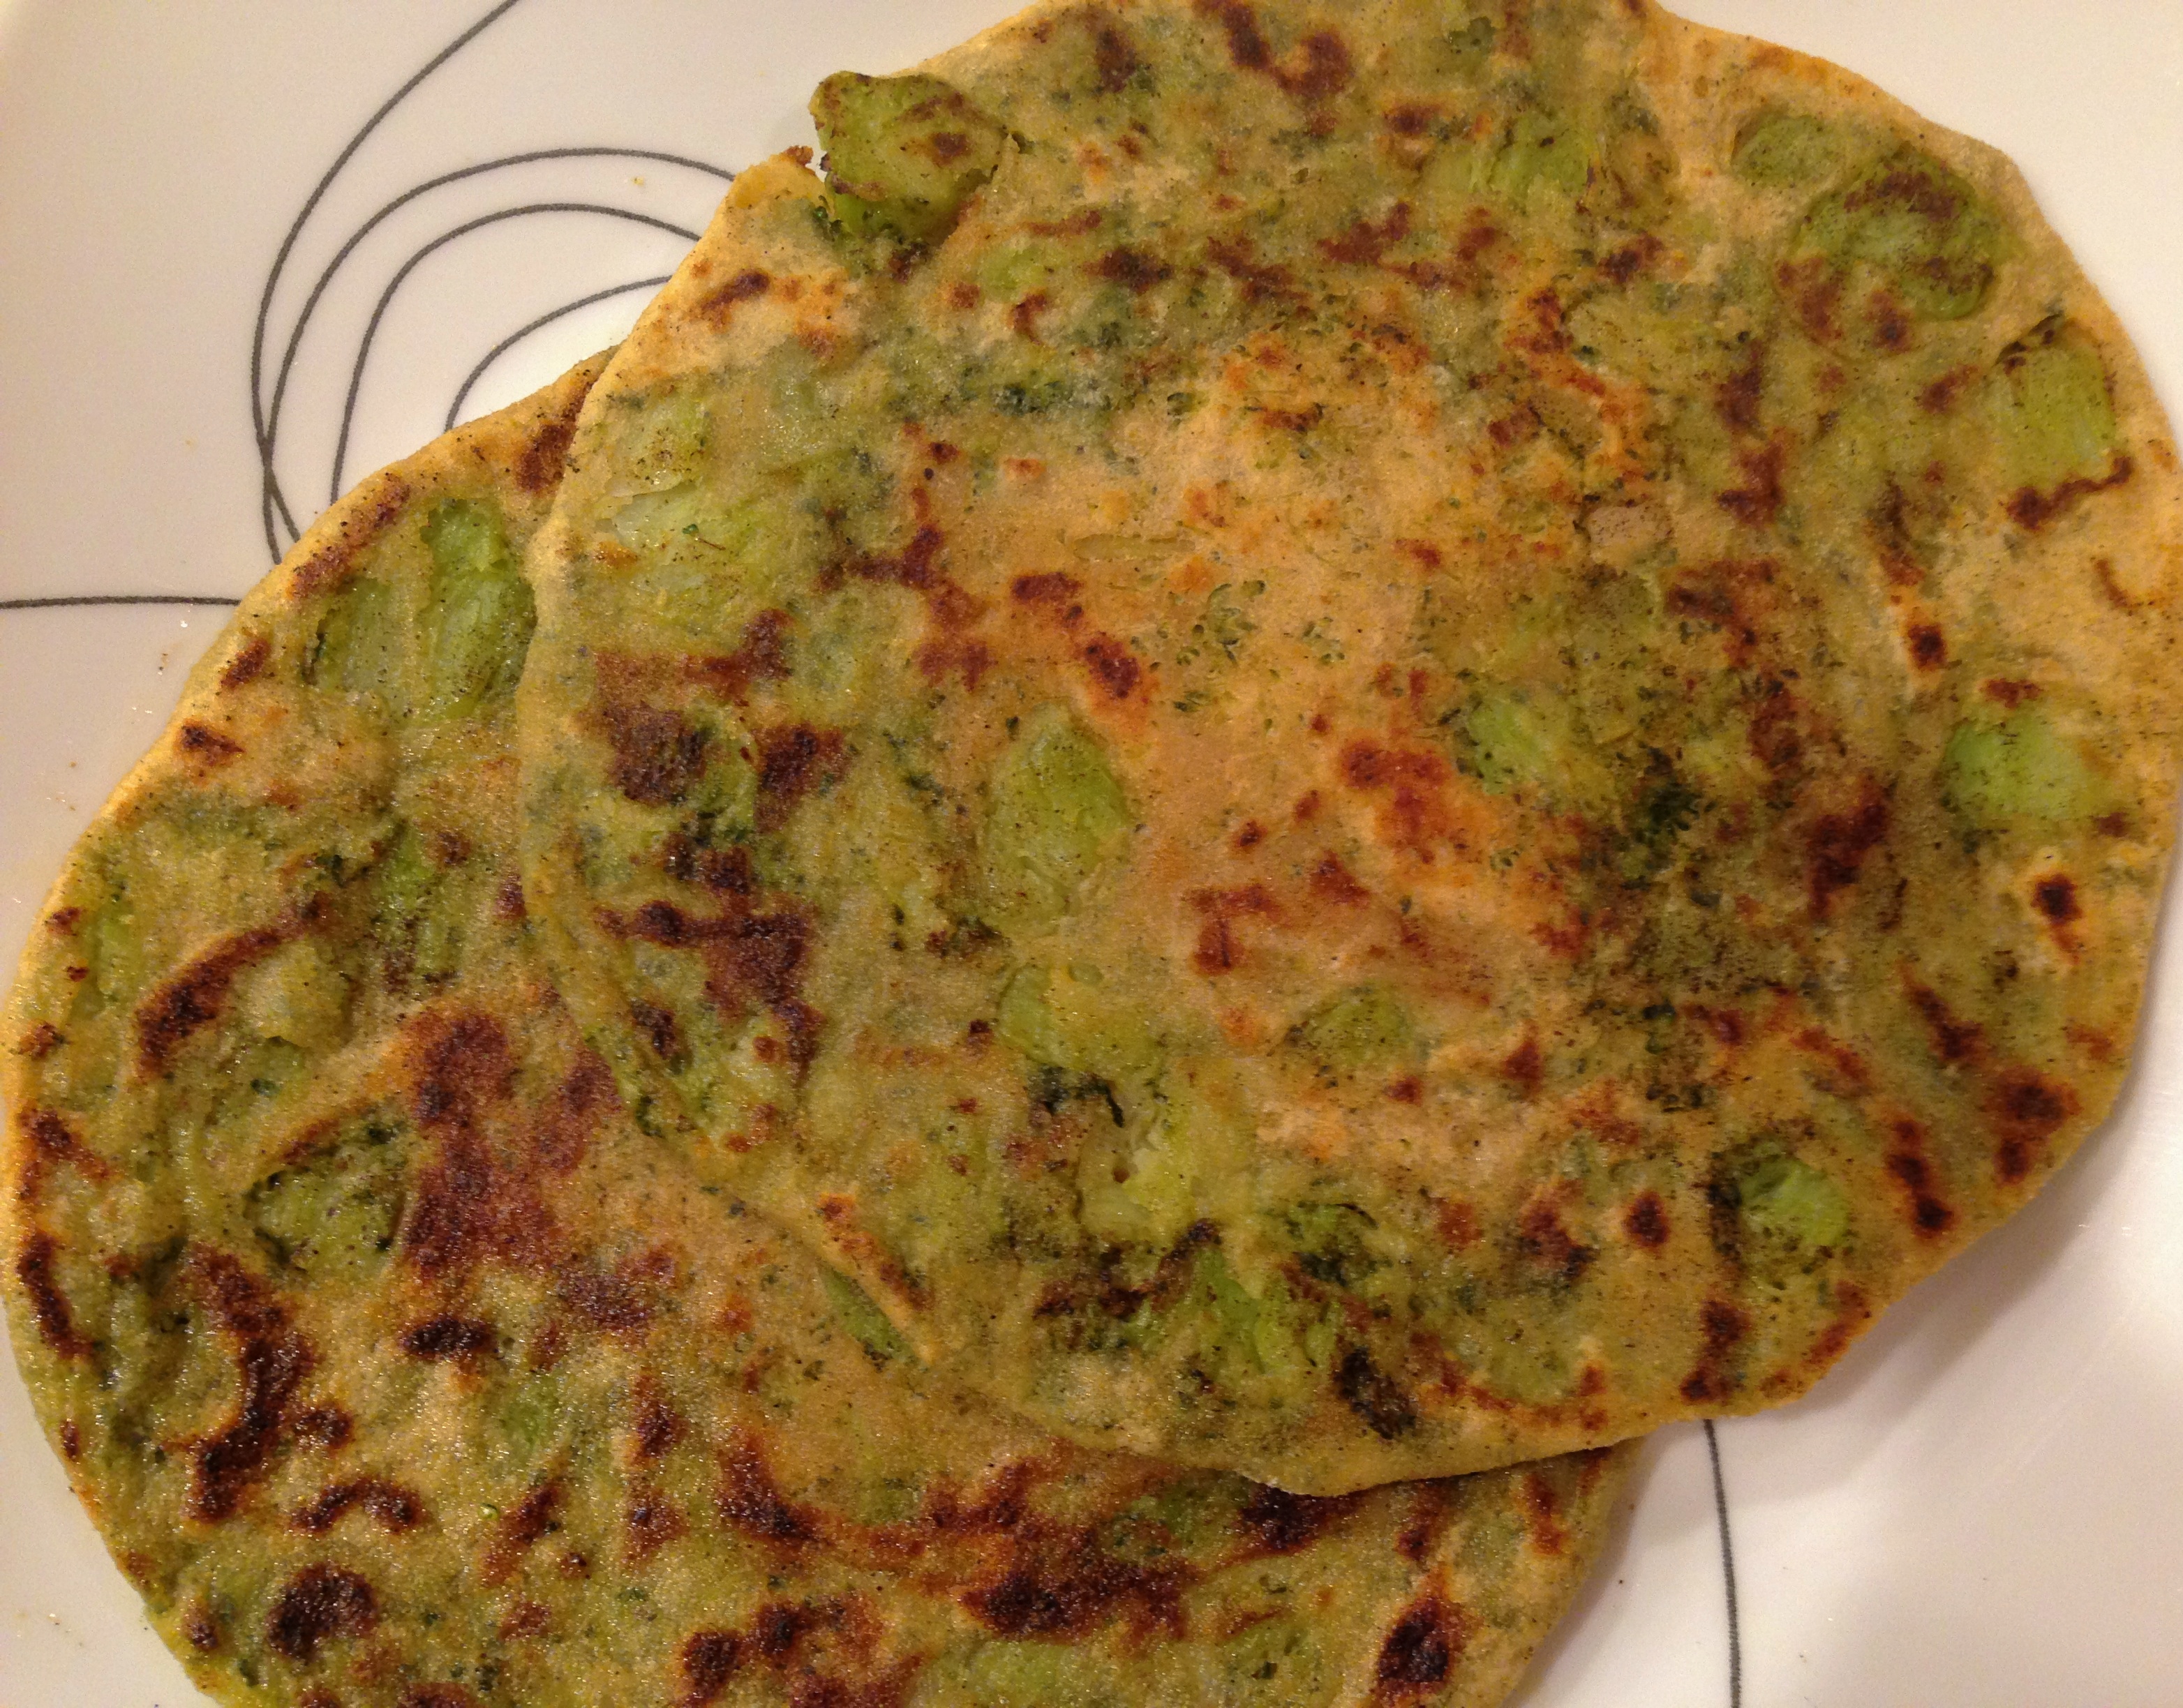
The first time I was introduced to a good broccoli dish was at Blimpie's Sandwiches with a delicious Broccoli and Cheese soup. I found the creamy texture of cheese and lots of broccoli with lots of black pepper very appetizing. So, I decided to try this combination in a day to day recipe by experimenting with it as a stuffing in a Paratha or Bread. I am glad that this idea delivered results because everyone's eyes lights up in my house when this is on the menu. It's quick, easy, colorful and healthy meal. It has a bit of western flavor and bit of Indian flavor with good amount of green chilies, and optional onion and garlic, which makes it appealing to all!
Heat about 1/2 cup oil in a broad pan.
Add chopped garlic and saute for 2 min.
Add chopped onions, and green chillies and saute for 6 minutes on medium flame.
Add broccoli including the thick stem part finely diced, salt and and stir.
Add 3 cups of water and cook on medium high for about 15 min.
Add cheese slices and stir for another 5 min.
Add fresh black pepper and stir for 2-3 min.
Let it cool.
Making of Dough
In a broad pan/dish, mix flour and 1/2 tsp salt.
Add utp 3/4 cups water at intervals to the flour and knead to a soft but firm dough.
Refrigerate the dough for 30 minutes at least, ideally for 60 minutes.
Rolling the Paratha
Divide the dough into 10 equal parts and shape into round balls.
On a flat surface, using a rolling pin and dusting flour, roll a ball into 4 inch circle.
Place 1/3rd cup of broccoli mix into the center.
Cover from all sides towards the center and close. Twist a bit and remove the excess from the top.
Roll it again to a round circle about 7 inches wide.
Cooking the Broccoli Cheese Paratha
Heat a round thin pan or griddle on a medium flame.
Lay the paratha top side down on to the griddle.
Cook on a medium flame.
Flip when orange spots appear.
Dot some oil on the top.
Cook the back side of Paratha in the same manner.
Serve hot Broccoli Cheese Paratha with pickle, yogurt or http://cookingbyinstinct.com/pomegranate-yogurt-dip
Recipe Notes
Tips:
Remove any yellow portion of broccoli, and make a point to use the thick stems which are loaded with iron, in this recipe.
If the dough is well kneaded, it will not stick while rolling the broccoli cheese paratha. Even if some chunks come in the way, it will be possible to roll, over it in such cases.
Jain Variation: Replace the onion garlic with 1/2 tsp of aamchur powder.
Instinct Factor:
Rolling to a round shape will come by practice, with the ability to apply even pressure all around.
Feel Factor:
Broccoli and Cheese, now loaded with nice dose of spicy chillies for everyday healthy meal at home.